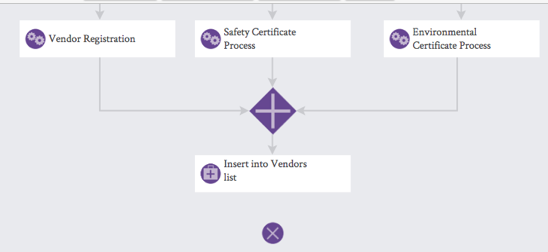
Welcome to the fifth and final stop on the Vendor Survey learning line. At this skill station, you will learn how to launch the survey stream from the Vendor Onboarding process.
Learning concepts at this station:
Removing the user-launch form
Cleaning up test records
Launching from another stream
Required fields and field validation
Removing the User-Launch Form
Recall that for testing, we published the survey stream with a form that could be accessed from the user-form catalog on the Home page. But now, the stream has been fully tested and is ready to go into production. From now on, we want this stream to be launched only by the Vendor Onboarding process.
So the first step is to remove the launching form from the user catalog:
- Go to the stream Summary page.
- Under the gear icon, select Edit Published Information.
(That choice is near the bottom of the list, unlike "Edit Details", which is at the top.) - Under "Select forms that will be available to users...", click Start Form.
(Or click any other column in that row. An "X" appears at the end of the row. - Click the "X" to remove the start form.
- At the bottom of the dialog, click Save Changes.
If you now go the Home page and click Submit New Form, you see that the survey launch form is no longer present.
Cleaning Up Test Records
In a trial account like this one, it isn't necessary to delete records you have created for testing. But it's worth seeing how to do it, so that in a product setting you can keep your data set clean.
To do that, go to the vendor survey stream and click the Records tab.
You'll notice that some records are In "Progress", while others are "Completed". But if you open the gear icon at the end of a row and examine the possible actions, you'll notice that a "Delete" action is nowhere to be found.
The reason is that records which are saved, by default. That's important for historical analysis and audit trails. It is possible to delete records, however. Here's how:
- First, click the gear icon for a record in the In Progress state.
- From the list of options, choose Abort Progress,
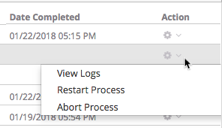
- You see a "spinner" wile Pulpstream processes the request.
When it's done, the status of the record changes to Aborted. - Click the gear icon to reveal a list of choices that now includes Delete Record.
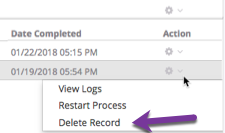
- Choose that option to remove the record from the list.
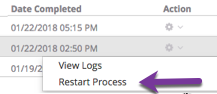
For record that is Completed, there is no option to abort the process, because the process has already finished. But there is an option to Restart the process. If you choose that option you can then abort the newly-started process, after which you can delete the record.
Note that for all process states, "View Logs" is the first entry in the least. That option lets you see everything Pulpstream has done with the record, and when it occurred.
Important!
When you choose to restart a process, a big warning appears. It's worth taking a moment to understand that warning:
- In a sophisticated system, your stream might be creating or updating records in an external database. Perhaps your stream adds a record to that database, or adds the value present in the current record to the external data.
- In such cases, restarting process for a record can generate downstream errors. So it's important to know what effect the restart will have before you choose that option.
- Even in a relatively simple system like the Vendor Management system we're building, restarting the Onboarding Process could trigger another Vendor Survey -- depending on where in the process flow the survey stream is launched.
Here, we know that restarting the Vendor Survey process will have no ill effects, so it's something we can safely do. But we only know that because we understand the stream in its entirety.
The moral of the story is this: Before restarting any process, make sure you understand what the effects will be. Downstream errors that result can always be corrected, but to make the necessary corrections you have to know what will need to be fixed.
Launching from Another Stream
As the last step at this skill station, we'll launch the survey stream from the onboarding stream:
- From the Survey stream, you can click Your Streams to go to the page that shows you streams you have defined.
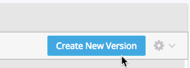
- On that page, click Vendor Onboarding.
- That stream has been published and, currently, there is no "working version" to modify. So click Create New Version to make one.
- A comment is optional at this point. (It is only required when checking in changes.) So in the dialog that comes up, click Create.
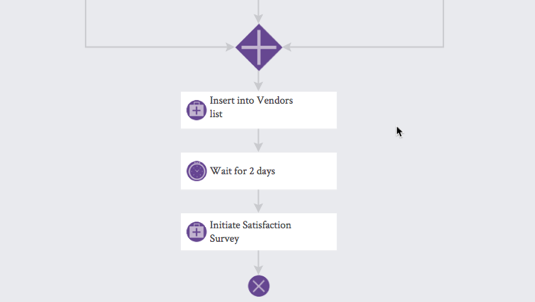
- You are now at the Stream Definition canvas, with the process diagram showing, and with a Checkin button at upper right.
- Scroll to the bottom of the process flow, and remove the line that goes to the End step from "Insert into Vendor Smart Object".
- Move the End step down to make enough room for two steps.
- From the Smart Steps list, drag a Wait Step to the bottom of the process flow.
This step will let us wait a couple of days before sending the survey:- Title - Wait for 2 days
- Wait duration - Wait for specific Duration
Note that many other choices are possible here, as well. - Wait for - 2 - Days
- Click Save Changes.
- Connect "Insert into Vendor Smart Object" to the Wait step.
Now we're ready to launch the survey stream:
- From the Smart Steps list, drag Create Record in another Stream into the process, below the Wait step.
- In the "Create Record..." dialog that opens:
- Title - Initiate Satisfaction Survey
- Choose Stream - Vendor Survey
- A new row appears that allows you map fields in the Onboarding stream to fields in the survey stream. Start by mapping the name of the vendor:
- Field - Vendor Name
This is the target field in the survey stream.
(The name of each data component in the stream appears as a bold heading, with fields in that data component listed under it.)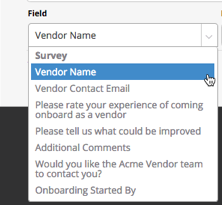
- Map Type - Field
This is a straight field-to-field mapping. Other choices are to specify a literal value or create an expression -- something we will do in a moment. - Value/Expression - Vendor Name
This is the source field in the Onboarding Data stream.
(Like the target fields, each data component in the source stream is identified by a bold heading.)
- Field - Vendor Name
- Click Add another Field and map the vendor's email address:
- Field - Vendor Contact Email
- Map Type - Field
- Value/Expression - Primary Contact Email
- Click Add another Field for the third and final time to identify the user who initiated the vendor onboarding process to the survey stream, in case the vendor asks to be contacted:
- Field - Onboarding Started By
- Map Type - Expression
This time, leave the default choice in place.
There is a magnifier icon to the right of the row that will let us choose the user who created the onboarding record. (There is also a checkmark-icon that can be used to check an expression, to ensure that is valid. We won't be using it right now. Just know that it is there.
- For Value/Expression, click the magnifier icon.
The "Select a Field" dialog opens.
The default tab lists the Data Component fields you're used to by now. - Click the second tab, Record Meta Fields and choose Created By
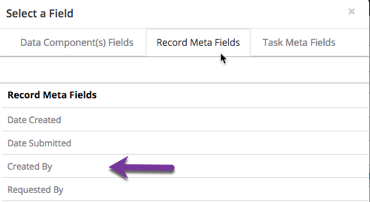
- Since user records have multiple fields, another dialog opens so you can select the field you're interested in.
- Note that any user field can be mapped to a target field -- a capability that can come in handy, at times -- especially when creating a more complex expression.
- But for now, all we really want is the ID field -- the handle that identifies the user.
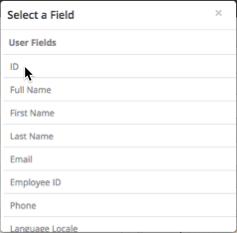
- Note, though, that further down in the list, "Supervisor ID" is also an option. (That value is specified when a user is added to the system.)
- You can also add other fields to User records -- for a example, a "troubleshooter" ID. The supervisor or troubleshooter could then be given the "contact vendor" task, in the event that the vendor asks for that.
- In short, meta-field capabilities provide a lot of power.
- Once you choose ID, you are shown the variable that needs to be inserted into the expression: record.createdBy.id
- Copy that value and paste into the expression field.
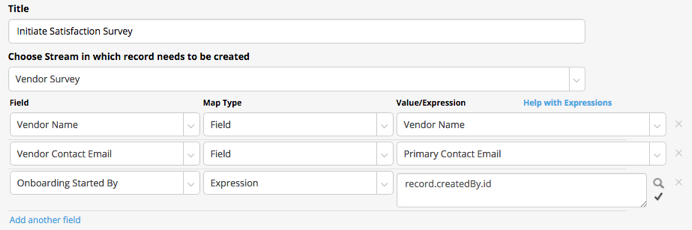
- At the top of the dialog, click Save Changes.
- Wire the Wait step to the survey step, and wire that step to the End step.
- Click Save Process, then click Checkin.
- Comments - Send survey after a 2-day wait.
- At the bottom of the dialog, click Checkin.
- Click Publish to make this version of the stream available for use.
From now on, whenever a new vendor is brought on board, a satisfaction survey will be sent to the vendor at the end of the process.
Required Fields and Field Validation
Note that launching the survey stream, we knew what fields needed to mapped. But if we were to leave out data the stream needs, the record we create would produce an error.
In the Vendor stream we identified some fields as "required" in the form the user fields, but when one stream kicks off another, forms aren't used. That data goes directly from one stream to another.
It's worth knowing then, that in addition to defining fields as "required" in the forms available to users, they can also be defined as "required" in the stream's data component itself.
In addition to making fields required, field contents can also be validated at the data component, rather than in the form. All of that processing goes on in the backend, on the Pulpstream server -- so in general it's a good idea to do as much data-validation as possible in the user forms. That processing is much faster, because it occurs in the user's browser. But for situations like this one, it's worth knowing that field validation can also be configured in the stream's data component.
Learn More
To learn more about the mechanisms for integrating a stream with an external data source, see Integrations in the online help system.
For more information on data-validations that can be configured in a stream's data component, rather than its forms, see Validations in the online help system.
Take the Next Step
Congratulations! You've reached the end of the Vendor Survey learning line. At this point, you have created two data-processing streams and have tied them together programmatically -- all without writing a line of code. There's more to come, too. In the next learning line (Vendor Renewals), you'll learn how to schedule tasks so they automatically appear at a future date.
