Welcome to the third stop on the Vendor Survey learning line. At this skill station we will test the process we defined. Along the way, we will explore ways of viewing stream records and their associated tasks.
Learning concepts at this station:
Create a test record
View the cascaded task
View the task
Visit the stream record
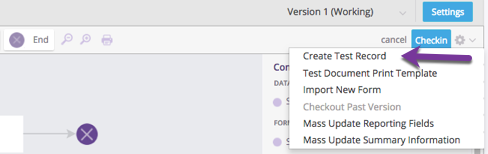
Create a Test Record
- In the vendor survey stream definition, click the gear icon above the components list.
- Click Create Test Record.
- Vendor Contact Email - Enter an email address you have access to, but which is not associated with a Pulpstream user. (If the email is recognized as belonging to a Pulpstream user, you'll get a login screen when you click the link in the email the stream sends you.)
- Vendor Name - Acme
- Onboarding Started By - This field has your name, since it defaults to the logged in user. But you could use the magnifier icon to choose another user, instead.
- Click Submit.
After a few minutes, your inbox contains a message that invites you (as the vendor) to take a survey.
- Click the link in the email and fill out the survey:
- Please rate your experience... - Average
The "tell us what could be improved" field appears. - Would you like the Acme Vendor team to contact you? - Yes
- Please rate your experience... - Average
- Fill out the other fields with any text you like.
- Click Submit.
For Extra Credit...
Note that to say Yes or No, to the contact question, you had to select from a dropdown list. That is the default display for an Enumeration field. For extra credit, edit the Survey Form and modify that entry. In that field, explore the Display as settings. Notice that in addition to the default choice ("Select"), there are two additional options: "Multi Select" and "Radio Button". Try changing the display attribute to "Radio Button", and create a new test record with that setting.
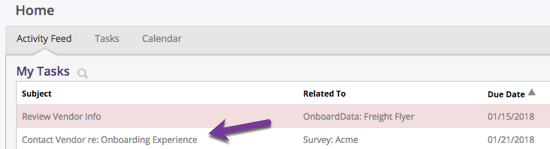
View the Cascaded Task
Pulpstream receives the survey, the cascaded task immediately creates a task for you. You see on the home page, with the title "Contact Vendor re: Onboarding Experience".
The task came to you in this case, because that is the way you filled in the Start Form. In normal use, it will go to the user who initiated the onboarding process -- but we'll get to that step later.
View the Task
When you click the task, you see a button that lets you declare it as complete, and in the main window you see the activity history associated with this stream record.
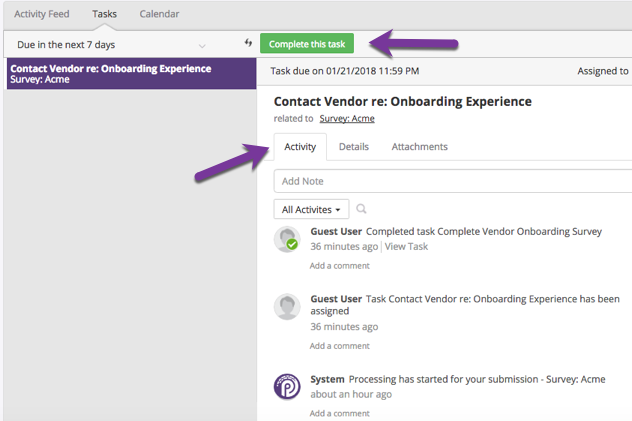
At this point, you could view the complete stream record by clicking the "Details" tab next to "Activity". That is the way most of your users will get to the record. But as someone who manages streams, there is another way to get there. We'll explore that avenue next.
Visit the Stream Record
- Go to the vendor survey stream.
- This time, instead of clicking on "Stream Definition", click the Records tab.
A list appears showing all of the records that exist in this stream.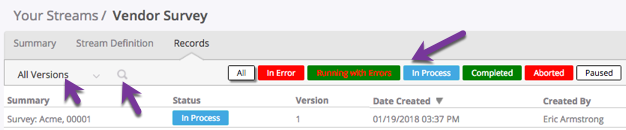
- Note that currently, records in All Versions of the stream version are displayed.
- That heading is a dropdown which lets you select a particular version.
- So if there was a new version 2 of the stream, you could select "version 1" to see how records that were created in that version of the stream.
- Next to the version selector you see the magnifier icon.
- Clicking that icon brings up a search field you could use to look for records for a particular vendor, or to look for text in other fields.
- Along the top of the window, you see the color-coded status icons.
- They show you the labels that appear in the Status column of the records in the list below.
- Clicking on one restricts the view to records with that status.
Next examine the list of entries.
- The list has the title, Summary, because it displays the list of summary records for the stream.
- For each stream record, there are the record details, which show all fields that are visible to a given user, and a record summary that appears in lists like this one.
- The first field shows in the summary line shows the word "Survey", the name of the vendor, and the record number.
- In essence, that field displays the record's name -- the handle you use to identify it.
- The format of the name was defined by default when the stream was created, but it can be modified by clicking the "Settings" option in the "Stream Definition" tab.
- Note the gear icon at then end of the list entry.
- That icon lets you view the logs associated with the record, restart the process for that record, or abort the process.
- Once a process has been aborted, an additional option appears to Delete the record.
- That option does not appear for records whose processing are in progress or completed. (Once completed, the record remains part of the stream history.)
We will end this section by examining the record in greater detail.
- Notice that the cursor changes when you hover the record name or its status indicator.
- Click on either one to drill down to the record details.
The view changes to a personalized list of records you have an interest in.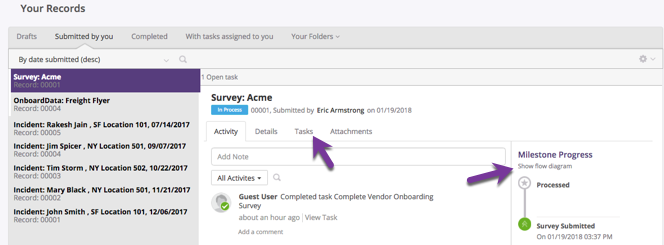
- Various ways to change the view appear across the top. The list of records available for viewing appears on the left, with the current record highlighted.
- At the right, you see summary of the record's process through the process flow.
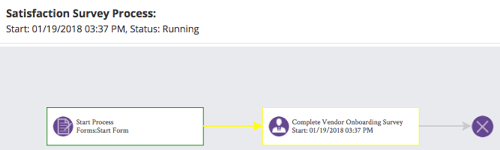
- If you click Show flow diagram, you see a color-coded version of the flow diagram showing steps that have been completed (outlined in green) and the step currently in progress (outlined in yellow).
- Note that next to the Activity tab and Details tab, one additional tab appears: Tasks.
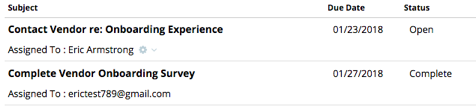
- This tab, which is available only to stream managers like yourself, shows all tasks that have been created for the stream record, and who owns them.
- The list shows two tasks. The first, assigned to the vendor to fill out the survey, has the status "Complete". The most recent, at the top, is the Open task that was created to contact the vendor.
- Click on the open task to edit it.
- At the top of the task display, click Complete this task.
One record has now made its way through the stream process.
Learn More
In the online help system, look at the Stream Settings page. From there, view the options for varying the display of the record number in the General section, and see the options for varying the display of record name in the Summary Fields section.
Also take note of the options for selecting Report Fields and Detail Forms, all of which are accessed from the Stream Settings.
Take the Next Step
Congratulations! You've run a test of the process and have ensured that it works as expected. And you've begun to explore the options for finding and managing stream records and their associated tasks.
At the next learning station, you'll learn more about the reporting capabilities you enabled for the checklist field in this stream.
