Welcome to last stop on the Vendor Onboarding Learning Line. At this station, you'll finish the vendor onboarding process by creating a Smart Object record -- a record that will be used in the other tutorials that make up the Vendor Management case study.
Learning Concepts at This Station:
What is a smart object?
Creating the smart object
Transferring stream data to the smart object
Testing with smart objects
Publishing the stream
Launching the stream from the home page
What is a Smart Object?
When we started defining the Onboarding stream, we called the data component "OnboardData", rather than "VendorData". There is an important reason for that:
The Onboarding stream contained certificate data and processing that
was no longer needed once the vendor was brought on board.
After the vendor is brought on board, we want to store their pertinent information in a Smart Object -- an object that can be referenced in other streams. In addition, smart objects provide sophisticated behaviors like schedules. They also provide a 360-degree view of all related records in other smart objects, which makes it easy to get to the details of all contracts related to a particular vendor, for example, or to get vendor-details for all parties to a particular contract (if multiple-vendor contracts happen to exist).
Together with stream processes, Smart Objects play a big role in making Pulpstream as powerful as it is!
Creating the Smart Object
At the top of the window you'll notice a "Smart Objects" entry in the menu bar. That's the way that your system users will access the objects you design. Here, we're going to define a new Smart Object.
For that:
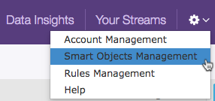
- Click the gear icon next to your profile photo and choose Smart Objects Management.
- Click New Smart Object.
- The "New Smart Object" form appears.
- Note that one Smart Object already exists -- "Groups". When a new user is added to your Pulpstream system, and you assign them to a group, the choices available to you are defined by records in that object. (In other words, you can create any groups you need to organize your workforce, merely by adding records to that object.)
- Fill out the fields to define the object:
- Title - Vendors
This Smart Object will contain the master vendor records, so that's what we call it. - Type - Local
Note that the other choices are :External", and "SalesForce Object". Those choices make it possible to reference an external database as an integral part of the Pulpstream system. - Fields - Define fields for the stream data we need to save:
Field Title Field Type Company Name Text Field Primary Contact Name Text Field Primary Contact Phone Phone Primary Contact Email Email Environmental Compliance Certificate Expiry Date Safety Certificate Expiry Date Address Text Field City Text Field State Text Field Zip Text Field - Note that there is an "Advanced" option for the text fields. You could use that option to specify an input data format, if you needed to. But for this object, all the data is coming from a stream in which data formats have already been validated, so it is unnecessary here.
- Title - Vendors
- Click Save.
The smart object is created, and appears in the list of objects on the left.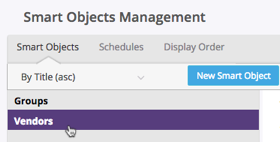
Transferring Stream Data to the Smart Object
Now that the Smart Object exists, we'll modify the Vendor Onboarding process to use it. When the vendor application is approved, we'll create a new record in the Vendors object and copy the stream data to it:
- Go to the stream definition.
- Click Edit Working Version.
(That's another way to get to the version of the stream that is currently in development.) - At the bottom of the "Vendor Onboarding" process, remove the connector between the Join Gateway and the End node, and move the End node down to make room for a new step.
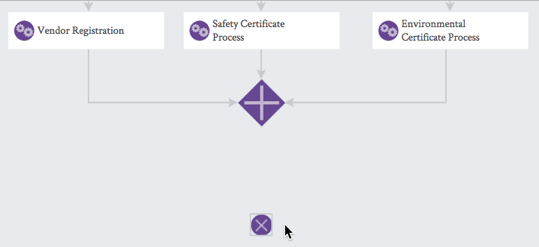
- At the top of the process-definition canvas, click Smart Steps to reveal a drop down list of options.
- Take a moment to notice the many things you could do at this point in the process flow, then drag Create Smart Object Record onto the canvas, into the space you created.
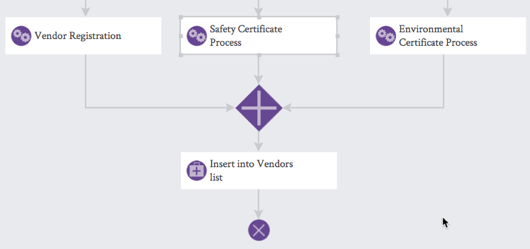
- In the dialog that opens, fill in the information for this step:
- Title - Insert into Vendors list
- Choose Smart Object... - Vendors
- Next, we will map the data fields:
- Under Field, choose Company Name.
This is the field in the Vendors object that you are mapping to. - Under Map Type, choose Field.
Your other options are to specify a literal value like "3", or to create a complex expression that can use data component fields, mathematical operators, and conditionals. (The Help button is there to give you assistance.)
But in this case, we are doing a simple field-to-field mapping, so choose Field. - Under Value/Expression, choose Vendor Name.
For this option, you're choosing an item from one the stream's data component.
You have now mapped the stream's "Vendor Name" field to the smart object's "Company Name" field.
- Under Field, choose Company Name.
- Repeat the process for the other fields defined in the smart object:
Smart Object Field Map Type Component Field Primary Contact Name Field Primary Contact Name Primary Contact Phone Field Primary Contact Phone Primary Contact Email Field Primary Contact Email Environmental Compliance Certificate Expiry Field Environmental Cert Expiration Date Safety Certificate Expiry Field Health Cert Expiration Date Address Field Street Address City Field City State Field State Note:
Now that you are choosing from the list of fields defined in the stream data component, you'll see that we've left out the tax-related fields and certificate fields (other than the expiration dates). That's all the data we really need, for our purposes. But of course in real life, you may well choose to store more. - Note that at this point, you could also choose to store a reference to the Smart Object record.
To do that, you would:- Create a field of type "Smart Object" in the stream's data component.
- Choose that field here, for the option "Store the Generated Record Id in".
- There is little point in doing that here, since the stream is about to terminate anyway. But there are times when that capability can come in handy.
- Click Save Changes.
- Connect the Join Gateway to the "Create Smart Object Record" step, and connect that step to the end step.
- Click Save Process.
Testing with Smart Objects
As a matter of information, were you to create a test record at this point and run it through the stream process, a Smart Object record would be created, as specified in the process definition.
That's certainly something you could do, of course. Just know that as part of cleaning up after a test, you want to delete the Smart Object record that gets created.
We're done with testing at this point, though, so we're to move on to publishing the stream.
Publishing the Stream
Publishing the stream makes it available to other processes, so it can launched programmatically. It also makes it possible for a normal user to launch the stream by submitting the appropriate form.
To publish the stream:
- Go to the stream definition.
- Above the components list, click Checkin.
- As a solo developer, we haven't had to worry about this step very much. But in a collaborative setting, you would ordinarily "check out" the stream to make a set of changes, and then "check in" again, when you're done.
- While it's checked out, others won't be able to edit it. That prevents their changes from interfering with yours. But to make it possible for them to make changes after you're done, you would ordinarily "check in" your changes.)
- Add your Checkin Comments.
- This is where you would add a short note summarizing the changes you made to the system. (When you check out the working version, you can also write a short note that tells what you're working on.)
- In this case, we can write something simple like, "Version 1 complete and ready for use."
- At the bottom of the dialog, click Checkin.
Two new buttons appear above the components listing, one to publish the working version, and one to check it out again.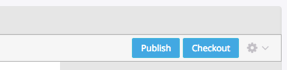
- Click Publish.
The "Publish Work Version" dialog appears. - Fill in the publication options for the starting form:
- Form - Onboarding Kickoff
- Title - Take the default title.
- Description - Submit this form to begin onboarding a vendor.
- Catalog Folder - All Processes
The catalog is the list of forms that users can access to launch a process. You can choose an existing folder, or create a new one and add it there. Here, we're choosing the top-level folder that is always available. - Publishing Comments - Here, you might summarize new features that users would notice. (For this version, leave it blank.)Note:
Given that the stream definition already defines a starting form, you may be wondering why you need to specify one here. The answer is that here, you are specifying forms that will appear in the user catalog -- a set of forms that users can use to launch a stream manually. On the other hand, it is also possible to launch a stream programmatically. (You'll do that very thing in another tutorial, when you create a Vendor Satisfaction Survey.) In that case, you might publish the stream without any manual-launch forms.
- At the bottom of the dialog, click Publish.
The stream is published and is available for use.
You are now on the stream summary page. - Notice that a number of things have changed on the summary page.

- Instead of appearing under Working Version, the "Version 1" stream now appears under Published Version. (When Version 2 is published, it will appear under Past Versions.)
- There is now an "(active)" indicator next to Version 1, indicating that it is currently in use.
- The "View change history" option (which always appears at the top of the window) shows you the latest version, by default. But you can always choose an earlier version.
- In addition to the checkin and checkout comments, that window displays an activity log of everything you did, from most recent to earliest. (A limited number of items are shown. When you scroll down, additional lines are added.)
- A new button appears at top right: Create New Version.
- That button creates a new working version that you can modify and test, without affecting the stream that is in use.
- And even when you publish a modified version, any records that are in-progress at the time will finish their processing using the older version of the stream. But when new records are created, they will use the new version.
Launch the Stream from the Home Page
Now that the stream has been published, and a starting-from specified, you see something new in your Home page. Under the Submit New Form button, the Onboarding Kickoff form now appears.
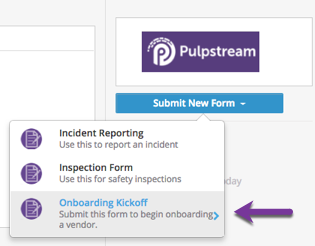
At this point, you can fill out that form to launch the process. When it finishes, a new data record will appear in the Vendors object.
Learn More
Explore the online help system to learn more about:
- Smart Objects
- In particular: Configuring Remote (external) and SalesForce Objects
- Other "Smart Steps" that can be added to a process flow, as outlined on the Process Definition page.
Take the Next Step
Congratulations! You have reached the last stop on the Vendor Onboarding Line! You have learned a lot about Pulpstream in the process, and may even be ready to begin building projects on your own. One of the best ways to learn, in fact, is to begin building a stream. You can then consult the Help System or talk to our excellent support staff to answer the questions that inevitably arise. You should also explore the other PurpleExpress tutorials that are available -- especially the ones that build on the onboarding process: Vendor Satisfaction Survey, Vendor Certificate Renewals, and Vendor Contract Management.
