In the Vendor Onboarding learning line, you learned how to create an onboarding stream, set up parallel review processes, and create a Smart Object record for the vendor when the process finishes. In this learning line, you create a separate stream to manage satisfaction surveys, and trigger that stream when the onboarding process completes.
Of course, satisfaction surveys are more typically sent to customers, rather than vendors, but the process is simple enough that you may find yourself creating more surveys than you initially imagined -- all of which have the capacity to contribute to the bottom line by streamlining your processes and improving customer satisfaction.
At this first skill station, you will work with a number of sophisticated field types, and conditionalize the way a form displays.
Learning Concepts at This Station:
Create the survey stream
Add survey fields to the stream data component
Add a checklist field
Enable numerical analysis
Add an enumeration field
Add a user field
Make form fields read only
Conditionalize a field
Create an email template for the survey
Create a data display form for the vendor
Create the Survey Stream
- Go the Streams Management page and click Create a new stream.
- Provide the title and initial fields:
- Title - Satisfaction Survey
- Give a name to this information... - Survey
This will be name of the default data component and the initial form. - Fields (Label, Type)
Vendor Name, Text Field
Vendor Contact Email, Email
Note that these are the incoming fields we need for this stream. As you'll see later, their data will come from the Vendor Onboarding stream.
- At the bottom of the dialog, click Done.
Version 1 of the stream is created.
Add a Checklist Field
- In the stream summary page, Edit the Working Version.
- Under Data Components, click the Survey data component.
- Click the Fields tab.
- Click New Field, and add the initial survey field:
- Title - Please rate your experience of coming onboard as a vendor
This is the label that is displayed to the user. Longer, more descriptive labels are used here, for design convenience and for usability. (For the user, they explain more. For the designer, adding a field to a form automatically populates the form with the most useful label.) - Name - ch1
The name is generally shorter, so it is easier to pick out of a field list, and to allow the system to operate as rapidly as possible. (Longer names take only a fraction longer to process, but when there are many of them, the time adds up.)
In this case, however, the field name is particularly short. The reason is that later on we will want to do numerical analysis reports on stream data -- checklist fields automatically produce detailed data, but only when when the name consists of "ch", followed by a number.
TIP:
When the title and name of the field will differ, entering the name first makes things slightly easier. - Type - Checklist
Additional options appear for this kind of field. - Subtype - Assign from available options
In other words, allow the user to choose from among the options you define.
(As a checklist, only one choice is possible -- but additional operations can be enabled.) - Define the values for this field:
Label Value Good 1 Average 0 Poor -1 - Note that the Checklist field type allows for many additional capabilities when a user selects a choice. Those capabilities were provided primarily for audits and assessments.
- For a particular choice, a user can be prompted to upload a photo, add explanatory notes, or even initiate a corrective action-task. (Those options and the additional advanced options that can be enabled for each choice are explored in detail in the Inspections and Assessments tutorial.)
- Title - Please rate your experience of coming onboard as a vendor
- Click Save Field.
The field has now been defined.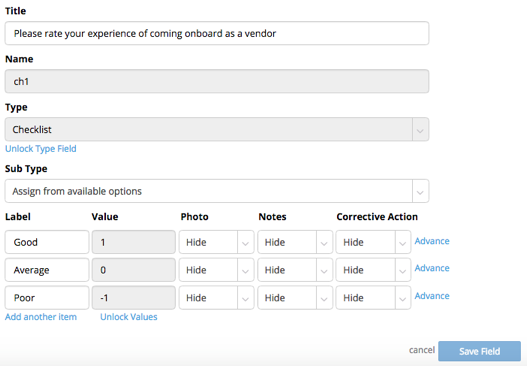
Enable Numerical Analysis
Before we add any other fields, let's see how we plan to use the rating field we just created.
- Click Save Changes to close the form and return to the stream definition.
- Click the Summary tab to go to the stream's summary page.
- Click the gear icon and choose Edit Details.
Recall that in the Stream Definition tab, you click the gear icon to create a test record.
The gear icon in the Summary page has a completely different set of options, including one to clone the stream and the Edit Details option we are choosing now.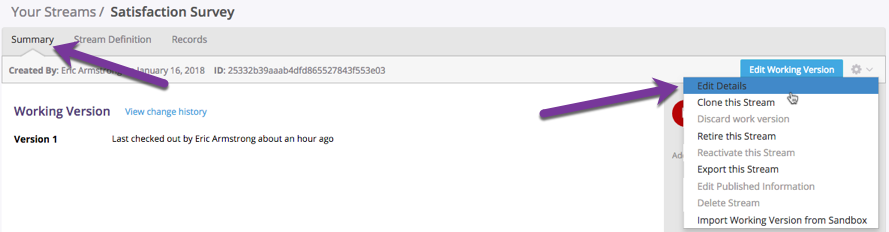 The Stream Details dialog opens.
 - At the bottom of the Stream Details dialog, click "Analyze Checklist Fields..."
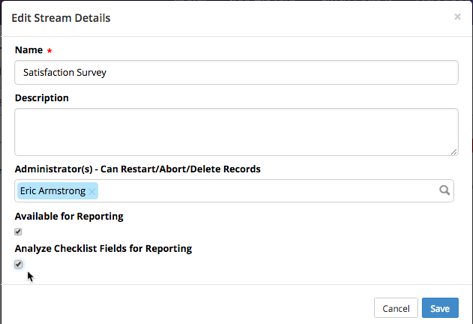
- Note that "Available for Reporting" is enabled by default. With that option, any fields that have been designated as "reporting fields" can have reports run on them.
- As you'll see later, you can drill down from such reports to the individual records that created them, so all fields in a record can be viewed, even from a report. But "reporting fields" can be used to determine totals, averages, plus maximum and minimum values, both for the collection of records selected for the report and for subgroups within the collection.
- Selecting "Analyze Checklist Fields" provides additional detail for checklist fields that have the right kind of name ("ch####"). In this case, that lets you get the number or percentage of vendors who regarded the onboarding experience as good, average, or poor -- a capability we'll explore further later on in this learning line.
- Click Save.
Add an Enumeration Field
An Enumeration field presents a user with a set of choices to select from. Those choices can be displayed in different ways (for example, as a dropdown or a set of boxes), and they can be configured to let a user make multiple selections.
First, we'll add a couple of text fields we need. Then we'll explore the options for an Enumeration field.
- Return to editing the working version, go to the Fields tab, and click New Field.
- Add a field for negative comments. (It will appear only when the vendor's rating is average or poor.)
- Title - Please tell us what could be improved
- Name - suggestions_for_improvement
- Type - Text Field
- At the bottom of the dialog, click Save Field.
- Add a field for other comments.
- Title - Additional Comments
- Name - comments
- Type - Text Field
- At the bottom of the dialog, click Save Field.
- Add a field that lets the vendor initiate a conversation.
- Title - Would you like the Acme Vendor team to contact you?
- Name - asked_for_callback
- Type - Enumeration (Choices)
- Enter the labels for the choices:
- Label - Yes
- Label - No
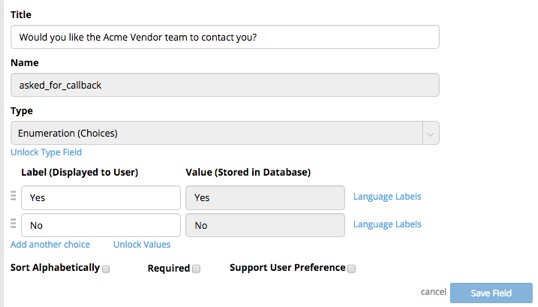
- At the bottom of the dialog, click Save Field.
- At top right, click Save Changes.
Note that when you type in "Yes", and then click "Add another choice", the value associated with the label defaults to "Yes". That's perfect for this situation. When you are setting up a conditional action based on the field, you will be able to compare to the values "Yes" or "No", rather than to values like one or zero. (In general, that kind of comparison will be more meaningful.)
Note, too, that the values associated with the labels presented to the user could be any values you choose. It all depends on whether you want to process them numerically (as we plan to do in the checklist field), or whether you want more meaningful values to compare to.
With this field type, you can change the order in which the options are displayed. To do that, you click and drag the "hamburger" icons to the left of the fields (the 3 horizontal lines stacked over each other).
And for each option, too, you can click "Language Labels" to assign labels in different supported languages, so that the user's choice of language determines which label appears.
Checklist Fields vs. Enumeration Fields
You may have noticed that a checklist fields and enumeration fields look very similar to one another. They do have a lot in common, and they can be used in much the same way. In particular, they are frequently used as a way to control conditional behaviors, both in data forms and in process flows. The difference between them, in fact, is rather subtle. Checklist fields, as you saw earlier, can generate numeric analysis reports automatically. And they provide a number of automated capabilities for adding photos, notes, and corrective actions. Enumeration fields, on the other hand, can be sorted, and can have labels in several languages. And when added to a form, they can be configured to allow for multiple choices -- in which case the choices appear as a set of checkboxes, rather than as a set of radio buttons.
No "Checkbox" Field
Finally, note that there is no "checkbox" field type. Such a field is simply a checklist or an enumeration field that has two values. (Since those field types are so powerful, it makes more sense to simply use them when a checkbox is required.)
Add a User Field
A field of type "User" stores a pointer to a Pulpstream user. If the vendor asks for someone to contact them, we want Pulpstream to create a task, to ensure it happens.
In this scenario, the member of the Vendor Onboarding team who initiated the onboarding process will be assigned the task. Here, we'll create the field that will store the reference. Later, when we launch the survey process at the end of onboarding, we will get the onboarding process to supply that data, the same we get the vendor name and contact email.
- Under Data Components, click Survey.
- In the Fields tab, and click New Field.
- Add the user-reference field:
- Title - Onboarding Started By
- Name - use the default
- Type - User
- At the bottom of the dialog, click Save Field.
- At top right, click Save Changes.
Make Form Fields Read-Only
When the stream was created, the initial form was created with the fields we defined then. Now, we'll modify the form to include the fields we just added.
- In the stream definition, under Forms, click Survey Form.
- Make the Vendor Name field read-only:
- In the form canvas, click the field's pencil icon.
The Edit Field dialog opens. - Under Field Attributes, choose Read Only.
- At the bottom of the dialog, click Save Changes.
- In the form canvas, click the field's pencil icon.
- Repeat the process to make the Vendor Contact Email read-only.
Conditionalize a Field
This survey form will be presented to the vendor, so start by dragging the remaining fields onto the form -- all but "Onboarding Started By", since that one is an internal field.
Drag each field into the form and click Save Changes in the dialog that appears when you drop it:
- Please rate your experience...
- Please tell us what could be improved
- Additional Comments
- Would like the Acme Vendor team to contact you?
Next, we'll make the suggestions_for_improvement field display conditionally:
- In the form canvas, edit Please rate your experience...
The Edit Field dialog opens.
Note that:- Under Orientation, you could choose to display the choices vertically, rather than horizontally.
- You could specify a Default Value for this form, if you wanted to.
- For conditional operations, you edit the field that triggers the condition, rather than the field that is affected by it.
- At the top of the dialog, click the Show/Hide Form Elements tab.
- Under Condition 1, Show/Hide Form Elements, click on Average and Poor.
These are the selections that will cause a change in the form's appearance.- Note that there is one field for form elements to show, and another for form elements to hide.
- Click in the field under Show following pages/sections/fields.
The list of form elements appears. - Choose Please tell us what could be improved.
Note that:- When you tell Pulpstream to show a form element based on some condition, Pulpstream knows to hide it, by default. (Similarly, when you choose to hide it.)
- Multiple form elements can be selected in the "show" field and in the "hide" field.
- Each element you select appears as a box in the form. When you hovering over the space at the end of the box, an "X" appears. Click there to remove the element from the field.
- You have an option to "Make Shown Fields Required" to ensure that the field is filled out. (It's not recommended here. If the user is already having a poor experience, and wants you to contact them, making the field required could add another straw to an already-frustrating experience. But this is a handy option to have available when a subsidiary fields really are required.)
- At the bottom of the dialog, click Save Changes.
- At the top of the form canvas, above the components, click Save Changes.
- In the dialog that appears, leave the form name unchanged and click Save Changes.
The form is saved and you are back at the stream definition.
Create an Email Template for the Survey
- In the stream definition, go to the Components pane.
- Hover over the Email Templates heading and click New.
- Define the template:
- Title - Survey Notification Email
- Who is Sender? - Specify Here
Additional options appear to let you specify the sender.- From Name - Acme Vendor Process
- From Address - acmevendor@acme.pulpstream.com
- Subject - Your feedback is requested
- Body -
Dear Vendor,
We would appreciate your thoughts on your recent onboarding
experience with Acme. Please click the link below to provide your input.
$!task.url
Acme Vendor Onboarding.
- Note the $!task.url line, highlighted in the text above. That is the critical part of the email. When the task is created by the process, we will configure the process step to provide the URL the vendor will use to fill out the survey form. That URL will then become part of the email.
- To find declarations for such variables, click the magnifier icon next to the field. Note that you choose from among task fields, data component fields, and internal record identifier fields ("meta" fields).
- By default, such variables have the form $!.... The "!" tells the system to display nothing at all if the variable is blank. When you have several, and one is misbehaving, it's worth knowing that you can remove the blank. In that case, the variable name is displayed, if it happens to be empty (for example, "$task.url").
- That sort of thing makes no sense to end users, of course, but it can be a valuable tool for the designer.
For Extra Credit...
Use the magnifier icon to find the variable for the vendor name and use it customize the email template.
- Scroll to the end of the dialog and click Save Changes.
Create a Data Display Form for the Vendor
When the email is sent to the vendor, it will have a link to the display-only form they will use to interact with the Pulpstream system. Here, we'll define a small form for them to use.
- In the stream definition, go to the Components pane.
- Hover over the Forms heading and click New.
The New Form dialog appears:- Select a data component - Survey
- At the bottom of the dialog, click Save Changes.
The form canvas appears. - Edit the New Section heading:
- Title - Vendor Feedback Request.
- Show section title at runtime - Yes
- At the bottom of the dialog, click Save Changes.
- Click Add Controls and drag a Text element into the form:
- Label - We appreciate your feedback on the onboarding process.
Please click on the "Complete" button above, to begin filling out
a short survey.
- Label - We appreciate your feedback on the onboarding process.
- At top right of the canvas, click Save Changes.
The form-name-and-description dialog appears. - Give the form a name:
- Enter Form Title - Survey Welcome Form
- At the bottom of the dialog, click Save Changes.
The form is saved, and you are once again at the stream definition.
Learn More
At this skill station, you have been mostly practicing the stream set-up steps you learned in the Vendor Onboarding tutorial. By now, they should be becoming second nature.
The new material covered in this station involved the new field types: Checklist, Enumeration, and User.
For additional information on the many capabilities of Checklist fields, see the Inspections and Assessments tutorial.
If you haven't already, explore Field Types in the help system to learn more about the kinds of fields you can create.
We also used the $!task.url variable in an email template, and showed how to obtain such variables by clicking the magnifier icon.
Take the Next Step
In the next station, we will configure the survey process. In subsequent stations, we will wire the survey process to the onboarding flow and evaluate survey results.
