Welcome to Station 2 on the Vendor Onboarding Learning Line. At this station, you'll learn to create the forms that capture vendor data.
In this lesson, we will define three forms that a vendor can use to supply data -- one for their initial registration, one for their health certificate, and one for the environmental certificate.
Creating separate forms will make it easier for a vendor who is just starting out to provide data as they get it. It will also make easier to kick off the appropriate review process each time a form is submitted, so the appropriate person or department approves the submission.
Learning Concepts at This Station:
Creating and editing forms
Working with form pages
Working with form sections
Adding text and links to a form
Adding fields to a form
Renaming a form page
Adding a conditional field
Setting up the environmental certificate form
Adding an information asset (image or file)
Setting up reviewer forms
Creating a "kick off" form
Begin by going to the stream definition:
- Gear icon > Streams Management > Vendor Onboarding
- Click “Version 1” or “Edit Working Version” (both are the same, in this case)
Creating and Editing Forms
In the Components pane on the right, you see the default form that was created for the OnboardData component we created in the last station.
In general, a form that has the same name as the data set will show almost all of the data fields, and will be used by internal user to see all of the non-sensitive data that a record contains.
For the moment, though, we’re going to focus on the forms a vendor will use to supply certification information and tax-reporting data.
So we’ll start by creating a new form:
- In the Components pane on the right, hover over the section title, FORMS.
The “New” option appears.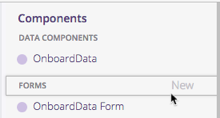
- Click New.
The New Form window appears, asking you select a data component. - Choose the OnboardData component and click Save Changes.
The Form Editing canvas appears.
(Right now, the canvas also has the title “New Form” – but that’s only because you haven’t given the form a name yet.)
Working with Form Pages
A Pulpstream form can have multiple pages, where each page appears as a tab on the form. As with other Pulpstream icons, the first option has a white background with a dotted border. You click that one to create a new page, or you click one of the solid icons that comes after it to edit an existing page.
In this case, the default page that has been created for you is "Page 1". That’s the page you are currently viewing.
Working with Sections
Sections divide a page into logical chunks. The default section heading created for you in the initial page is, “New Section”.
Let’s start by changing that to something useful:
- Hover over the section title and click the pencil icon that appears at the end of the line.

- In the pop up dialog that appears, set the title to Vendor Registration.
- Click the option to "Show section title at run time", so the title appears when the form is displayed.
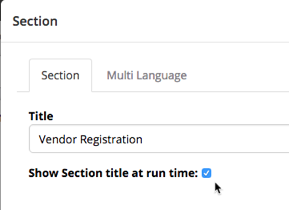
- At bottom right of the pop up dialog, click Save Changes.
Adding Text and Links to a Form
Once the onboarding process is initiated, the vendor will use the form we’re designing to supply information, so now we want to add some text to tell them what to do.
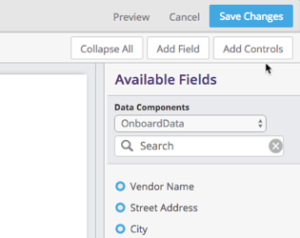
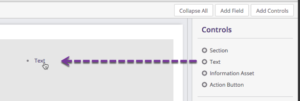
On the right side of the page, you’ll see the list of fields that can be added to the form. We’ll use those in a moment. Right now, we want to add a text control that we use to display a message for the vendor.
- To do that, start by clicking on the Add Controls option, just above the list of fields.
- In the list of form controls (anything that isn't a field), drag the Text option into the form.
- In the dialog that opens, add the following text to the Label field:
- Welcome to Acme Vendor Registration. Please provide all required information. Details on these requirements can be found at our site: http://acme.pulpstream.com/vendorpolicy
- Then highlight the link text to make it an active link:
- Use Ctrl+K on a PC, Cmd+K on a Mac
- In the "Insert Link" dialog, copy the "Text to display" into the URL field, and click OK.
- Note:
Since the label is an HTML field, so you can also use {Ctrl/Cmd}+B for bold, and +I for italics. Formatting is also preserved when you paste in formatted text (for example, text taken from this tutorial).
- At the bottom of the dialog, click Save Changes.
Adding Fields to a Form
You're now viewing the form, which displays the text you added. We want to insert some basic fields, at this point. We'll start by adding the "Vendor Name" field.
- To the right of the form, above the list of available controls, click Add Field to go back to the list of fields.
- From that list, drag in the Vendor Name field.
- In the dialog that opens, under Field Attributes, select Required.
- At the bottom of the dialog, click Save Changes.
The field appears in the form with a red asterisk (*) next to the label, to indicate that it is required.
Repeat the process for the other three basic information fields:
- Street Address
- City
- State
Next return to the list of Controls and drag in a new Section under the last field.
- Title - Contact Information
Then return to the list of Fields and drag in the contact-information fields:
| Field | Label | Attribute |
| Primary Contact Name | Name | Required |
| Primary Contact Phone | Phone | Required |
| Primary Contact Email | Required |
The section you have added to the form now looks like this:

Note that when you hover a section, and when you hover over a field, the pencil icons used for the editing becomes visible, along with the "X" icon the deletes the element.
Renaming a Form Page
At this point, let's rename the form page we've created to something more useful. Instead of calling it "Page 1", lets call it "General". To do that:
- Click the gear icon under "Page 1", and choose Rename Page.
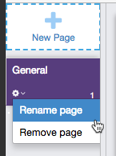
- Under "Enter a page name", type General.
- Click Save Changes.
Adding a Conditional Field
At this point, we will create a new form page for tax information, and add a field that is conditionally required.
- Start by adding a New Page.
- Rename it to Tax Info.
- Change the section heading to Tax Information.
- Drag in the Entity Type field, and make it Required.
- Drag in the Tax ID field. This field is not required, by default.
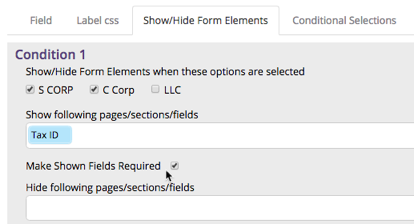
With form elements in place, we're now ready to display the Tax ID field conditionally, and be required field when it does appear. Recall that the Entity Type can be S Corp, C Corp, or LLC. Whenever the choice is one of the first two, we want the Tax ID field to appear.
- Hover over the Entity Type field and click the pencil icon to edit it.
- Click the Show/Hide Form Elements tab, which is an option for fields like this one that have a defined set of values.
- Under "Show/Hide Form Elements when...", click S Corp and C Corp.
You are now specifying "Condition #1".
Note:- For each condition there is a field that lets you specify things to show, and another field that lets you specify things to hide.
- If you needed to, you could also click "Add New Condition" at the bottom of the dialog to specify additional conditions.
- Click the field under "Show following pages/sections/fields".
Note that you have a choice of displaying or hiding entire pages or sections, as well as fields. Also note that anything you choose to conditionally display will automatically be hidden, by default. - In this case, we want a field to appear, so choose Tax ID from the bottom of the list.

- When that field appears, we want it to be required. So underneath that field, click "Make Shown Fields Required".
- Next, drag in the W9 field, and make it Required.
That field displays a button that lets a user browse for a file to upload. - At the bottom of the dialog, click Save Changes.
The "Save Form" dialog appears. - Under Enter Form Title, type in Vendor Registration Form.
- At the bottom of this dialog, click Save Changes.
The form is now saved.
Note:
If you were away from your desk for any period of time, and were logged out of the system as a result, you'll have noticed that when you log in again, you pick up right where you left off. That's because Pulpstream saves your work-in-progress state in your browser. If you log in from any other browser, though, you won't see the changes you've made until after you have clicked "Save Changes".
Setting Up the Environmental Certificate Form
This is the form that vendors will use to provide their environmental compliance certificate. Note that we are not including the expiration date field in this form. Reviewers will put in that date after inspecting the form.
- Use the steps learned earlier to create a new form:
- Data component: OnboardData
- Page name – General
- Section heading – Environmental Certificate
- Text – To become an approved vendor of Acme corporation, a valid Environmental certificate is required. Please visit this link to see a list of acceptable certificates: http://acme.pulpstream.com/acceptableCerts
- Add the fields to the form:
- Environmental Compliance Certificate – Required
- Environmental Cert Issuer Name – Required
- Save Changes
- Form title – Environmental Certificate
Adding an Information Asset (image or file)
Start by setting up the last of the forms that is intended for vendors to use, to enter their Health and Safety Certificate. But here, instead of a link that goes to a web page, we'll reference a document that lists acceptable certification authorities. After it is uploaded, it will be stored as an asset on the Pulpstream servers.
- Create a new form:
- Data component: OnboardData
- Page name – General
- Section heading – Health and Safety Certification
- Text – To become an approved vendor of Acme corporation, a valid Health and Safety certificate is required.
- At top right, click Add Controls.
- Drag in an Information Asset control:
- Label - Certification Authorities
- Information Type - File
Note that images can be stored, as well. - Click Choose a file and upload a PDF.
(Any PDF will do, for now. Or use this sample list of certification authorities.) - Click Save Changes.
- Add the fields to the form:
- Health and Safety Certificate – Required
- Health Cert Issuer Name – Required
- As with the environmental certificate, we do not include the expiration date field on this form, intended for vendors. That will be for the reviewers to fill out.
- Save Changes
- Form title – Health and Safety Certificate
Setting up Reviewer Forms
When we set up the review processes in the vendor-onboarding stream, the accounting department will be sent the vendor-registration form, with the tax information it contains. They will then be able to accept or reject the submission.
The people who review the certificates will also see the form that has the information they need. But in addition, they will have an additional form to fill out that contains the expiration date.
Use the procedures you have already learned to create the forms those reviewers will need.
- Create a new form for the Health and Safety reviewers:
- Data component: OnboardData
- Page name: General
- Section title: Health and Safety Certificate Review
- Text: Please review the certificate provided by the vendor and fill in the certificate expiration date.
- Field: Health Cert Expiration Date
- Label - use the default
- Field Attributes - Required
- Save Changes
- Form title: Health and Safety Certificate Review
- Create a new form for the Environmental reviewers:
- Data component: OnboardData
- Page name: General
- Section title: Environmental Certificate Review
- Text: Please review the certificate provided by the vendor and fill in the certificate expiration date.
- Field: Environmental Cert Expiration Date
- Label - use the default
- Field Attributes - Required
- Save Changes
- Form title: Environmental Certificate Review
Creating a "Kick Off" Form
The last form we'll need is one to launch the onboarding process. (We'll use the default OnboardData form for that, but will rename it when we save it.)
- In the stream definition, under "Forms", click the OnboardData Form, to edit it.
The form opens. It already contains the one field that was defined when the stream was created. (Any fields defined at that time automatically appear in this, the default form.) - Next, we'll add some instructions for the person who starts the onboarding process.
- This time, when you drag in the text control, you want to position it above the initial field.
- Notice that when you drag it into the form, the "General" section is highlighted. Notice too, that when the cursor is over the "Vendor Name" field, that field is highlighted, as well. Release the mouse there to put the text control above that field.
- Text - Submission of this form will kick off the onboarding process. Please provide the name of the vendor and the email address of the contact who will be able to provide the vendor's information.
- We'll also need the email address of the contact who will be providing the information, so add that field:
- Field - Primary Contact Email
- Field Attributes - Required
- Save the form
- Form Title - Onboarding Kickoff
Learn More
To learn more about the options for working with forms, see Forms in the help system.
Take the Next Step
We have now created the forms needed to bring a vendor on board. In the next learning station, we will define the groups of people who can review the submissions.
