Welcome to the second stop on the Vendor Survey learning line! At this skill station, you will define the survey process, preparing the way for it to be kicked off at the end of the onboarding process. Along the way, you will work with task escalations and conditionally-generated child tasks.
Learning Concepts at This Station:
Add a user task for the vendor
Send the notification email
Create a task escalation
Create a cascading task
Define the start form
Add a User Task for the Vendor
We'll start by modifying the process to add a user task.
- Go to the stream definition and edit the working version.
- Delete the "Send Report" step.
- You can leave the end step and move it as needed to make room, or delete it now and add it again later.
- You can also choose to rearrange the stream steps so they flow vertically, or leave the default horizontal arrangement. (For a simple two-step process like this one will be when it is finished, the horizontal arrangement makes sense. For three or more steps, a vertical arrangement tends to be easier to follow.
- Drag a User Task step onto the canvas.
- Title - Complete Vendor Onboarding Survey
- Select a form to show record details... - Survey Welcome Form
- Select an optional form...to complete this task - Survey Form
- Give the vendor 5 days to fill out the survey
- When will this task be due - ... in days specified here
- Enter a number - 5
Send the Notification Email
- In the Assignment tab, make the task the vendor the task owner.
- Assign task to - Email Address present in a Field
- Field - Vendor Contact Email
- Turn off the standard notification message, so we can use the email template we created, instead.
- Send task assignment notification email - Off (uncheck the box)
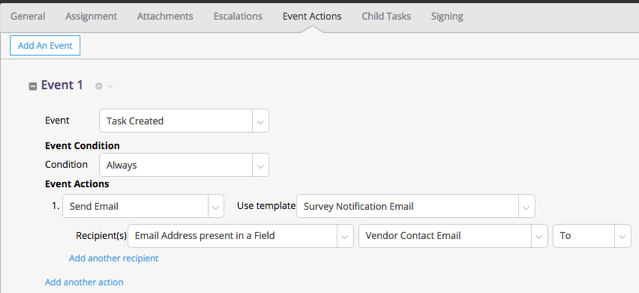
- In the Event Actions tab, use the template we defined to send the survey request.
- Event - Task Created
- Event Condition - Always
Note that actions can be conditional, and that multiple actions can be specified. - Event Actions - Send Email
- Use template - Survey Notification Email
- Recipients - Email Address present in a Field
- Field - Vendor Contact Email
Create a Task Escalation
Here, we'll define an escalation rule that is triggered if the survey has not been completed after 4 days. (In real life, of course, you would be unlikely to pester your suppliers with multiple survey requests. Consider this step as an exploration of escalation capabilities.)
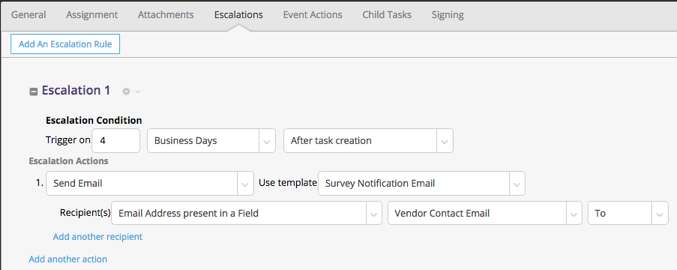
- Go to the Escalations tab.
- Set up the Escalation Condition
- Trigger on - 4 - Business Days - After task creation
Note that there are multiple ways to define such conditions. You can even use data defined in the stream record. - Escalation Actions - Send Email
- Use Template - Survey Notification Email
In real life, of course, you would probably use a different email template. But for this exploration, the original template is fine. - Recipients - Email Address present in a Field
- Field - Vendor Contact Email
Note that since this stream includes a User field, that field is also available for selection. Since every user has an email address, Pulpstream lets you select user fields as well as email fields.
- Trigger on - 4 - Business Days - After task creation
At this point, we can finish creating the task step:
- At the top of the dialog, click Save Changes.
- Wire the start step to the User Task.
- Wire the User Task to the End step.
- Click Save Process.
Create a Cascading Task
Cascading Tasks are tasks that can be triggered by conditions created in another task. Here you will create one that is launched as child task (subsidiary task) of the vendor-survey task, whenever the vendor asks to be contacted.
We could, of course, create a decision branch that asks if the stream data records a "yes" to that question. We could then create a task to contact the vendor, and join the task flows together in the main process. But by using a cascading task for that purpose, we keep the main flow simple, so it shows the primary processing pathway.
Note:
While the stream component is known as a cascading task when you're defining it, it is kicked off as a child task when you're launching it from another task. In reality, it is the same thing with two different names.
In fact, a child task always has the same completion-conditions as the original task (generally either Complete, or Approve/Reject, but custom actions can also be defined). Because a child task has the same completion conditions, the task flow simply picks up where it left off when the child task completes, just as though it were the original task (the triggering task, or parent task) that had finished.
And since such tasks can cascade to an arbitrary depth, they make it easy to define "nightmare scenarios" that would be extremely difficult to model with a process-flow diagram. As an example, consider an expense-approval process. Depending on the amount, a task may be generated for a supervisor, manager, or an executive. And if the expense were for computer equipment, a review-task might be generated for the IT department.
Using cascading tasks in that scenario makes it easier to manage the complexity. From the standpoint of the process flow, there is simply an "approve or reject" step. The details of who does the reviewing and approving are hidden away in a series of cascading steps.
Now, let's create the cascading task:
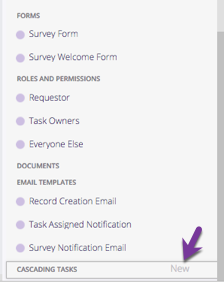
- In the stream component list, scroll down to the Cascading Tasks heading and click New,
- Fill in the task data:
- Task Subject - Contact Vendor re: Onboarding Experience
- Select a form to show record details - Survey Form
The default. Show the vendor's responses to the user who gets the task. - When will this task be due... - Specify a day or a couple of hours.
- In the Assignment tab, assign the task to the user who started the onboarding:
- Assign task to - User present in a Field
- Field - Onboarding Started By
- The default options for the remaining values are fine. For example, the standard notification email is fine for an internal user. But there is one choice you need to be aware of when you define a cascading task:
- Action buttons available to task assignee
The options specified here should match the options available in the triggering task. That is how the results of the cascaded task become synonymous with the results of the triggering task. Here, the default option is "Complete", which works well for our purpose.
- Action buttons available to task assignee
- At the top of the dialog, click Save Changes.
The new task appears in the component list.
Next, we'll invoke the cascading task as a child task of the vendor survey:
- In the process flow diagram, double-click the Complete Vendor Onboarding Survey step.
- In the Child Tasks tab, select the task we defined:
- Title - Cascaded task for vendor contact
- Task - Contact Vendor re: Onboarding Experience
- Create this task on - Task Completion
- At this point, a new option appears: "Completion Action".
- Since our triggering action only has one completion action ("Complete") that is the only choice available here. But for an Approve/Reject task, for example, multiple choices would be available.
- That is the more typical use for a cascading task, in fact. If the original reviewer rejected the submission, there is nothing further to do. But if the original reviewer approved it, and the amount is greater than some threshold, we might need to create a review task for a higher-level manager.
- Child Task Condition - Match All
Here select the conditions that trigger the child task:
- Field - Would you like the Acme Vendor to contact you?
- Operator - Equal to
- Value - Yes
As with checklist fields, the possible field values are displayed in a dropdown. You need only select the appropriate value.
- At the top of the dialog, click Save Changes.
The survey task now triggers the cascaded child task, and you are back at the process flow canvas. - Connect the vendor survey task to the end step.
- Click Save Process.
The process has now been defined.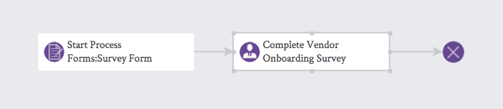
Define the Start Form
We started the stream definition by defining the Survey Form, because that is the primary data that the stream will be working with. By default, that form also becomes the "start form" for the stream. That's typical for most streams, but in this case the form will be filled out by the vendor.
Eventually, we want to launch this stream from the Onboarding process. So now we will create the form that specifies the incoming data needed to launch the stream.
- In the stream definition's components list, at the Forms heading, click New.
- Select the data component - Survey.
- Click Save Changes.
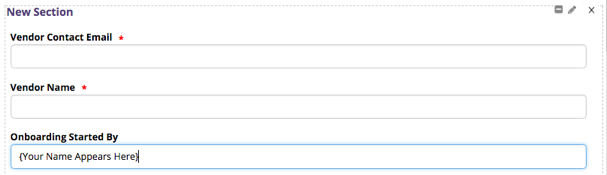
- In the Form canvas, drag in the fields we need to launch the process:
- Vendor Contact Email (Attributes: Required)
- Vendor Name Attributes (Attributes: Required)
- Onboarding Started By (Default: Logged in User)
- The form is now defined.
- Click Save Changes.
- Enter the Form Title - Start Form
- Click Save Changes.
You are now back at the process flow. Notice that the Start Process step still shows the launch form as "Survey Form". We will change that now:
- Double-click the start step.
- Modify the step:
- Start Form - Start Form
- Click Save Changes.
- Click Save Process.
The Start Process step now shows the Start Form as the one and only entry in the list of forms that can launch the stream.
Learn More
Find out more about Child Tasks and Task Escalations in the online help system.
Take the Next Step
Congratulations! You've finished the process definition, and have learned a bit more about the capabilities of user tasks. At the next skill station, we will test the process and explore stream records.
