Welcome to Station 6 on the Vendor Onboarding Learning Line. At this station, we'll test the stream to see how it works. Along the way, we'll identify a small improvement and make it.
Learning Concepts at This Station:
Creating fake users
Creating a test record
Start the Test
Viewing the initial vendor form
Supplying vendor data
Viewing an internal task
Claiming the task
Releasing or reassigning the task
Viewing tasks by date
Completing the task
Creating Fake Users
To prepare for testing, the first step is to make sure that you or members of your testing-team are occupying the roles you plan to test.
For the Finance Team, that's easy to do, because you selected specific users. (You chose yourself and the "Test User" you created at station 3).
But for the other two roles, we used filters to select users who occupy that role. To test those roles, you'll need users who occupy those roles, as well.
For those teams, recall that we created filters that select reviewers based on their State field (the state they reside in). To make sure that you (or other testers) are in those roles:
- If the filter compares the user's State field to a hard-coded value like "CA" or "NY", make sure that your profile and the test user's profile specify the appropriate state.
- If the filter compares the user's State field to the vendor's State, make sure that the test record you create in the next step has the value that will match the users who fill the role.
If you have a team of people you're working with, each of you can occupy a different role. Or, if you're working solo, you can make sure that you are a participant in each of the roles. That advantage is that it is easy to test the system. The disadvantage is that your view of the system is always the same.
At this station, we'll use a real user -- yourself. And we'll test the Finance Team review process, because we know you are a participant in that role. But for rigorous testing, you'll want to create fake users.
Setting up fake users lets can log in as different people, so you can see how the view of the Pulpstream system changes, depending on who you are. That way you can be sure that each role sees the data they need to see, and no data they shouldn't see.
To create a fake user:
- Use a bogus email address to create a new user.
- Once the new user is created, change the email address to your own address.
Voila! You now have a different username and a different profile, but you'll still
see all of the emails intended for that user.
Creating a Test Record
To test the stream, we need a test record -- a form that is submitted to Pulpstream that will launch the process we created, so we can see how it works. It turns out that it is very easy to do that:
- Go to the stream definition.
- Above the Components pane, click the Gear icon to reveal the dropdown of choices.
- Select Create test record.
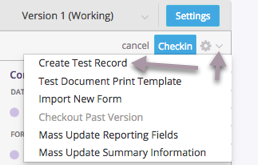
Pulpstream knows that the Onboarding Kickoff form is the one that launches the process, so it presents that form for you to fill out.
Start the Test
- Fill out the Onboarding Kickoff form:
- Vendor Name - Freight Flyer
- Primary Contact Email - provide an email address for an "external user"
Note:
The email address must not be associated with any existing Pulpstream user. If it is, the recipient of the email will see a login screen when they click the link in the email, instead of the registration form they are intended to see.
- Click Submit.
The process is launched.
View the Initial Vendor Form
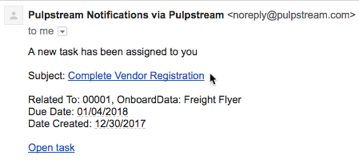
In a couple of minutes, three "Pulpstream Notification" emails arrive in your inbox, one from each of the subprocesses that was initiated when the main process was launched.

Open the first one -- the "Complete Vendor Registration" task. That email contains a link to the Pulpstream form that you (as the vendor) need to fill out. (It contains two links actually. One at the top and one at the bottom. Both go to the same place.)
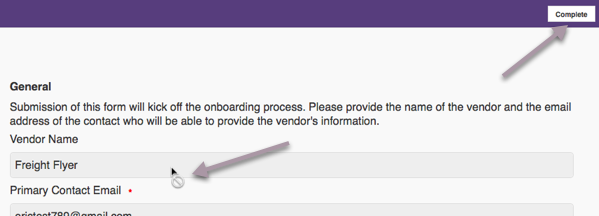
When you (as the vendor) click that link, you see the registration-kickoff form (because that is the way the process is designed, at the moment).
Note that:
- The fields in this form are not editable, as shown by the cursor when you hover over a field, and the fact that you can't click in it.
- Instead of displaying the "Cancel" and "Submit" buttons that were present when you were creating the vendor registration record, there is a "Complete" button for the Vendor to use when they are done.
- After a vendor clicks the "Complete" button, they go to the registration form where they will fill in data. (Reviewers will see "Approve" and "Reject" buttons. Those buttons signal Pulpstream to validate incoming data and, if everything is ok, take the next step.)
At this point, it is clear that the process could use some improvement. As an extra-credit assignment, consider creating a better welcome form for vendors:
- Create a new form: Vendor Registration Welcome, using the procedures you learned in Skill Station #2:
- Display only one field -- the vendor name.
- Above that field, add welcome-text and an explanation:
Welcome to the Acme vendor-onboarding process!
Reading this message is the first step in the process.
Click the "Complete" button to finish this step and begin adding your data.
- Open the Vendor Registration subprocess.
- Double-click the "Complete Vendor Registration" step to open it.
- Where it says, "Select a form to show record details to task assignee," chose the Vendor Registration Welcome form you just created.
- Note that you are required to choose a record display-form. "None" is not an option.
- The reason is that many tasks are completed in the system simply by clicking a button -- "Accept" or "Reject", or "Complete" to signal that some required action has been performed. It happens so often, in fact, that it is the default behavior of the system. (To supply data as part of task, you therefore need to click "Complete" to close the data-viewing form and go to the optional data-input form defined in the task step.)
- Create a new test record.
Clicking the link in the email now takes you to the new Welcome form.
Supplying Vendor Data
Once you click "Complete" in the record-detail display form, you go to the Vendor Registration input form, as defined in the process step.
In contrast to the task-completion form displayed earlier, this data-input form has two buttons, Save As Draft and Submit. That pair appears wherever data is being supplied, so a user can save work-in-progress when they need to.
![]()
When the form first appears, you are positioned in the initial tab -- in this case the General tab.
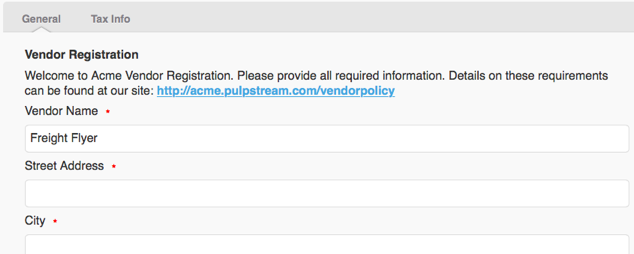
Note that the Vendor Name field (at the top) and the Email field (at the bottom) are already filled out. The data for those fields were supplied when the process was launched, and were stored in the data record for this stream instance (a fancy term that includes the data record, along with the status information that keeps track of the record's progress through the process defined for the stream).
Supply the required information in the General tab, then click the Tax Info tab and supply the data required there.
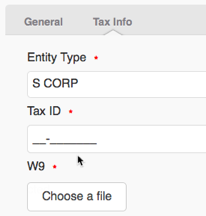
When you choose S Corp or C Corp, the Tax ID field appears. When you click in that field, you see the guidelines that help the user to enter data in the format specified for the field.
Note too, that when you upload a file, it can take a minute or so. While it is happening, the "Choose a file" button disappears. You'll know the upload is finished when the filename appears, along with the "Choose a file" button.
Extra-Credit Assignment #2:
When there are required fields on secondary tabs, as is the case here, it's a good idea to tell the user which tabs are required. (Pulpstream will reject the record when required data is missing, so no harm will be done. But it's easy for a user who is unfamiliar with the system to miss the additional tabs, so it's a good idea to point them out.)
Finally, click Submit to send the data to Pulpstream. The vendor's task is now done (for this subprocess, at least), and Pulpstream moves the record to the next step in its processing cycle.
Viewing an Internal Task
Once the vendor registration data has been submitted to the system, the process we defined creates a review task for the Finance Team. To see that part of the process in action, log in to Pulpstream and go to the Home page.
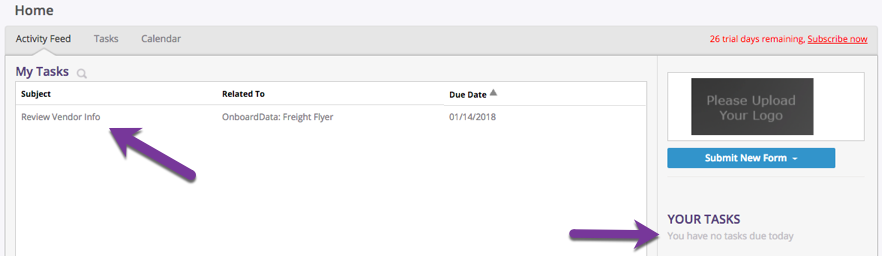
When you log in, you see the task listed under "My Tasks" at the left. It is there because you are a member of the Finance Team. That list shows tasks that are available, in addition to tasks you own. On the right, under "Your Tasks", the indication refers to the tasks you own. (It tells you how many are due today and/or the number that are overdue.)
Claiming the Task
To see the difference, click the task to open it. The task window appears. This is the view you see when you open an individual task.
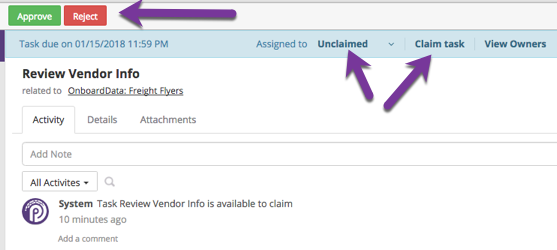
Since this is a review task, Approve and Reject buttons appear at the top, which would allow the task to be completed immediately. Since it is assigned to a role, there is also a status indicator that shows the task is currently "Unclaimed", along with a button that lets you claim it.
At the moment, the task is owned by everyone who occupies the designated role -- even though no one has as yet claimed it as their own. Clicking "View Owners" shows you who those users are.
At the moment, the task is unclaimed. Click the Claim button to claim it for yourself. Notice that the status-bar heading changes, showing you as the sole owner:
- Assigned to {Your Name}
Releasing or Reassigning the Task
Just because you own the task now doesn't mean you're stuck with it forever, however. If you click your name, a dropdown appears with two options:
- Release task
This option makes the task available once again to all members of the Finance Team. - Assign task to someone else...
This option lets you give the task to a different user or role.
Of course, the availability of these options is configurable at the admin level. We will avoid plumbing those depths in detail, though. Just know that such options are available and that someone in a supervisory role can reassign tasks that belong to members of their team.
Viewing Tasks by Type and Due Date
It is also worth noting at this point that when you click the dropdown under the Tasks tab, you can choose to view tasks of a particular type, or tasks that fall into a particular date range:
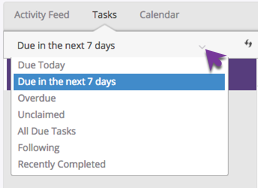
Most of the options are self explanatory: "Due Today", "Due in the next 7 days", "Overdue", "Unclaimed", "All Due Tasks", and "Recently Completed".
The one worth noting is "Following". That selection gives you status-at-a-glance for particular records whose progress you have chosen to follow.
Completing the Task
It is now time to review the data supplied by the vendor:
- In the review task, next to the Activity tab you're currently viewing, click the Details tab.
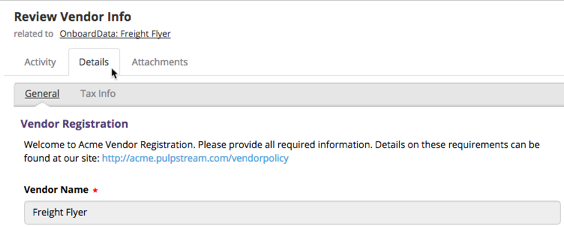
The Vendor Registration form appears. - In the General tab, review the vendor's address and contact information.
- In the Tax Info tab, review the vendor's Tax ID, and click on the uploaded "W9" document to view that.
- Most uploaded documents can be viewed onscreen, at this point.
- But if you happened to upload a document the system didn't recognize, it was first encapsulated into a Zip file, which was then uploaded.
- If the uploaded document can't be viewed directly, note that you can download it to your local system and inspect it there.
Learn More
In the online help system, see Managing Streams for more information on the many possible options for defining, collaborating on, and managing the streams you develop.
Take the Next Step
Congratulations! You have reached the next-to-last stop on the Vendor Onboarding Line! Next, learn about creating a master record for vendors, and why you might want to do that. But at this point, you've already learned most everything you need to know to begin building projects of your own!
So take a few minutes to breeze through the last stop on our tour, and then get ready to make your your business processes work more smoothly than they ever have before!
