Welcome to Station 4 on the Vendor Onboarding Learning Line. At this station, you'll start to define the business process that Acme Corp uses to bring a vendor on board.
Learning Concepts at This Station:
About processes
Launching a process
Defining a subprocess
Adding a user task as a process step
Adding a review task
Selecting a task distribution strategy
Connecting process steps
Adding a decision gateway to branch the process flow
Connecting gateway paths
Creating an email template
Capturing an event
Saving the subprocess
About Processes
A process is a series of steps that achieve a business goal. Steps can be automated, or they can be manual steps that require someone to take an action. When a step is completed, the process moves to the next step.
The process flow (the movement from step to step) can branch, depending on conditions, and it can loop back to an earlier step when needed. Subprocesses can also be defined, to keep the overall flow clear.
The process constructed in the stream definition is an abstract version of the process that depicts all possible flows. Each Pulpstream record, in addition to the data it contains, also contains the record’s process state—where it is in the process, what steps have been carried out, and what remains to be done.
You have seen the initial 2-step mini-process that was built for you when the you created a stream. It is now time to build out that process.
Launching a Process
To understand how a process is launched, let’s explore a bit.
- Go to the stream definition
- Notice the first step in the process definition, “Start Process”. That’s the start node.
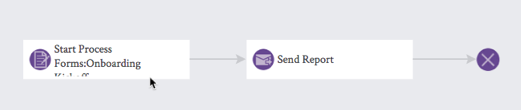
- Double click the start node to open it.
The “Process Properties” window opens. - You’ll notice that:
- The "Start Form" for the process is the “Onboarding Kickoff” form. The process is launched whenever that form is submitted to the Pulpstream system.
- The process could be launched by other forms, as well. You only need click “Add Form” to add one to the list. (You’ll work with that feature in the Vendor Invoice Approval Learning Line.)
Recall that in the Kickoff form we asked for the vendor name and the primary contact email address. (Revisit that form if you need to refresh your memory.)
When the form is received, we will be sending an email to the specified address, to tell the vendor what information is needed, and where to go to supply it. We’ll do that now, in a subprocess we create for the purpose.
Defining a Subprocess
At this point, we have defined the fields needed to track vendor information, and the forms needed to supply that information and review it. Now we need to set up three subprocesses that can run in parallel:
- Review of vendor registration data when the registration form is received.
- Review of vendors' Health and Safety qualifications when the certificate is received.
- Review of their Environmental Compliance when that certificate is received.
Defining subprocesses will help to keep the main flow comprehensible, because it will all fit on a page. It will also make it easier to revise a subprocess, when it needs to change, without having to edit some huge process that has everything in it.
Perhaps most importantly, once you've built the initial subprocess, you'll be able to clone it, making a copy you can modify to build other subprocesses.
When each of the subprocesses has been completed, the main process will conclude by notifying the vendor that they have been brought on board. But let's start by building the first subprocess.
- Close the "Process Properties" window, if it is open.
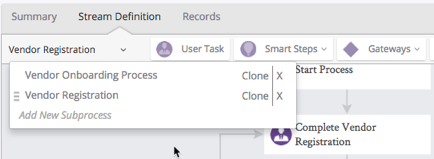
You are now back at the stream definition, viewing the process flow and the components. - At the top of the flow definition, you'll see buttons for steps you can add to the flow (for example, you could add a "User Task" step). Just to the left of those buttons is a drop down menu that display the process name: "Vendor Onboarding Process". Click that dropdown to open it.
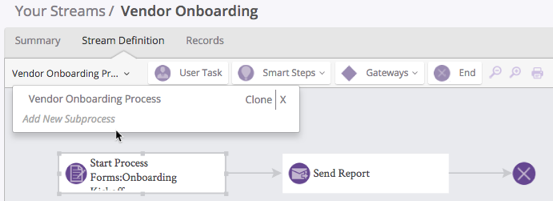
- Notice that a "Clone" operation is available here. (We'll use that feature later to make copies of the subprocess we're about to create.)
- Right now, click Add New Subprocess.
The "Process Properties" window opens again, this time with blank fields. Fill them out as follows:- Process Name - Vendor Registration
- Allow Manual Start - No
When this option is enabled, Pulpstream adds a button to the record detail page that a user can click to launch the subprocess. (For an example, see the Inspection learning line.) We won't we be using that capability here, so uncheck this option.
- Click Save Changes.
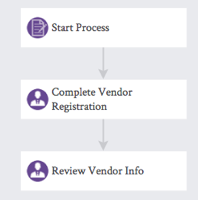
You're now looking at a process flow that has a start node and nothing else. Meanwhile, the button above the Components listing now says "Save Sub Process".
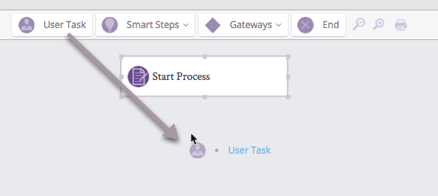
Adding a User Task as a Process Step
A task is an action item that is assigned to someone. A task can be assigned manually, or it can be assigned automatically in a process flow. It can be assigned to an individual user in the system, or sent to an email address. Tasks can also be assigned to a collection of users who are participants in a Role.
Here, you'll add a user task to the subprocess:
- We will build this flow so it runs down the page, so start by dragging the start node to the top center of the canvas.
- Next, drag the "User Task" step onto the canvas and drop it under the start node.
- The "User task" dialog opens. Fill it in with this data:
- Task Subject - Complete Vendor Registration
This is the name of the task. - Select an optional form ... to fill... - Vendor Registration Form
- When the task is assigned to the primary vendor contact, they will use the specified form to provide registration data.
- Next, give the vendor 5 business days to complete the task:
- When will this task be due... - ... in days specified here
- Enter a number - 5
- Task Subject - Complete Vendor Registration
- Up to now, we have been in the first tab associated with the User Task, the "General" tab.
Next, go to the Assignment tab and fill out the assignment options:- Assign task to - Email Address present in a Field
Note that there are many ways to assign a task. This is one of the strengths of the Pulpstream system. In this case, you're assigning the task to an external vendor, who will be able to directly interact with the form you provide. (Bu they won't have any other access to the system, unless you give it to them.)- (Field) - Primary Contact Email
Note that the one email field defined in the stream record is the only option available for you to choose. (So it's hard to go wrong!)
- (Field) - Primary Contact Email
- Assign task to - Email Address present in a Field
- Nothing else in this form needs to change, but let's take a moment to examine the options we're accepting:
- Allow delegation of this task - Yes.
If the recipient wants to pass the task on to someone else, they can. - Send task assignment notification email - Yes
This part is critical. That's how the prospective vendor is notified that there is something they need to do, and how they get the link to the form they need to fill in. - Action button available to task assignee - Complete.
When the vendor finishes filling in the form, the have a single button to click to submit the form to the system, after which Pulpstream takes the next step in the process flow. (Reviewers, on the other hand, will have two buttons to choose from, like Accept/Reject.)
- Allow delegation of this task - Yes.
- Click Save Changes.
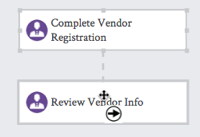
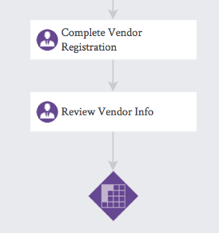
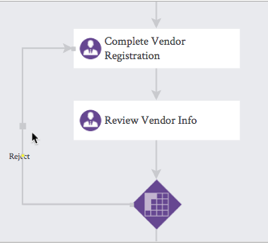
The process flow now shows two steps "Start Process" and "Complete Vendor Registration".
Adding a Review Task
The next step in the process is to review the incoming data. That's similar to what you just did, so we'll create that node now. (In a moment, we'll come back and connect the nodes together to create the flow.)
- Drag another "User Task" step onto the canvas, under the node you just created.
- General
- Task Subject - Review Vendor Info
- Select a form to show record details... - Vendor Registration Form
To see the data the vendor has submitted, the reviewer can use the same form the vendor used to supply the data. - Optional Form that Assignee is Required to Fill... - None
Recall that people who review certifications will need to put in certificate expiration dates. But the people who review the financial details don't have additional data to add, so they don't need a form to complete the task. Instead, they'll simply see buttons they can use to approve or reject the submission. - When will this task be due... - ... in days specified here
- Enter a number - 5
The Finance Team will have 5 days to review the data after the task is assigned.
- Assignment
- Assign task to - Assign to Role
- (Role) - Finance Team
- Assign task to - Assign to Role
- General
Selecting a Task Distribution Strategy
The review task you're creating has been assigned to a role, which means that there are multiple people who could carry out the task. Pulpstream gives you several ways to do that:
- Open to all assignees - The task is seen by all Role participants. It is displayed as "Unclaimed". When one of the participants claims it, it is no longer seen by others (unless or until it is reassigned or released).
- Assign using round-robin format - Role participants are assigned new tasks in turn, one after the other.
- Assignee with minimum number of tasks - The task is assigned to the participant with the smallest number of open tasks.
Here, we'll use the default option, "Open to all assignees".
Finish Creating the Review Task
- Finish defining the review task by making sure that the reviewers can either approve or reject the submission, by giving them two action buttons:
- Action buttons available... - Approve/Reject
- Click Save Changes.
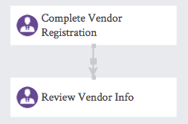
The process flow now shows the three process steps you have defined.
Next, we'll connect them together.
Connecting Process Steps
It's time to start connecting the steps into a coherent process.
- Start by dragging the steps so they line up vertically.
Notice that dotted guidelines appear when things are in alignment.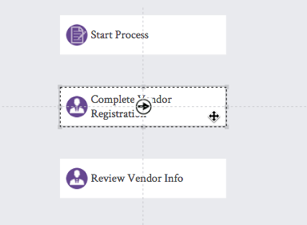
- Notice, too, that when the cursor is over a node, an arrow-in-a-circle icon appears. That is the connector icon. To connect two steps, drag it to the next step in the process and drop it there.
- A dotted line appears while you're dragging.
- When you drop the icon, the line becomes a solid arrow.
- A dotted line appears while you're dragging.
- Now connect the start node to make it part of the flow.
Adding a Decision Gateway to Branch the Process Flow
Okay. Things are about to get interesting. You now have a flow that goes up to the point where a reviewer chooses to Accept or Reject the submission. At this point, the flow needs a branch, to "do the right thing" in each case. In Pulpstream, the branch-point is called a Decision Gateway. (They can get pretty complex. But we'll keep it simple.)
- At the top of the canvas, click the Gateways dropdown to reveal the possible choices.
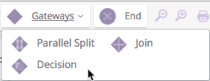
- Choose Decision and drag it onto the canvas, below the last step.
- Fill out the "Decision Matrix" dialog that appears:
- Title - Review Decision
- Use previous task outcome - Yes
- "Previous" here means any task that came earlier in the process flow. It does not necessarily mean the task that immediately precedes the gateway (although that situation is typical).
- The other option ("Decision Matrix") lets you specify a true matrix of conditional comparisons, taking one of several branches, depending on the results.
- User Task - Review Vendor Info
- Here, you select one of the user tasks that came earlier in the flow.
- The review task is the one you want, since that task has two possible results.
- Click Save Changes.
The Decision Gateway icon appears in the canvas. - Position the icon so it is centered below the other steps, with a bit of space around it, and connect the review task to it.
Connecting Gateway Paths
- Drag an End step into the canvas, below the Gateway.
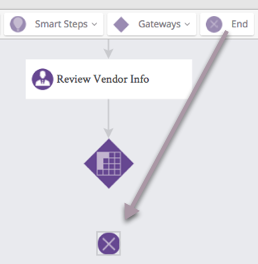
- Connect the gateway to the end-icon. When you drop the connector icon on the destination, a new Connector dialog appears. In that dialog, you select which gateway result applies to the path you're creating.
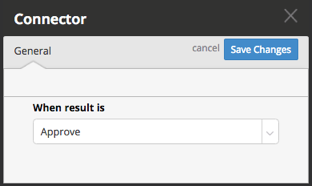
In this case, the basis of the gateway as an Approve/Reject task, so the choices are approve and reject. - Select Approve (the default) and click Save Changes.
The subprocess now terminates when a member of the Finance Team approves the vendor's registration.
That just leaves the matter of what happens when a submission is rejected. We'll do that now.
- From the gateway, drag the connector icon up to the "Complete Vendor Registration" task.
For a rejection, we want to go back to the first task in the process, where the vendor is asked to supply information. - This time, when the Connector dialog appears, the default result-value is Reject.
That is the only possible choice, at this point, because Pulpstream is keeping track of which result-values are possible, and which ones have already been used. - Click Save Changes.
A new arrow is drawn between the gateway and the task.
That arrow is going straight up, over the existing downward flows, so at the moment, it's hard to to see. But we can fix that.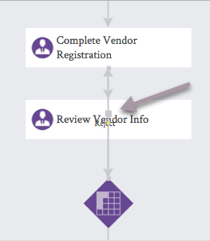
- Notice that there is a square in the middle of the last line you drew -- or any arrow you select. You can drag that square elsewhere on the canvas to reroute that arrow. In this case, drag the square to the left, so the arrow is routed around the tasks that make up the main flow of the subprocess.
- At this point, the complete process flow has been defined. There are still a couple of things to do, but now is a good time to click Save Sub Process, to save your changes.
Creating an Email Template
The subprocess now terminates when the vendor's registration data is approved, and it goes back to the vendor-submission step when the data is rejected. But in that case, we want to send a message to the vendor, to let them know what happened.
To do that, the process will need to capture the rejection event, and we'll need an email template we can use for the message. We'll start by defining a generic template we can use for all rejection-messages. After that we'll finish up the subprocess definition by capturing the event.
To create an email template:
- In the Components pane, scroll down to the Email Templates section.
- Hover over the heading and click New.
The "Add Email Template" dialog appears. - Fill out the initial fields in the dialog:
- Title - Information Reject
- Who is Sender - Specify Here
Other options are to use an email field in the record or send it on behalf of the record submitter. But in this case we want to specify the sender right here, in the template:- From Name - Acme Vendor Management
- From Address - acme_vendor@acme.pulpstream.com
- Subject -
The supplied information could not be accepted in step - $!task.subject- Note that when you click the magnifier icon, you can choose from a variety of fields.
- In the case, the field was in the Task tab (the record that accompanies the task, and that keeps track of task state). Choosing the Subject field provides the identifier for that field (
$!task.subject). - For the Vendor Registration subprocess, the subject of the task in question will be "Review Vendor Info" -- because that is the task whose event we will be capturing. (For other subprocesses, the task will have a different name.)
- Body of the message.
Copy it from here then, for practice, use the magnifier icon to find the fields that are in it:- Dear $OnboardData.Vendor_Name,
Thank you for supplying your information. However, our review has found the following issues:
$task.completionComments
You will receive another email, so you can resubmit the requested information.
Regards,
Acme Vendor Onboarding
- Dear $OnboardData.Vendor_Name,
- Note that the template works because, when a reviewer rejects a submission, Pulpstream allows the reviewer to add comments that explain why. Those comments are stored in the task record, and can then be inserted into the email that goes out to the vendor.
- Scroll to the bottom of the dialog and click Save Changes.
Capturing an Event
The email template is ready to send. Now we need to capture the event that triggers it.
- In the subprocess definition, double-click the Review Vendor Info task to open it.
- Go to the Event Actions tab. That's where we'll tell Pulpstream to send an email when the rejection-event occurs.
- Choose the following options:
- Event - Task Completed
- Completion Action - Rejected
- This option appears when you choose the "Task Completed" event type.
- Pulpstream knows there are several ways to complete the action, and lets you choose the ones you're interested in.
- Here, we want to take action when the reviewer has rejected the submission.
- Event Condition - Always
- Notice that when an event occurs, you can add additional conditions that determine whether or not it triggers an action. (The action occurs only if all conditions are met.)
- Here, we don't want to add any extra conditions, so we take the default, "Always".
- Event Actions - Send Email
- Several actions are possible. Here, we want to send an email.
- Use template - Information Reject
- Recipients - Use Email Address present in a Field
- (field) - Primary Contact Email
- (address type) - To
- Note that you could also choose Cc or Bcc are also choices, and that you can add multiple recipients.
- Note, too, that you could click "Add Actions" to take additional actions when an event occurs.
- Click Save Changes to save the event-handling settings for the task.
You are now back at the process-definition canvas. - Click Save Sub Process to save your modification to the subprocess definition.
- Notice the process-selector dropdown at the top left of the canvas now shows your subprocess along with the original process, and that each of them can be cloned. (You'll take advantage of that feature as you build the remaining subprocesses.)
Learn More
To learn more about subprocesses, see the Subprocesses page in the Help system.
Take the Next Step
At this point, you've done most of the work that needs to be done. You've created the fields and forms, and have created your first end-to-end process flow. Next, we'll finish up the process definition -- which won't take very long at all, given what you've already done.
