Welcome to Station 5 on the Vendor Onboarding Learning Line. At this station, we'll create additional subprocesses by cloning the one you created in Station 4, and we'll create the overall business process that ties them all together and lets them run in parallel.
Learning Concepts at This Station:
Cloning a process definition
Creating parallel flows
Cloning a Process Definition
We'll start by making a copy (a "clone") of the Vendor Registration subprocess you created at the last station:
- Go the Vendor Onboarding stream definition.
- Click the process-selector dropdown at top left of the canvas.
- Next to the Vendor Registration subprocess, click Clone.
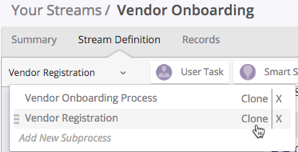
- The Clone Process dialog opens.
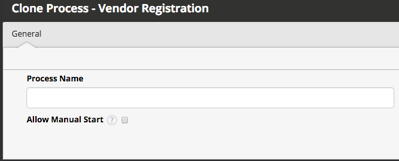
- Provide name for the new subprocess:
- Name - Safety Certificate Process
- Click Save Changes.
You're now looking at a clone of the process you defined earlier. (It looks the same, but the name that appears in the process selector at top left is different.)
The general outline of the process flow is correct, of course, but now we need to change some of the details:
- Double-click the Complete Vendor Registration step and make the following changes:
- Subject - Supply Health and Safety Certificate
- Select an optional form that assignee... - Health and Safety Certificate
- That is the form the vendor will use to supply the certificate
- Click Save Changes.
- Double-click the Review Vendor Info step and make these changes:
- Select a form to show record details... - Health and Safety Certificate
- To see the data the vendor entered, the reviewer uses the same form the vendor used.
- Select an optional form that assignee will be required to fill... -
Health and Safety Certificate Review- For this subprocess, we select the form the reviewer will use to supply the certificate expiration date.
- Select a form to show record details... - Health and Safety Certificate
- Go to the Assignments tab.
- Change the role for the task assignment to the Safety Team.
- Click Save Changes.
- In the process-definition canvas, click Save Sub Process.
That's all there was to it! In a few short steps, you created an entire new process from the one you had before.
Repeat the steps to create the last subprocess we need to bring a vendor onboard:
- Clone the Vendor Registration subprocess:
- Name - Environmental Certificate Process
- Save Changes.
- Modify the Complete Vendor Registration task.
- Subject - Supply Environmental Certificate
- Select an optional form that assignee... - Environmental Certificate
- Save Changes.
- Modify the Review Vendor Info task:
- Select a form to show record details... - Environmental Certificate
- Select an optional form that assignee will be required to fill... -
Environmental Certificate Review
- Modify the Assignments:
- Change the task-assignment role to the Environmental Compliance Team.
- Save Changes.
- Save Sub Process.
That's it. All of the subprocesses are now defined. Next, we'll use them as part of an overall process flow that lets the subprocesses run in parallel.
Creating Parallel Flows
When a new vendor is coming on board, the certificates they need to do business could still be in the works. When they're available, the prospective vendor will need to submit them. But to make they can provide information as it becomes available, we're going to set up the main process flow so that each of the subprocesses runs in parallel.
- Start by going back to the main process definition, Vendor Onboarding Process.
- Delete the Send Report step:
- Click on the step to select it.
- Press the Delete key.
- Delete the End step (the circle with the large "X" in it).
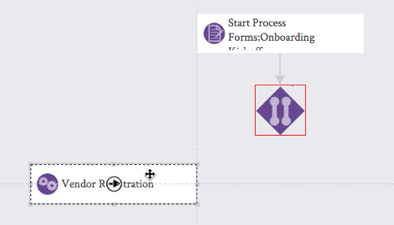
- Move the Start Process step to the center of the canvas, near the top.
- Open the Gateways dropdown and drag a Parallel Split gateway onto the canvas below the start step.
- Connect the Start Process step to the Parallel Split.
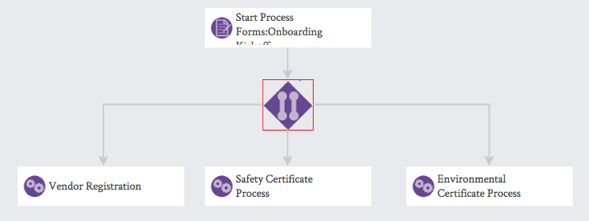
- Open the Smart Steps dropdown and drag a Call Subprocess step onto the canvas.
- Note that there are many "smart steps" to choose from. Together, they provide powerful processing capabilities, including the ability to launch a process defined in another stream by creating a record in it.
- In the dialog that opens, choose the Vendor Registration subprocess.

- Save Changes.
- The process definition canvas reappears. We'll have three subprocesses to connect to, so drag this subprocess to left of center, below the Parallel Split Gateway.
- In the diagram, the right edge of the subprocess is aligned with the left edge of the start step. But you'll want it be a little left of that, to leave room for the next subprocess.
- Connect the Parallel Split gateway to the subprocess.
- You can't create the next Call Subprocess step until you do.
- Repeat the previous steps to create the Call Subprocess step for the Safety Certificate Process.
- Put this one in the middle of the canvas.
- Repeat them again to create the Call Subprocess step for the Environmental Certificate Process.
- This one goes to the right.
- You now have the Start Process step connected to the Parallel Split, which is in turn connected to the 3 subprocesses that will run in parallel.
The finish the process definition, we next need to join the flows together and put in the end step.
To do that:
- Open the Gateways dropdown and drag a Join gateway onto the canvas, below everything else, and connect each of the subprocesses to it.
- Drag an End step to the bottom of the canvas and connect the Join gateway to it.
- Click Save Process.
The entire process is now defined.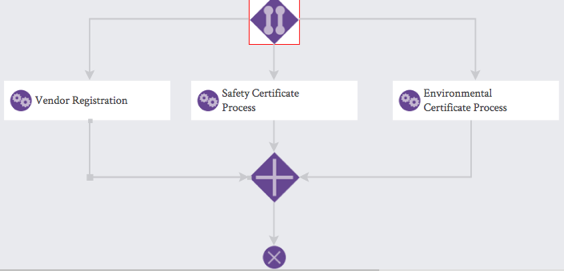
Learn More
There is a lot you can do with process definitions.
- To learn more about Parallel Splits and Decision gateways, see Process Gateways and Endpoints in the Help system.
- To learn more about Smart Steps, see the Process Definition page in the Help system.
Take the Next Step
Congratulations! The hard work is behind you. You're now ready to test the stream you created.
