Learning Concepts at This Skill Station:
Linking employee records in Smart Objects to forms
Routing requests to employee managers for approval
Directing requests back after an error
Video Tutorial:
Now that we have a form with proper validations, we are ready to enhance our Stream.
Today we will configure 3 things:
- Using an employee number entered on a form to link it to the correct employee record that is present in a Smart Object
- If there is no matching employee found, the request will be sent back to the submitter with the prompt to resubmit with the correct employee number
- Route the request to the employee’s manager for approval
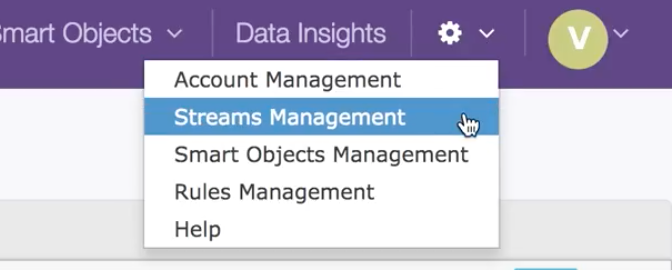
Go to your Streams Management dashboard. As you know by now, click on the gear icon by your profile photo. Select Streams Management in the pull-down.
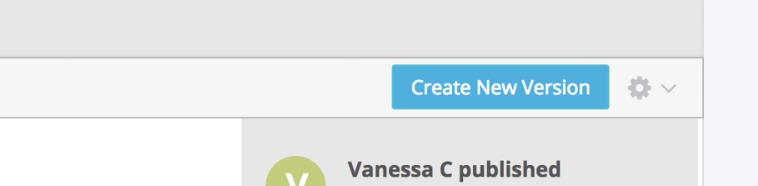
Select your Stream. On the Stream Summary tab, create a new version of our Leave of Absence stream.
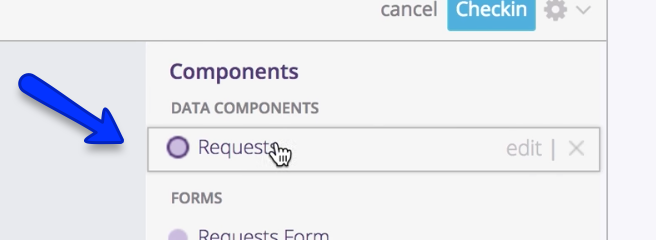
Currently we have an employee number field in our Request Data Component, but there is no Smart Object field that points to the Employee object and links the request to the employee record. Let's start today by opening the Request Data Component and creating a new field that is of the type Smart Object. Open your Requests Data Components Catalog. Click the name of the component to open it.
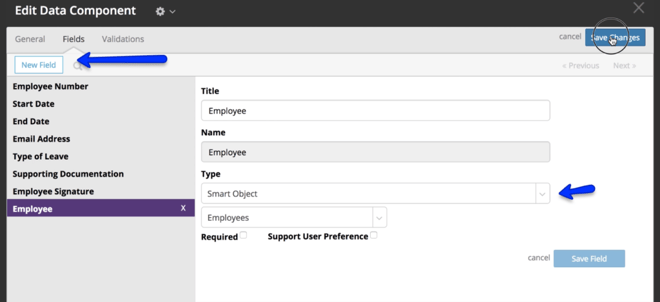
In the Edit Data Component popup, go to the Fields tab. Create a new field. Give the new field a title of “Employee.” The name autopopulates. In the type pull-down menu, we will select “Smart Object” to tell Pulpstream that this field will contain this type of information. In the pull-down menu below, select the “Employees” Smart Object we created at Skill Station 1.
Save your changes to the Data Component.
Next we are going to rearrange our stream. Delete the step called “Send Report.” Drag the end and start steps to reorganize the stream so that it flows vertically. Next, we will configure the new Employees field. It will never appear in the request form. We will link the request to the employee record in the background.
Remember from Skill Station 1 that we made the Employee Number be the Record Key of the Smart Object. We will use this now. We know that if we have an employee number, we can get corresponding employee information, because the employee number is a key of that Smart Object. Let’s create an Update Step field to do this linking for us.
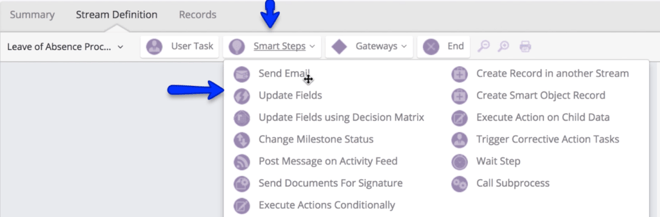
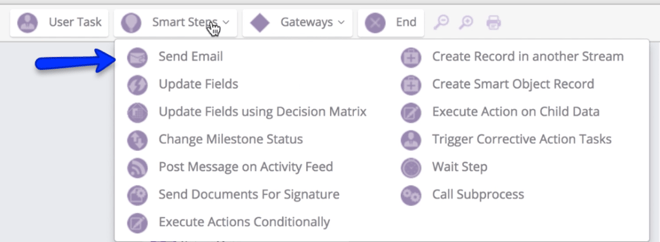
In your Stream Definition Canvas options, find the Smart Steps. Click on that to open your options menu. Select the “Update Field” step and drag it into your canvas.
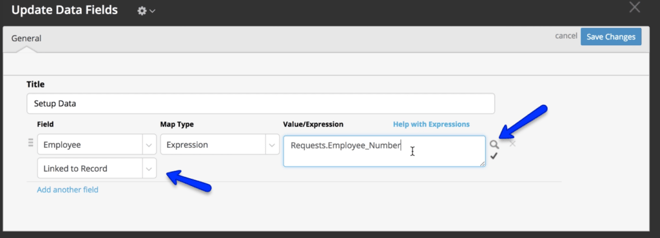
In the Update Data Fields configuration popup window, we shall begin to do this. Give the step a title. We will title it “Setup Data.” In the field pull-down menu, select the field we recently created, which is called “Employee.” Since Employee is a Smart Object field, it will immediately display all the fields that are available inside the Employee Record that you may want to update, such as “Leave Accrued” or “Contact information.” That is not our goal right now. But it is good to know. We want to set this field value to point to the employee record. For this there is a special option in the pull-down menu, called “Linked to Record.” Select that. This option is used when you want to set a Smart Object field so it points to a specific record.
We have a few options in the type menu: Literal means that we can type anything into the field to the right of this map type. For example, if I write 101, it will convey to the system that this will set the employee field to employee record 101. We want to set this to the employee whose employee number is the same as the employee number entered on the leave of absence request form. Set the map type to be “expression.”
Find the employee number with the merge field value finder tool That’s accessible in the magnifying glass icon. Select “Employee Number” in the pull-down menu to accomplish this. Copy that merge field value. Paste it into the expression box.
Save the step.
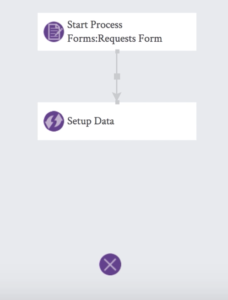
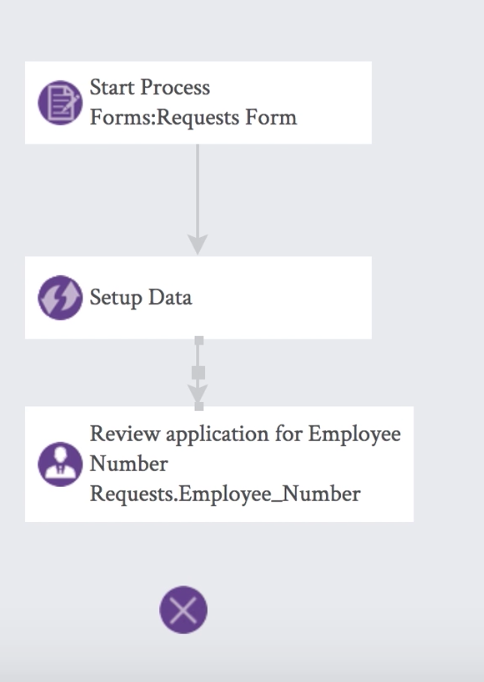
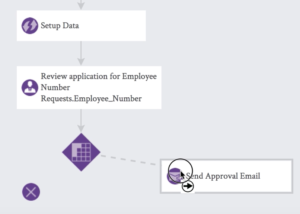
It now appears as a step under your Start Process forms step. Connect it to our Setup Data step. Hover your mouse over the step to reveal the connector arrow. Click on that and drag it to a step to connect the two.
Now that we have a link to the Employee Record, we want to send the task to an employee manager for approval or rejection of their request.
In the Stream Definition Canvas options, find and drag a “User Task” onto your canvas.

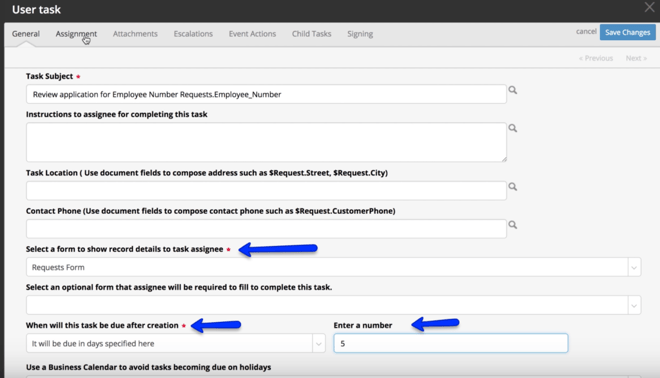
We will give this task a subject that will be dynamically generated, such as “Review application for Employee Number.” To do this, type in the first part. Then we will use the merge field value finder tool to find the value for the employee number. Click on the magnifying glass icon to do that.
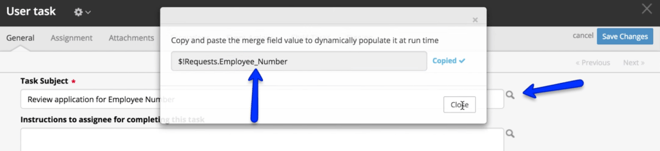
Copy it and paste it into the task subject field.
Scroll down and see that the system has automatically selected the form that will show the record details to task assignee. It is the “Request Form.” Since the manager will only need to approve or reject the request, they will not need to complete a form. We will learn more about this at the next Skill Station. So leave the Select an optional form that assignee will be required to complete this task field blank. In the When will task be due after creation pull-down menu, select “It will be due in the days specified here.” We will enter a number to tell Pulpstream how many days. We’ll give them 5 days.
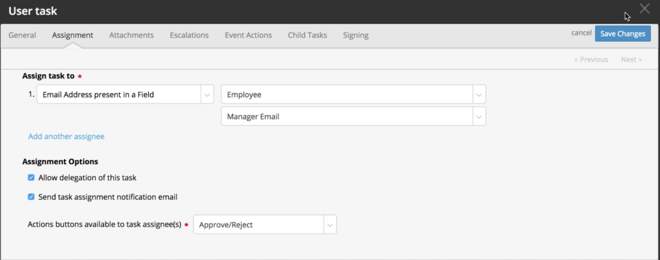
Next we will move to the Assignment tab to determine who owns this task. Let's send the task to the employee’s manager. When we created the Employee Smart Object, we entered a manager email address. So, on this tab we will assign the task to the email address present in that employee record field. Select that in the Assign to pull-down menu. To the right click on this pull-down menu to reveal all the fields that are of the type Email Address, as well as the Smart Object fields. We are interested in the manager email address field that’s present in the Employee Smart Object. So choose the “Employee” field.
When you do this, the system immediately makes all the fields available in the Employee Smart Object available in a pull-down menu under that. Select the “Manager Email” option. This tells the system to assign the task to the email address present in the manager email field in the corresponding employee record.
Next we will provide the outcome options that will be available to the manager. In our use case, we will give it two options: Approve or Reject. Under Assignment Options in the Action Buttons available to task assignees pull-down menu, choose “Approve/Reject” to accomplish this.
Your Assignment tab should look like this:
Save changes to the task.
Back on your Stream Definition Canvas, connect the Setup Data step to the Review Application user task step we just configured. Hover your mouse over it to reveal the connector line creator arrow. Drag that from step to step to connect them.
Next we need to find out if the manager approved or rejected the request. If they approved it, we want to send the person who requested leave an email to notify them. If they rejected it, we want to give the requester an opportunity to fix the request. To do this, let’s drag a Decision step onto the canvas. This step is in your Gateways options. Find the Decision gateway and drag it down into the canvas.

We will title this decision matrix “Decide on Manager Action.” Tell the system that you want to use the outcomes of the previous task to make this decision. Do that by checking the radio button by the words use previous task outcome. Under that, in the User Task pull-down menu, select the “Review Application for Employee Number” step we just created.
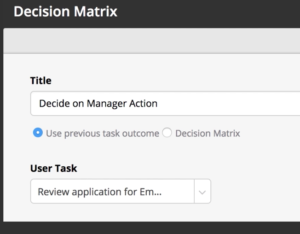
Save your changes to the Decision step.
Back on your Stream Definition Canvas, connect the Review Application step to the decision step. There will be 2 connector options available in this decision box.
1) Request approved
2) Request Rejected
We are wanting to send an email notification when the request is approved. In the Stream Definition Canvas options, find Smart Steps. Click on that. Find the Send Email step and drag it down on to the canvas.
In the Send Email step configuration popup, give the step a title “Send Approval Email.” We don’t have a proper email template for this yet, so we will use the “Record Creation Email” template for now. We will create this email template later. The recipient will be the “Record Submitter,” so choose that from the pull-down menu. We want to send the email to the manager as well. Underneath that, click on the “add another recipient” text. Another recipient row will appear. In that second Recipient Type pull-down menu, select “Email Address present in a field.” To the right of that, select “Employee.” Under that in the pull-down select “Manager Email.”
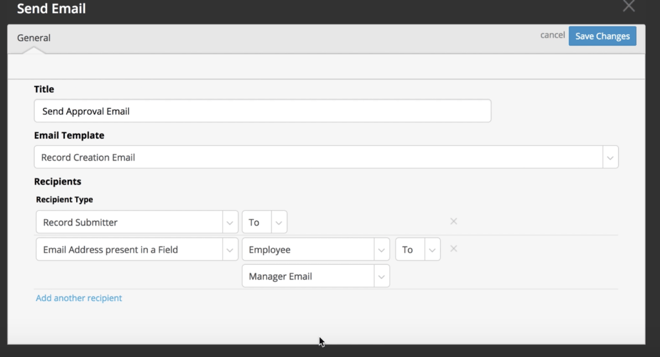
Save the changes to the step.
Now in your stream, connect the decision step to the Send Approval Email step. Hover your mouse on the step to reveal the connector arrow. Drag it over to the next step.
In the connector configuration popup, tell the decision to send the flow that way when the result is “Approve.” Choose that in the pull-down menu.
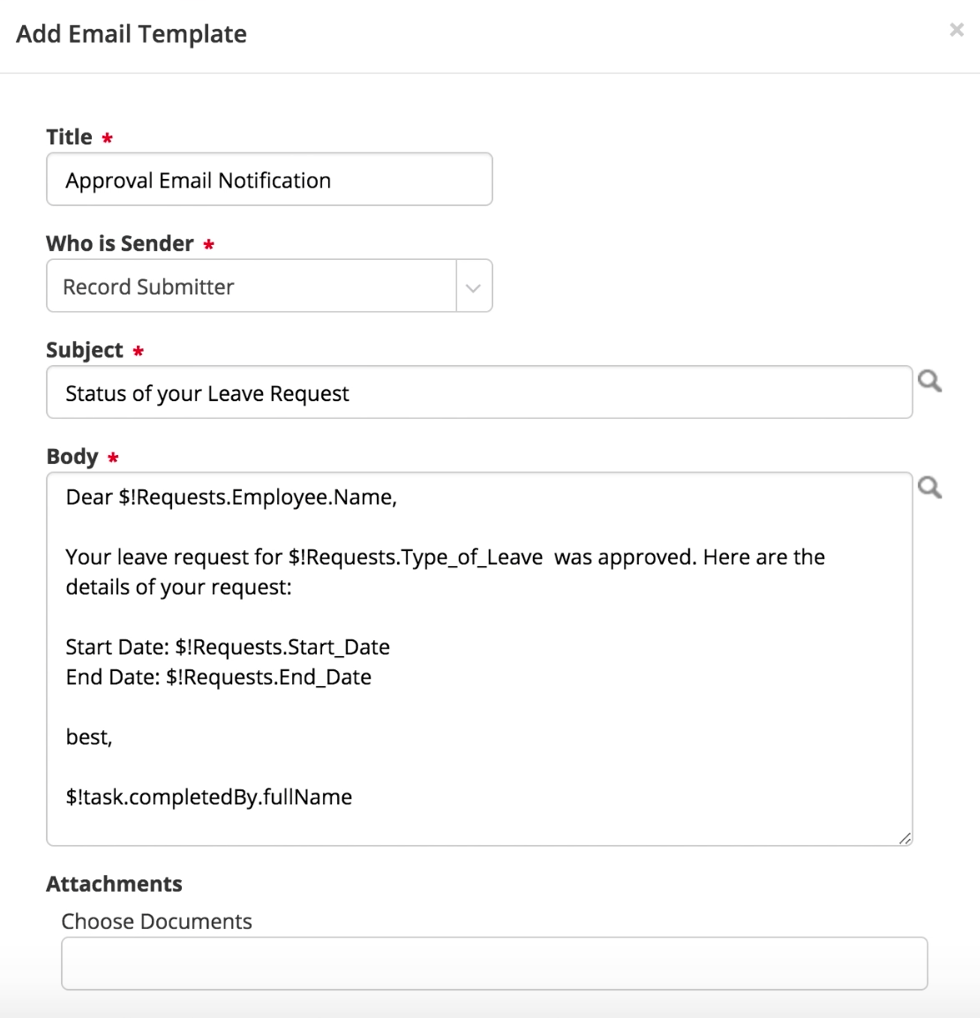
Next we need to create an email approval template and add it to the Send Approval Email step. Create this on your own.
When you’re done, your email template should look like this:
Let’s go back to your Stream Definition Canvas, drag an end step onto the canvas. Connect the Send Approval Email to it, to conclude the workflow.
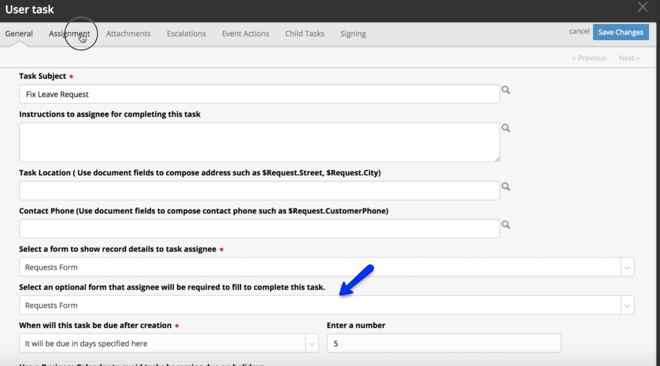
Next, we will configure a User Task Step that gives the person requesting leave a chance to fix the request when the supervisor rejects the request. In the canvas options, find the User TAsk step. Drag it onto the canvas. In the User task configuration popup, give it a Task Subject of “Fix Leave Request.”
The select a form to show record details to task assignee pull-down menu, will have the Request Form selected. Under that in the Select an optional form that assignee will be required to complete this task section, select “Request Form.” This will require the user to complete this form to correct information. Give the employee 5 days to complete this.
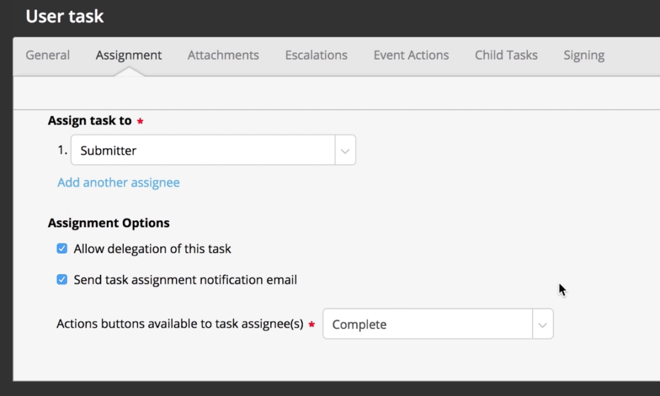
Let’s move onto the Assignment tab. We will assign the task to the “Submitter.” Choose that in the pull-down menu. Under assignment options, make sure both boxes are checked. The only outcomes that will be available will be “Complete” so choose that in the Action buttons available...pull-down menu. Save your changes.
Back on the Stream Definition Canvas, let's connect the steps.
When the person requesting leave fixes, or modifies, the leave request, it should go back to the Setup Data step. Connect the decision gateway to the Fix Leave Request step. Select the condition of “Reject” to guide the flow this way in that condition. Connect the Fix Leave Request step to the Setup Data step. Save your process.
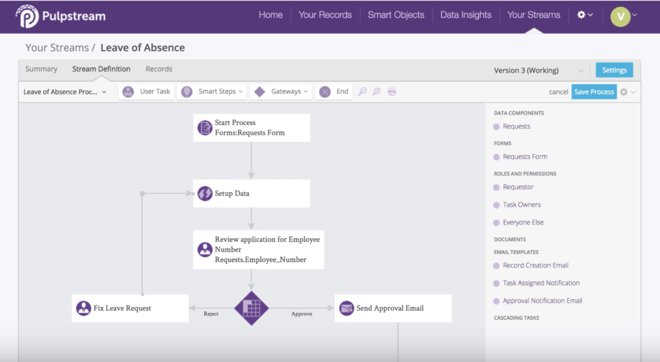
Your work stream should look like this:
This is a great time to check in and publish the first version of our Leave of Absence Management Stream.
Press that check in button. Type some comments for the change logs. Click the publish button.
Note: When you publish a Work Stream, you need to declare what people will be using this form for. In the Form pull-down menu, choose “Request Form.” Give it a title such as “Leave Request.” Add a description, such as “Use this form to request a leave of absence.” You can organize the form into a catalog folder. Create one called HR processes if you’d like to do that.
You can always edit these later by going to the summary tab of Your Streams and accessing the option through the gear icon. Select “Edit Published Information” from that pull-down menu to accomplish this.
This is how your configurations will manifest in the catalog.
Now that we’ve enhanced the Stream, it’s time to test it. Submit a request for a leave of absence. Remember to make sure that the employee number that you use in the request is one that is present in an employee record.
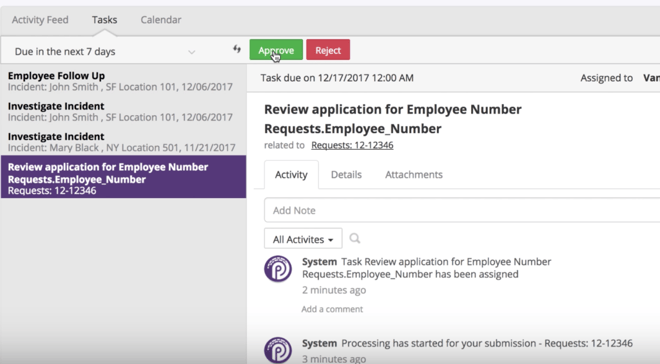
The manager you specified will receive an email after the request form is submitted.
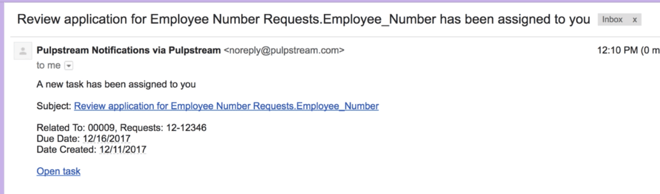
Clicking on the link will open the employee’s request record. In the subsequent landing page that populates, you will see the action buttons on the top right corner of the screen. The manager can either Approve or Reject the request.
Thus concludes our visit to this Skill Station. At the next Skill Station we will learn how to dynamically determine due dates and escalate approval requests to a higher level supervisor.
