Learning Concepts at This Station:
Using the update fields step
Configuring a decision matrix
Executing actions conditionally
Video Tutorial:
At a previous Skill Station, we created a Work Stream with which a person can request a leave of absence. We configured it so that the person who reviews it for approval has 5 days to accomplish that. (You can see this by opening the Review Application task, looking at the General tab, and reviewing the when the task will be due after creation field.)
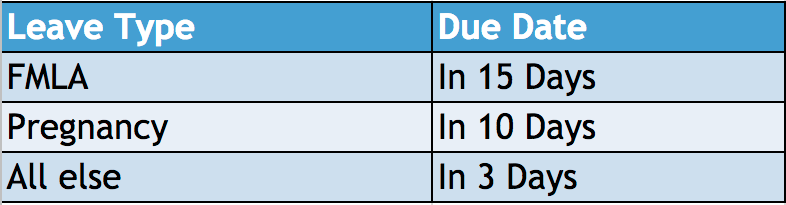
What if the due date needs to be based upon the type of leave that’s being requested? For example, a corporate policy could be that a maternity or paternity leave request would get 10 days for review and approval. Here is an sample leave of absence review and approval policy:
Also, what if the start date of the leave is before the date derived from the type of leave request? In that case, the due date should be one day before the leave start date. To equip our work stream to handle these situations we will use a new step: Update field using Decision Matrix.
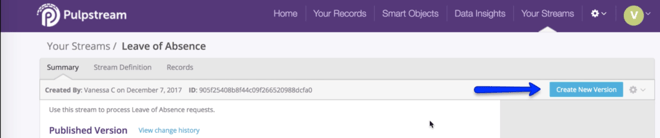
Let’s start by creating a new version of the stream. Go to your Stream Summary.

Create a new version of the stream.
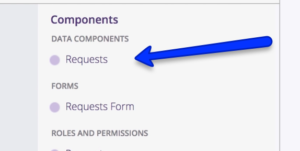
Next let's edit the Request Data Component. Hover your mouse over it to reveal the edit function. Click on it to open it.
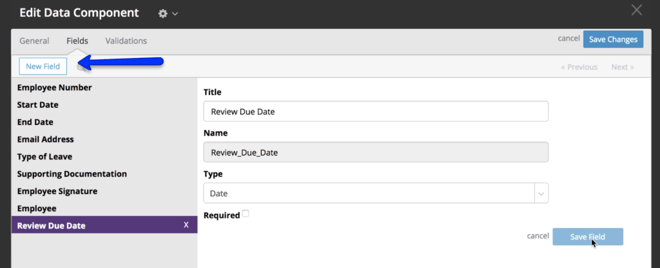
Since we will be deriving the review period based the due dates, we need a field in which to store the due date. On the Fields tab, click the New Field button to create a new field. Title it “Review Due Date.” The name autopopulates as usual. The Type of information in this field will be “Date,” so select that in the pull-down menu. When you are done it should look like this:
Save the field. Save the changes to the Data Component.
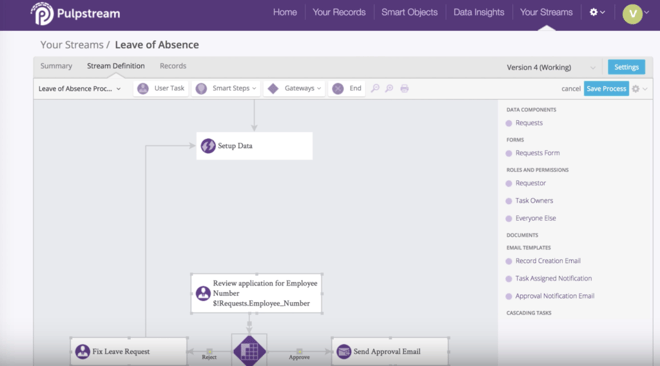
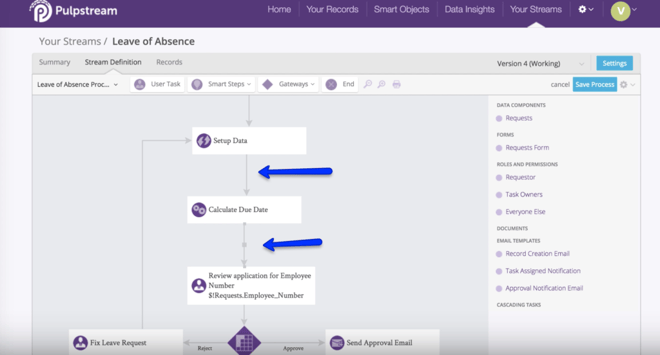
On your Stream Definition Canvas, remove the connector in between the Setup Data step and the Review Application step. Highlight all the steps below the Setup Data Step and move them down to create space for additional steps.
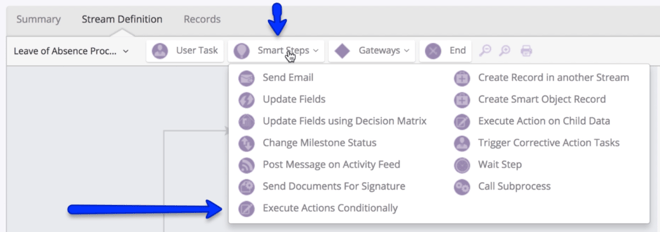
We will use a Smart Step to conditionally execute actions. In the canvas options menu, click on “Smart Steps” to reveal your options. Find the “Execute Actions Conditionally” step. Drag that down onto your canvas.
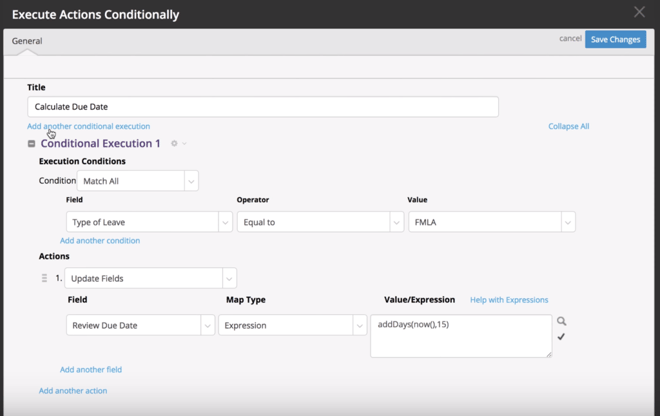
In the configuration popup, title it “Calculate Due Date.” Under the Execution Conditions, choose “Match All” in the condition pull-down menu, as the criteria for the first condition.
Remember that these are the corporate policies that we will use to configure these:
Our first condition is if the leave type is FMLA. In the field, choose “Type of Leave.” The operator will be “Equal To.” The Value will be FMLA.
Let’s move on to the Actions section. When the leave type is FMLA, we want the Review Due Date to be 15 days from today’s date. Choose “Update Fields” in the Actions pull-down menu.
Underneath that, in the first field, select “Review Due Date” in the pull-down menu. The Map Type will be Expression. We will use an expression to find the date that is 15 days from now. Create an Expression to do that. We will use the add days function: addDays(now(),15) Specify the days by including that within the inputs of the addDays function, but outside of the now function. When you are done your execution condition should look like this:
If you need help with expressions or a reminder of which ones are available to you, click on the Help with Expressions text above the Value/Expression box..
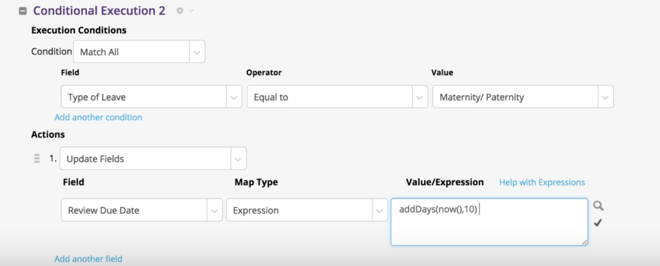
Next, Add another condition. Create a condition to handle the Pregnancy due date policy. It is due in 10 days.
The Execution Condition will be” Match All.” The Field will be “Type of Leave. The Operator will be “Equal to.” The value will be “Pregnancy” or Maternity/ Paternity, as you specified in your Smart Object.
The Action will be 1. Update fields. Select “Review Due Date” under the Field title. The Map Type will be “Expression.” The Value/Expression will be the same as before, but now we specify that we will give the person 10 days to review it by modifying the second parameter in the function. Eg AddDays(now(),10)
When you are done your conditional execution should look like this:
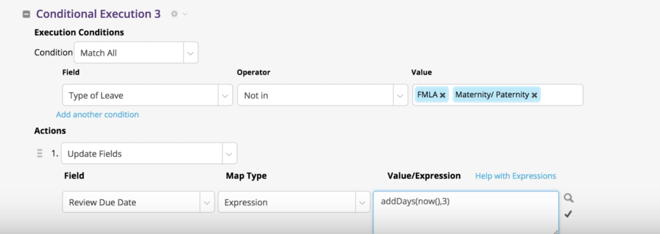
Next add one more Conditional Execution to handle other types of leave requests. The Condition will be “Match All.” The Field will be “Type of Leave.” The Operator will be “Not in. The value will be FMLA and Pregnancy. Type those in. The Action will be 1. Update fields. Select “Review Due Date” under the Field title. The Map Type will be “Expression.” The Value/Expression will be the same as before, but now we specify that we will give the person 3 days to review it by modifying the second parameter in the function. Eg AddDays(now(),3) When you are done it should look like this:
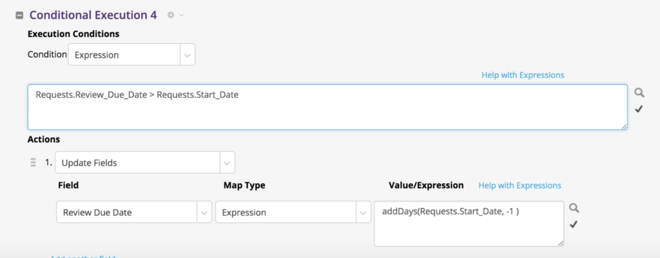
Now in the last scenario, where we had to determine if the review due date was greater than the start date, the due date should be one day before the start date. To handle this, we will need to add one more execution condition. This time, choose the Condition “Expression” from the pull-down menu. We will derive the due date by subtracting one day from the Start Date. Let’s configure this.
The Action will be 1. Update fields. Select “Review Due Date” under the Field title. The Map Type will be “Expression.” In the Value/Expression write a new expression with the AddDays() function. Use the value finder tool to the right of the box to find the request start date. Copy the value into the parenthesis to use that as a parameter for the function. Make the second parameter -1. It should look like this: AddDays(Request.Start_Date,-1)
This conditional execution should look like this on your screen:
We now have 4 execution conditions. Save the step.
Back on the Stream Definition Canvas, connect this Calculate Due Date step to the Setup Date Step and the Review Task step. Hover your mouse over the step to reveal the connector line creator creator. Click on it and drag it to the next step to connect it.
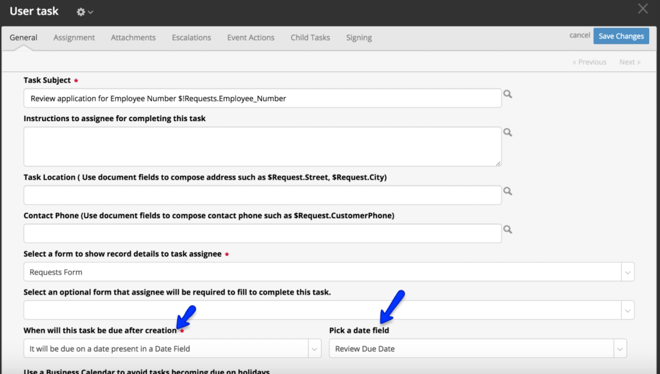
Next let’s edit the Review Step. Double click on it to open it. In the general tab, in the bottom of the screen find the when will this task be due after creation pull-down menu. Change that to make it due on a date present in a date field. In the Pick a date field, we will select “Review Due Date.”
Save the task. Save the process (the work stream).
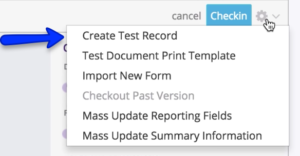
At this point, you can create a test record if you like. From the Stream Definition Canvas click on the gear icon and select “Create Test Record” in the pull-down menu.
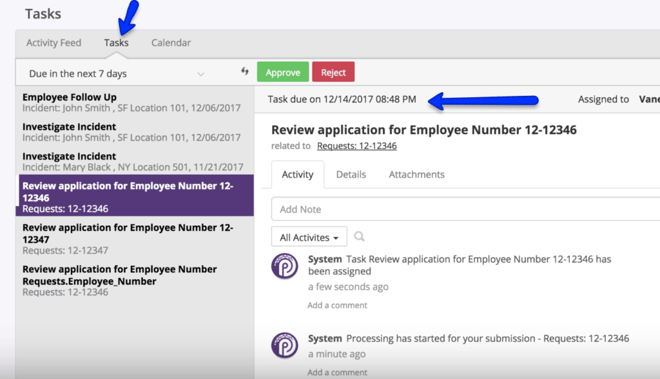
After you’ve initiated a new request and submitted it, you will be able to see how the “Due date” is derived by going to Your Records, and clicking on the your tasks.
Thus concludes our visit to this Skill Station. At the next Skill Station we will learn how to autocheck employee leave balances.
