We have learned how to build a digital work stream to process inspections, generate reports about the results of those inspections, and automatically send them to stakeholders. We also learned how to future-proof those reports. At this Skill Station, we will learn how to trigger corrective actions to resolve things that are out of compliance.
Learning Concepts in this Skill Station:
Triggering corrective actions
Configuring escalation conditions
Assigning ownership
Setting due dates
Automating reminders
Testing edits to a work stream
Video Tutorial:
Triggering corrective actions
Start by unlocking the Inspection work stream that we built at the last Skill Station. Go to Your Streams and unlock the latest version of your work stream.
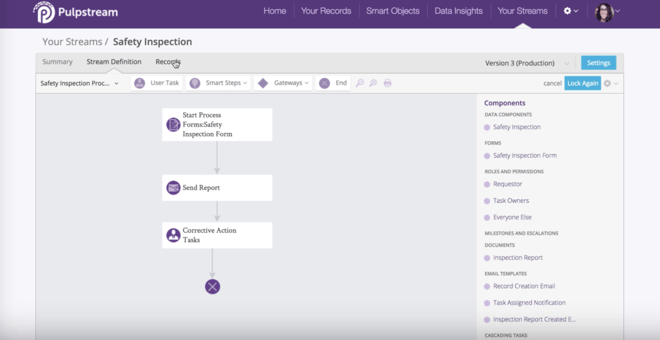
Remove the connector line between the Send Report component and the End Step. Do that by pressing the delete button on your keyboard.
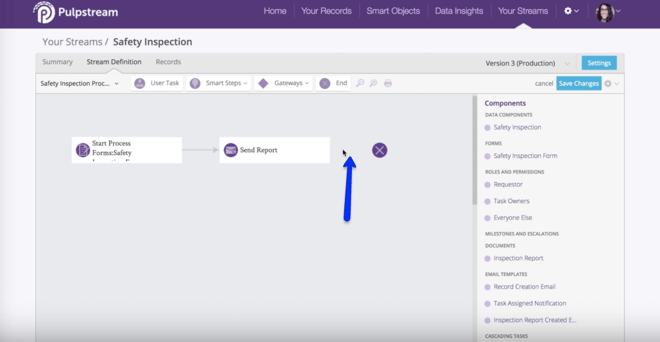
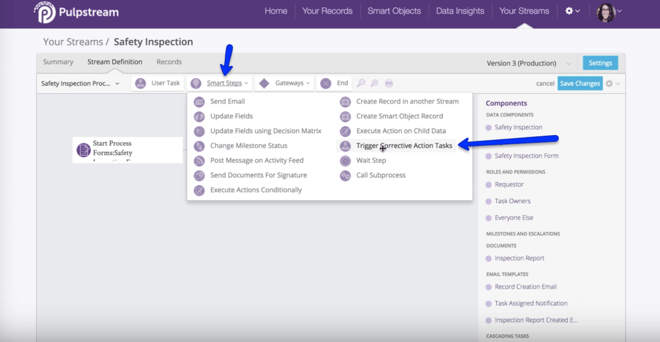
In your Stream Definition canvas navigation menu, you will see a Smart Steps pull-down menu. Click on that to reveal new steps you can use to customize your work stream. Drag the one called “Trigger Corrective Action Tasks” onto your canvas.
Configuring escalation conditions and assigning ownership
In the Trigger Corrective Action Tasks configuration popup, look at the General tab. You will see fields that allow you to set a due date and assign tasks to someone. The Assigned To drop-down menu has a few options worth discussion.
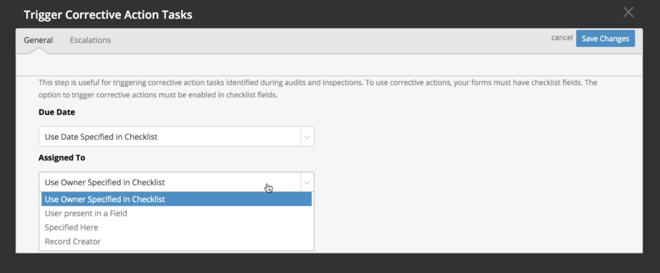
Use date specified in checklist - This option will use whatever duration was specified for a specific corrective action in a the checklist form.
Use owner specified in a checklist - This option will send the task to an owner that was specified in a checklist.
User present in a field - If you plan to always send corrective actions to the same person, this is a good option for you. You can create a user field on your Inspection Data component and put it on your form.
Specified here - This hard codes the person who will always own corrective action tasks. ie
Add their name here, and the corrective action will always be assigned to that person.
Record creator - Use this option to always request action from the person who created the inspection record
For our purposes today we will select: “use date specified in checklist” and “Use owner specified in checklist.”
Automating reminders
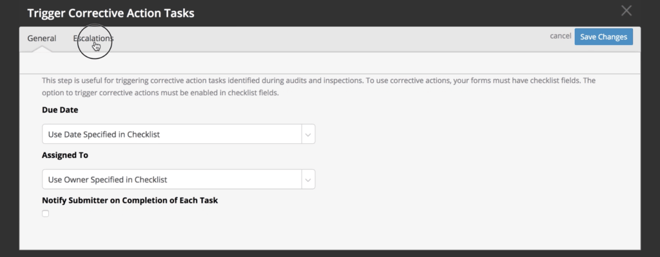
After someone in the field completes a task, more often than not, someone else in your organization will need to review it. Let's configure the workflow to escalate a task to the next level.
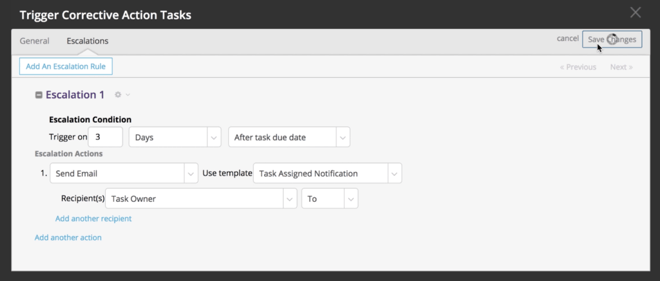
Click on the Escalations tab. This is where we will declare the conditions that will send reminders based on due dates. We want to automatically email the person who needs to take action to correct something that was not in compliance. Create a condition that triggers a reminder 3 days after the task due date. Set an escalation action that emails the task owner. Use the Task Assigned Notification Email template. It should look like this:
Save your changes and go back to your Stream Definition Canvas. Now connect the Send Report step in your work stream to the Corrective Actions Task step. Hover your mouse over the step to reveal the connector generation arrow. Click on that arrow and drag it onto the other step to connect the two. Connect the Corrective Tasks step to the End Step. (That’s the purple dot with the x on it. )
Rearrange the flow of the stream if you like. Lock the stream again.
Testing edits to a work stream
We’ve edited the work stream. Now we need to test our changes. Click on the Stream Records tab.
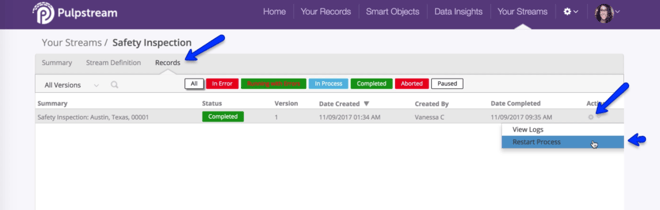
This screen shows you all the versions of your work streams, who created them, and when. You’ll also see color-coded alerts that tell you if the stream has errors or not. On the right side of the screen, there is a gear icon under the word Action. Click on the gear, click "Restart Process." That will restart the work record.
You can see how adding that step to the stream altered the it in few ways. If you’re working from a desktop computer you can:
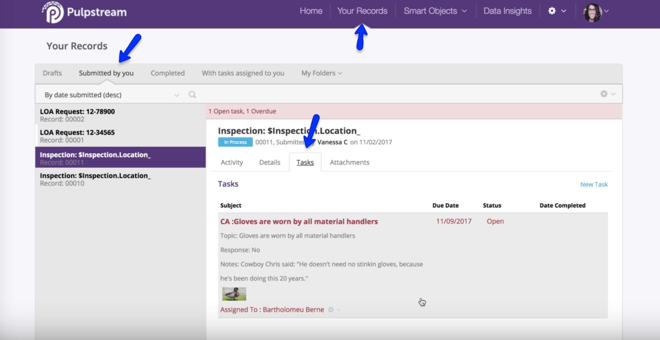
Go to Your Records to see the change in the step of work you are in within the work stream. Click on Submitted by You. In the Activity bar atop the record, you will notice that the status color indicator is blue, which means it’s In Process. On the Tasks tab, you can see who it has been assigned to. Find notes, due dates, and details there.
If you’re looking at the mobile app, you can see the changes in Your Tasks. A consolidated list of corrective actions will be sent to each owner via email.
That’s all for this Skill Station. At the next Skill Station, we will learn how to assign quality scores to quantitatively measure performance.
