Welcome to the 2nd stop on the Contract Management learning line. At this skill station, we will begin to define the process associated with the stream.
When an employee of Acme prepares a contract for a customer, we always want it to be reviewed by the employee's supervisor in this case study. Additional reviews may be needed as well, depending on how large the contract is and where the customer is located.
At this skill station, we will create a task for the initial review by employee's supervisor. We will then process the outcomes of that review, and do the preliminary work needed to implement a decision matrix that designates additional reviewers.
Learning Concepts at this Station:
Sample Decision Criteria
Adding a Rollup Field
Rollup Fields vs. Compute Fields
Adding an Enumeration Field
Adding an Email Field
Modifying the Start Form
About Processes
Creating a Review Task
About "Supervisors"
Connecting Process Steps
Adding a Decision Gateway to Branch Process Flow
Creating an Email Template
About Task Meta Data
Capturing an Event
Checkin Changes and Publish the Stream
Launching the stream from the Home Page
Sample Decision Criteria
In this case study, we assume that the supervisor of the person who submitted the contract always reviews it, before it is sent to the customer. But additional reviews may be needed, depending on the size of the contract and where the customer is located.
Here is a sample set of decision criteria we will use for this case study:
| Total Value | Continent | Additional Approver |
| 0 – 10,000 | Any | None |
| 10,001 – 100,000 | North America | john@acme.com |
| 10,001 – 100,000 | Europe | mary@acme.com |
| 10,001 – 100,000 | Other | tom@acme.com |
| 100,001 – 500,000 | Any | mary@acme.com |
| 500,001 onwards | Any | cfo@acme.com |
It is clear at this point that for any contract we need to know its total value and the customer's location. We will also need a field to hold the email address of the additional reviewer appropriate for the contract.
Let's call those fields:
- Total Value (a rollup sum of the line items in the contract)
- Additional Approver (an email field)
- Customer Continent (an enumeration field with choices "North America", "Europe", or "Other")
Having clarified the decisions we need to make and the additional fields we need to add, we start this skill station by adding those fields, and then modify the stream process to initiate the supervisor's review.
The stream would actually be usable at the end of this skill station -- because the supervisor will have enough information to know when additional reviews are required. (The only thing missing would the email address of the additional reviewer -- but of course the supervisor could easily figure out who it should be.)
At the next skill station we will finish automating the process definition by implementing the decision matrix -- automatically filling in the email address and creating a review task for that individual, thereby making sure that all required reviews take place.
Adding a Rollup Field
- If you're not already at the stream definition, start by clicking the gear icon next your name.
- From the dropdown menu, choose Streams Management.
- From the Your Streams list, click the Contract Management stream.
- From the summary page, go to the Stream Definition tab.
- In the components list, click on the Contract data component, to edit it.
- In the Fields tab, click New Field:
- Title - Total Value
- Type - Rollup
- Data Component - Line Items
Here, you choose any stream data component other than Contract.
(There is of course only one.)
- When you choose the data component, a new set of choices appear. The first choice is for the kind of rollup-function you want to use on the line items. The choices are:
- Sum - the default. Add up values from the line-item records.
- Max - the maximum (largest) value in the line-item records.
- Min - the minimum (smallest) value in those records.
- Avg - An average of line-item values.
- Count - the number of line-item records
- Here, you want to add up the line-item values, so choose Sum.
- You now an additional choice -- the field to sum. Choose Total.
The formula value calculated in the line-item "Total" fields will now be added together and stored in the Contract record.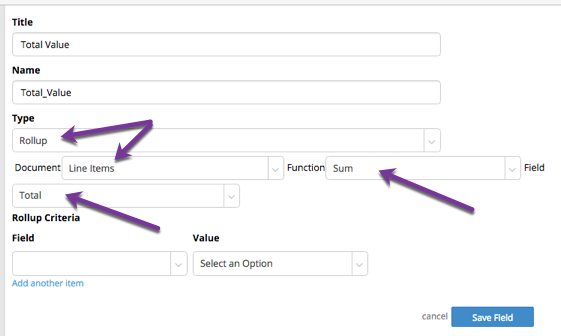
- Note that it is also possible to specify criteria to select the records that participate in the Rollup. We don't need that feature here, but it can be useful when there are different types of records in the child-data list.
- At the bottom of the Data Component dialog, click Save Field.
The new field appears in the list at left, and we are ready to add the next field we need.
Rollup Fields vs. Compute Fields
You will have noticed that the Rollup field is a duplicate of the "Compute" field we created for line-items in the Contract form. The difference is that the value shown in the form isn't actually stored anywhere -- and in this case we need the total value stored so we can use it in our decision matrix.
In addition, you have seen that a Rollup Field lets us calculate a variety of different values, in addition to a Sum. And while there can be only one Çompute field for a child-data list, we can define as many Rollup fields as we like.
On the other hand, it is often helpful to have a continually-update Compute field in a form. That field is updated in the user's browser, so it is always accurate. A Rollup field, on the other hand, isn't updated until the record is stored on the server. (For that very reason, Rollup fields are not generally displayed in any form that can be edited.
Adding an Enumeration Field
- In the Contract data component, click the Fields tab.
- Under the tab, click New Field.
- Create an enumeration field for the customer's location:
- Title - Customer Continent
- Type - Enumeration (Choices)
- Fill in the labels for the choices. (The values default to the same text, which is fine when the labels are short, and the values don't need to be numeric.)
- Label - North America
- Add another choice. Label - Europe
- Add another choice. Label - Other
You have now defined an enumeration field with the possible choices.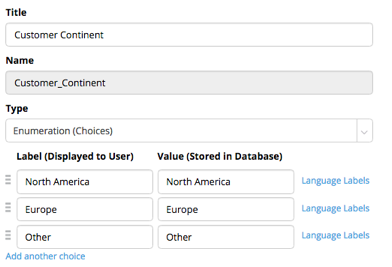
- At the bottom of the window, click Save Field.
The enumeration field is added. It appears in the list at left.
Adding an Email Field
For the last field we need to add to the data component is the email address for an additional reviewer, when required:
- Click Add another field and create a field for the contact's email address:
- Title - Additional Approver
- Name - (default)
- Type - Email
- At the bottom of the Data Component dialog, click Save Field.
The new field appears in the list at left. - At top of the dialog, click Save Changes.
The new fields are stored on the Pulpstream server, and you are back at the stream definition.
Later, we will define a process step that assigns a review task to the email address stored in this field.
Modifying the Start Form
Of the three new fields we have added, one needs to become part of the Contract form that initiates the stream.
The Rollup field doesn't need to be shown because that value is calculated, and because the Compute field does a better job of displaying it in a form. The email address for an additional reviewer doesn't need to be shown, because we will be setting that value later.
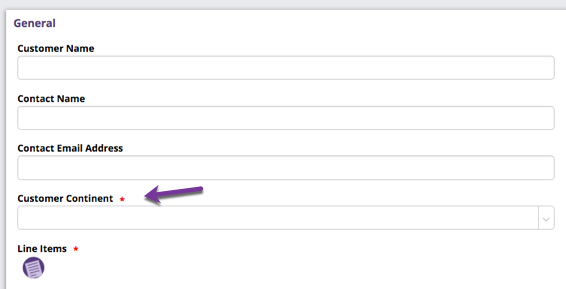
But the customer's location does need to be shown, so it can be specified when a new contract is created. To do that:
- In the stream components list, click Contract Form to edit it.
- Drag the Customer Continent field onto the form canvas, just above the Line Items field.
- In the Field Attributes, mark it Required.
- At the bottom of the dialog, click Save Changes.
The field appears in form. - If the field isn't exactly where you want it, drag it into position.
- At the top of the form canvas, click Save Changes.
- In the Save Form dialog, click Save Changes.
Your modifications are now stored on the Pulpstream server.
It's time to begin working on the process definition.
About Processes
A process is a series of steps that achieve a business goal. Steps can be automated, or they can be manual steps that require someone to take an action. When a step is completed, the process moves to the next step.
The process flow (the movement from step to step) can branch, depending on conditions, and it can loop back to an earlier step when needed. Subprocesses can also be defined, to keep the overall flow clear.
The process constructed in the stream definition is an abstract version of the process that depicts all possible flows. Each Pulpstream record, in addition to the data it contains, also contains the record’s process state—where it is in the process, what steps have been carried out, and what remains to be done.
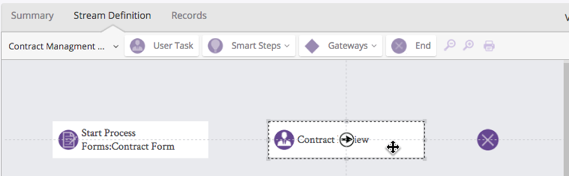
You have seen the initial 2-step mini-process that was built for you when the you created a stream. It is now time to build out that process.
Creating a Review Task
A task is an action item that is assigned to someone. A task can be assigned manually, or it can be assigned automatically in a process flow. It can be assigned to an individual user in the system, or sent to an email address. Tasks can also be assigned to a collection of users who are participants in a Role (one of the stream components that can be defined).
Here, you'll add a user task as a process step. The task will send the contract to the supervisor of the person who submitted the contract, for review:
- In the process definition canvas, click on the Send Report step to select it.
- You could also double-click to examine it. You'll see that it is configured by default to send you (the submitter) an email whenever you create a record.
- Then press the Delete key to remove it from the process flow.
- We will build this flow so it runs down the page, so start by dragging the start node to the top center of the canvas.
- Next, drag the "User Task" step onto the canvas, between start and end nodes.
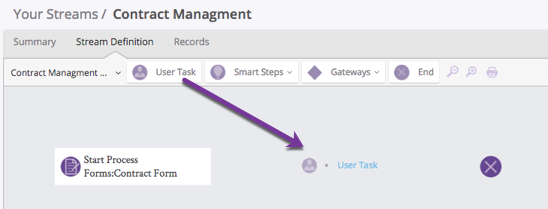
- The "User task" dialog opens. Give it a title:
- Task Subject - Contract Review
In the Instructions to assignee... field, we want to identify the total value of the contract. To do that :
- Add the text - Contract Value:
- Click the magnifier icon to the right of the field.
- Select the Total Value field.
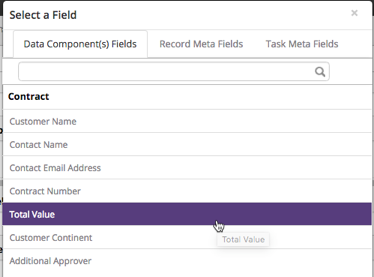
- A dialog appears that shows you the format of the field variable.

- Click in that field to copy the variable to the clipboard.
- Close the dialog.
- Paste the variable into the Instructions field.
The field now reads: Contract Value: $!Contract.Total_Value - At the bottom of the form:
- When will this task be due ... - ... in days specified here
- Enter a number - 2
In the middle of the screen, the default form that was selected to show record details to the supervisor is the Contract Form -- the same one the submitter used to provide the information.
We could also specify an optional form ... to complete the task. If we wanted to record the supervisors approval, for example, we could add a field in which they enter their initials, and give them a form that displays that field.
The point, of course, is that there a lot of options! But what we have so far is fine. There is just one thing left to do -- we need to assign the review task to someone!
If you click "Save Changes" in fact, you will immediately be brought to the Assignment tab, with an error message that tells you to assign the task. Let's set that value now:
- Go to the Assignment tab.
- For Assign task to, select Supervisor of submitter.
That choice directs the task to the user's designated supervisor -- a setting which is maintained by the system admin. - For Action buttons available to task assignees, choose Approve/Reject.
- At the top of the User task dialog, click Save Changes.
The task is created. It appears in the process-definition canvas.
About "Supervisors"
When a user is added to Pulpstream, a user record is created. That record contains a Supervisor field that (in a large system), points to another Pulpstream user. The value in that field is specified by the system admin when the user-record is created.
As a trial-account user, your user record won't have a value specified in that field. So when the process sends the contract out for review, who does it go to?
In this case, since you are the stream owner (the person who created the stream and maintains it), you will automatically get the email for any user who's"supervisor" field is empty.
That behavior is a basically fail-safe mechanism to ensure that messages aren't sent out into the void. But in this case it means that when you create a test record, everything will work exactly the way you want it to, for your test.
Connecting Process Steps
- In the process diagram, start by dragging the steps so they line up and are spaced evenly. Notice that the cursor changes to a four-way arrow, and that dotted guidelines appear when things are aligned.
- Hover over the Start Process step to display the arrow-in-a-circle icon that is used to draw a connection-arrow.

- Drag that icon to the Contract Review step until that step is highlighted with a solid border.

- Drop the icon to establish the process-flow connection.
The connector is drawn. The box in the middle and the dots at either end indicate that it is currently selected.
Note:
At this point, it is not possible to save the process, because it is missing the final connection. In general, that is a good thing, as it prevents invalid processes from being stored. On the other hand, it is also nice to be able to save your work! If you wanted to save at this point, the workaround is to connect the Review step to the end node, save the process, then click on the connector to select it and press the Delete key to remove it. It's not something you necessarily have to do at this point -- just something worth knowing.
Adding a Decision Gateway to Branch Process Flow
You now have a flow that goes up to the point where a reviewer chooses to Accept or Reject the submission. At this point, the flow needs a branch, to "do the right thing" in each case. In Pulpstream, the branch-point is called a Decision Gateway. (They can get pretty complex. But in this case study, we'll keep it simple.)
- At the top of the canvas, click the Gateways dropdown to reveal the possible choices.
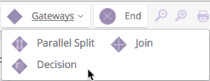
- Choose Decision and drag it onto the canvas, below the Review step.
- Fill out the "Decision Matrix" dialog that appears:
- Title - Supervisor Decision
- Use previous task outcome - Yes
- "Previous" here means any task that came earlier in the process flow. It does not necessarily mean the task that immediately precedes the gateway (although that situation is typical).
- The other option ("Decision Matrix") lets you specify a true matrix of conditional comparisons, taking one of several branches, depending on the results.(That's where complex behaviors can be specified.)
- User Task - Contract Review
- Here, you select one of the user tasks that came earlier in the flow.
- The review task is the one you want, since that task has two possible results.
- Click Save Changes.
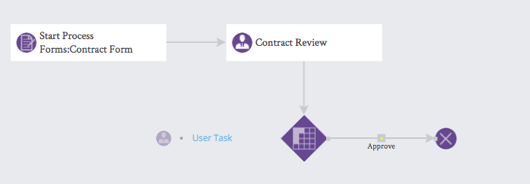
The Decision Gateway icon appears in the canvas. - Position the icon so it is centered below the Review Task, with a bit of space around it.
- Connect the Review task to it, and move the End node down so it is aligned with the gateway.
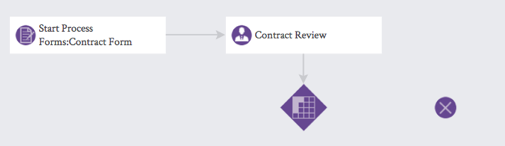
We are now ready to process one of the outcomes of the review.
The gateway knows that that possible outcomes from the task are "Approve" and "Reject", so every time we draw a connector from the gateway, it will let us choose from those outcomes:
- Next, drag a connector from the gateway to the End step.
- The Connector dialog appears, so you can choose the action that causes this path to be taken.
- When you examine the list of the choice, the only available options are "Approve" and "Reject" -- the actions that were defined for the Review task.
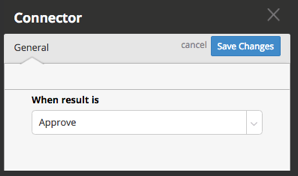
- Select the task action (result) for this path
- When result is - Approve
- Click Save Changes.
The connector arrow appears in the process diagram.
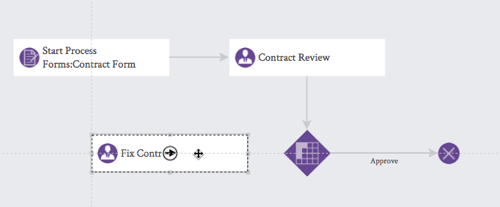
Next, we will create a task for the contact-submitter that tells them to make changes when a contract is rejected:
- Drag a User Task step onto the canvas, to the left of the gateway.
- Enter initial details for the task:
- Task Subject - Fix Contract
- When will this task be due ... - ... in days specified here
- Enter a number - 2
- Note that you could select a business calendar at this point, to ensure that the task is due during the work week.
- The Standard Calendar is available by default. An admin can create additional calendars.
- In the Assignment tab:
- Assign task to - Submitter
The task will now go to the user who submitted the contract. - Action buttons available ... - Complete
When the contract is fixed, the submitter will click this button to indicate that they have finished making changes.
- Assign task to - Submitter
- At the bottom of the dialog, click Save Changes.
The task appears in the diagram. - Drag it a position that lines up nicely with other steps in the process.
We are now ready to process the reviewer's reject action:
- Draw a connector from the gateway to the Fix Contract task.
- When you drop the connector icon, a dialog opens that lets you choose the outcome.
- When result is - Reject
At this point, this is the only option. You can see that no other choices remain in the dialog. Each one that is selected is removed from the list of remaining options.
- When result is - Reject
- In the dialog, click Save Changes.
The connector arrow is drawn. - Now draw a connector from the Fix Contract task back to the Contract Review.
- When the submitter finishes fixing the contract, it will be re-submitted for another review.
- The process diagram is complete at this stage, but the arrows are a little awkward.
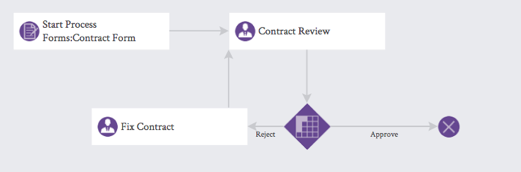
- Try positioning things to improve the arrangement.
Here are some things to try:- Drag the Fix Contract step a little to the left, so the right edge aligns
with the left edge of the Contract Review step. - Select the connector that comes from Fix Contract, then drag the box in the center of the connector to the left, so the arrow joins the initial start arrow.
- Click the Reject connector. Note that there is a little yellow dot in the center of the box that appears in the middle of the arrow. Drag that dot to change the position of the label.
- Drag the Fix Contract step a little to the left, so the right edge aligns
- At the top of the canvas click Save Changes.
The process definition is saved to the Pulpstream server.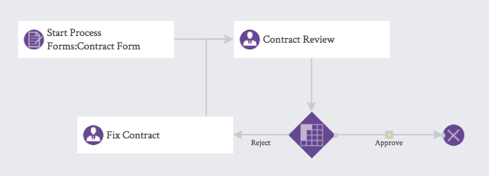
Creating an Email Template
As in many of the streams defined in the PurpleExpress tutorials, we capture an event during stream processing and use it to send an email. The basis of the email message is a reusable template. We will create that template now.
In this case, the primary motivation is deliver additional information to the person who submitted the contract, so they don't have to log in to find out the results of the review. To do that, we take advantage of the fact that Pulpstream lets us include task comments in the message we send.
To create the email template:
- In the stream components list, hover over the Email Templates heading.
- Click New.
The "Add Email Template" dialog appears. - Fill out the initial fields in the dialog:
- Title - Review Notification
- Who is Sender - Specify Here
Other options are to use an email field in the record or send it on behalf of the record submitter. But in this case we want to specify the sender right here, in the template:- From Name - Contract Review Inbox
- From Address - noreply@pulpstream.com
- Subject - Status update on contract for ...
We fill now finish the subject name by supplying the customer name:
- Click the magnifier icon to the right of the Subject line.
A dialog comes up that lets you choose a variety of record fields. - There are several tabs along the tab, for different kinds of fields.
The first tab shows Data Component fields.- Note that Line Item fields aren't shown, because it is a Child Data list.
(But if there were other data components, they would be shown.)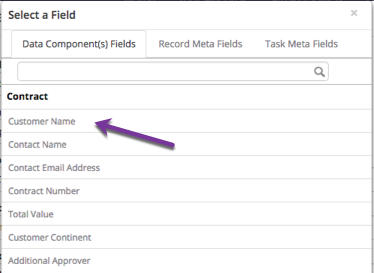
- Note that Line Item fields aren't shown, because it is a Child Data list.
- Choose Customer Name.
A dialog opens, showing you the variable that will put that value into the message. - Click on that field to copy the variable name to the clipboard.
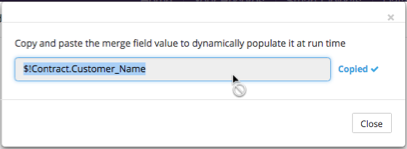
- Close the dialog and paste the variable to the end of the subject line:
- Subject - Status update on contract for $!Contract.Customer_Name
Next, put the body of the message into the email template.
- Copy the text below into the Body field:
- Dear $!record.createdBy.fullName,
The $!Contract.Customer_Name contract was reviewed by $!task.completedBy.fullName.
Reviewer action: ** $!task.completionAction **.
Comments from the reviewer:
$!task.completionComments
Regards,
Contract Management
- Dear $!record.createdBy.fullName,
- Then, for practice, use the magnifier icon to find the fields that are in it.
(The fields are bold in the text above, so they're easy to see. When you add them to the template, they will appear as normal text.)
Hints:- In the Record Meta Fields tab, find the Created By field.
- That tab shows fields pertaining to the record itself -- who created the record, when it was created, and other information that applies to all stream records in the database.
- The Created By field identifies the person who created the record, as a result of submitting a form.
- Because that field points to a User record, an additional dialog appears that shows you User Fields.
- In that list, select the Full Name field.
- In the Task Meta Fields tab, find the Completion Comments field near the bottom of the list. (This tab lists fields that are related to tasks.)
- Just below that, find the Completion Action field.
- In the Record Meta Fields tab, find the Created By field.
- Scroll to the bottom of the template-definition dialog and click Save Changes.
Notes:
- The standard task-completion actions are in all-lowercase ("approve", "reject", "complete"), so define your templates with that thought in mind..
- When you define custom actions, the labels can be anything you like -- for example "Passed" or "Failed".
About Task Meta Data
The "completion comments" and "completion actions" variables in the email template will have a value, for two reasons:
- When a reviewer acts on a submission, the reviewer can add comments to explain their action. Those comments are stored, along with the action they took,
- The very next thing we are going to do will be to set up an event that sends the email when the review task is completed. Because we will use the email template as part of that event handler, the Task Meta Fields will have values. (In other contexts, they wouldn't.)
Capturing an Event
The email template is ready to send. Now we need to capture the event that triggers it.
- In the subprocess definition, double-click the Contract Review task to open it.
- Go to the Event Actions tab. That's where we'll tell Pulpstream to send an email when an event occurs.
- Choose the following options:
- Event - Task Completed
- Completion Action - Any
- This option appears when you choose the "Task Completed" event type.
- Pulpstream knows there are several ways to complete the action, and lets you choose the ones you're interested in.
- Here, we want to take action whenever the reviewer is finished.
- Event Condition - Always
- Notice that when an event occurs, you can add additional conditions that determine whether or not it triggers an action. (The action occurs only if all conditions are met.)
- Here, we don't want to add any extra conditions, so we take the default, "Always".
- Event Actions - Send Email
- Several actions are possible. Here, we want to send an email.
- Use template - Review Notification
- Recipients - Record Submitter
- Note that there are several possible choices here.
- Take a moment to explore them.
- Note, too, that you could add additional recipients. You could also click "Add another action" to take additional actions when an event occurs.
- Click Save Changes to save the event-handling settings for the task.
You are now back at the process-definition canvas. - Above the components list, click Save Process.
The event-handling settings you set up for the Contract Review step are saved to the Pulpstream server.
Checkin Changes and Publish the Stream
Publishing the stream makes it available to other processes, so it can launched programmatically. It also makes it possible for a normal user to launch the stream by submitting the appropriate form.
To publish the stream:
- Go to the stream definition.
- Above the components list, click Checkin.
- As a solo developer, we haven't had to worry about this step very much. But in a collaborative setting, you would ordinarily "check out" the stream to make a set of changes, and then "check in" again, when you're done.
- While it's checked out, others won't be able to edit it. That prevents their changes from interfering with yours. But to make it possible for them to make changes after you're done, you would ordinarily "check in" your changes.)
- Add your Checkin Comments.
- This is where you would add a short note summarizing the changes you made to the system. (When you check out the working version, you can also write a short note that tells what you're working on.)
- In this case, we can write something simple like, "Version 1 ready for use."
- At the bottom of the dialog, click Checkin.
Two new buttons appear above the components listing, one to publish the working version, and one to check it out again.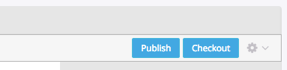
- Click Publish.
The "Publish Work Version" dialog appears. - Fill in the publication options for the starting form:
- Form - Contract Form
- Title - Contract Submission
- Description - Use this form to submit a contract for approval.
- Catalog Folder - All Processes
The catalog is the list of forms that users can access to launch a process. You can choose an existing folder, or click Edit to create a new one and add it there. Here, we're choosing the top-level folder that is always available. - Publishing Comments - Here, you might summarize new features that users would notice. (For this version, leave it blank.)
Note:
Given that the stream definition already defines a starting form, you may be wondering why you need to specify one here. The answer is that here, you are specifying forms that will appear in the user catalog -- a set of forms that users can use to launch a stream manually. On the other hand, it is also possible to launch a stream programmatically. In that case, you might publish the stream without any manual-launch forms.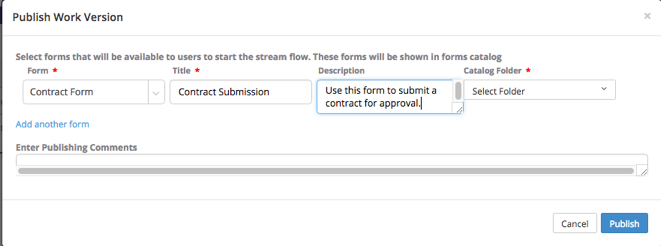
- At the bottom of the dialog, click Publish.
The stream is published and is available for use.
You are now on the stream summary page.
Notice that a number of things have changed on the summary page.
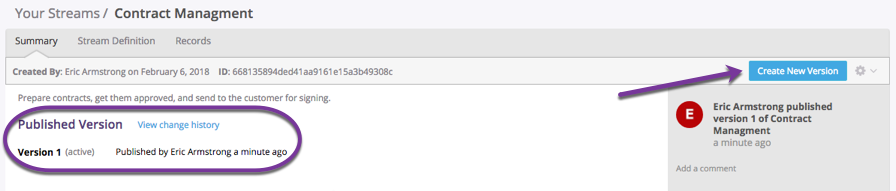
- Instead of appearing under Working Version, the "Version 1" stream now appears under Published Version. (When Version 2 is published, this version will appear under Past Versions.)
- There is now an "(active)" indicator next to Version 1, indicating that it is currently in use.
- The "View change history" option (which always appears at the top of the window) shows you the latest version, by default. But you can always choose an earlier version.
- In addition to the checkin and checkout comments, that window displays an activity log of everything you did, from most recent to earliest. (A limited number of items are shown. When you scroll down, additional lines are added.)
- A new button appears at top right: Create New Version.
- That button creates a new working version that you can modify and test, without affecting the stream that is in use.
- And even when you publish a modified version, any records that are in-progress at the time will finish their processing using the older version of the stream. But when new records are created, they will use the new version.
Launching the Stream from the Home Page
Now that the stream has been published, and a starting-from specified, you see something new in your Home page. Under the Submit New Form button, the Contract Submission now appears.

You can now fill out that form to launch the process.
Learn More
This skill station covered a lot of ground! Learn more about the subjects we covered in the online help system:
- Field Types
- Process Definitions
- Process Editing
- Process Gateways and Endpoints
- Editing User Records
- Email Templates
- Event Actions
- Checkout, Checkin, Locking, Publishing, Versions
Take the Next Step
We now have a fully-defined process for the initial review. At the next skill station, we will finish implementing the decision matrix that brings additional reviewers into the mix, when they are needed.
