Welcome to the first stop on the Contract Management learning line. At this skill station, we will create a digital work stream to track contract details.
Learning Concepts at This Station:
Analyzing a sample contract
Creating a basic work stream
About the working version
Adding an auto-number field
Viewing the initial form
Defining line-item fields
Adding a formula field
Relating line items to contracts
Creating the line-item form
Adding the line-item grid to the contract form
Testing the data form
Analyzing a Sample Contract
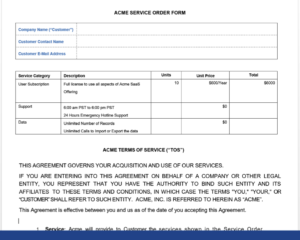
For this case study, let's assume that Acme Corp is currently sending out Service Order contracts that have a few identifying fields at the top, a set of line items in the middle, and standard "boilerplate" terms and conditions underneath.
The boilerplate text will be part of the contract document we generate. But the identifying information at the top and line items in the middle represent data we need to store in the stream.
Creating the Initial Stream
A stream contains processes, forms, data components, and other useful elements. At this station we will create the stream, defining its data components, and set up forms to enter and display data.
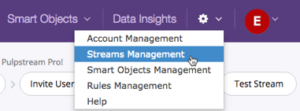
To begin developing the stream, start by clicking the gear icon at top right, next to the area where your profile image appears. From the pull-down menu, choose "Streams Management".
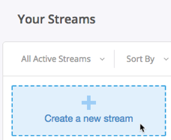
The "Your Streams" window appears. At top left of that window, click "Create a new stream."
The "New Stream" window appears. Enter the following information:
- Give a title... - Contract Management
- Description - Prepare contracts, get them approved, and send to the customer for signing.
- Create Using Wizard - This is the default choice, and the easiest way to create a new stream from scratch.
- Give a name to this information... - Contract
- This is an internal name for the data record that will store the basic contract information.
Next, we will add fields for the contract's identifying information:
- Add the customer name field:
- Title - Customer Name
The title is the label that will be shown when the field is displayed. Short titles are generally good, but at times they will be lengthy, to give the user more information about what the field is for and what they should enter. - Name - (default)
This internal name is constructed from the title. It can be changed now, while the field is being defined, but you only do that when the title is long. Here, the default name is fine. - Type - Text Field
One of the most common kinds of fields you will create, so it is the default choice.
- Title - Customer Name
- Click Add another field and create a field for the contact's name:
- Title - Contact Name
- Name - (default)
- Type - Text Field
- Click Add another field and create a field for the contact's email address:
- Title - Contact Email Address
- Name - (default)
- Type - Email
Fields like this one have a pre-defined format -- so data entered by the user is automatically validated to ensure it is in the proper form. This too is a common choice, so it is near the top of the list. (Scan the list to see what other kinds of fields can be created.)
- At the bottom of the screen, click Done.
The initial version of the stream is created.- You are now at the streams's Summary page.
- At the moment, there is one version of the stream -- the Working Version.
- We'll learn a little more about that in the next section.
About the Working Version
Note that right from the outset, Pulpstream has the ability to maintain multiple versions of a stream. At the moment, you're looking at your Working Version -- the development version of the stream you're creating.
Once you finish development and testing, you'll Publish the working version. From then on, that version will be in production. The rest of your company will use that -- the Published Version -- while you enhance the working version of the stream with additional functionality.
When you finish testing your new version, you'll put it into production as easily as clicking the button to Publish it. (But if it doesn't work out for some unforeseen reason, you'll always be able to revert to an earlier version.)
Pulpstream gives you ways to prevent conflicts, too, in case there are multiple people who can modify a stream. And it gives you a way to fix minor oversights in a published stream, without having to go through the whole development cycle.
For now, just know that your stream has been created. As part of the stream, Pulpstream created the an initial form that can be used to collect data. Pulpstream also created an initial version of the onboarding process your users will follow, in the "Stream Definition" tab. (Both are minimal, at this point. You'll be extending them as we go along.)
Adding an AutoNumber Field
Using standard fields to capture basic contract information was great, but having an automated stream lets us take advantage of other Pulpstream features. We'll add a field for one of those features now:
- At the end of the stream status bar, click Edit Working Version.
(You could also click the "Stream Definition" tab, or click the line beginning with "Version 1" in the version list.)- You are taken to the Stream Definition tab., where you can begin modifying this version of the stream.
- The large area in the center of the screen shows the rudimentary process that was created for this stream. You'll be modifying it later.
- To the right is the list of stream Components.
- When you hover over any heading in the components list, you have the option to create a new component of that kind.
- When you hover and existing component, you have the option to edit that component, or delete it.
- Under Data Components, click the Contract component to begin editing it.
The "Edit Data Component" window opens. - Click the Fields tab.
- On the left, you see the fields you defined when you created the stream.
- On the right, you see the definition for the currently-selected field.
- Above the list of fields, click New Field.
- Create a field that will automatically number each new contract that gets created:
- Title - Contract Number
- Type - AutoNumber
- Format - The default is "{0000}". Add an extra zero if you expect a lot of contracts.
- Start with number - 1
- At the bottom of the field display, click Save Field.
- The display doesn't change, because you are still looking at the field you just defined.
- But the field list at left now shows the new field, and it is selected.
- At the top of the "Edit Data Component" window, click Save Changes.
The fields you added are stored on the Pulpstream server, and you are back at the stream definition.
Viewing the Initial Form
We've seen the Contract data component. Just under it in the Components list is the Contract Form -- the default form that was automatically generated when when we created the stream.
You could click that stream to edit it, but to see it in action, click the gear icon above the Components list and notice that you have an option to create a test record.

Before selecting that option, notice that the Start Process step in the process-diagram shows a list of forms that can be used to launch the stream -- the start forms. The "Contract Form" that was created for the stream is the default start form for this process.
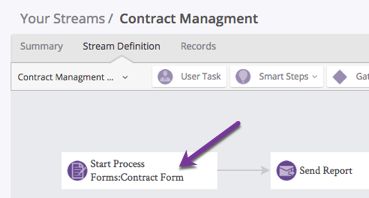
Now, under the gear menu, choose Create Test Record. The default start form is displayed.
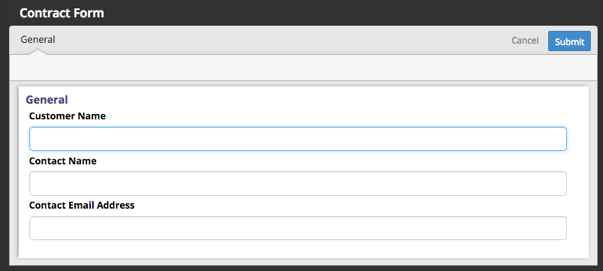
That form shows the three identifying fields we created the stream with. (It doesn't show the autoNumber field, because we added that later. But that's fine. We won't need it until we begin generating contract documents.)
What that form does not include are the line items that make up the contract. We will define them next.
Defining Line-item Fields and Formulas
Each contract record contains a single company name and contact, but each contract can have multiple line items. To capture those line items, we will create a second data component:
- In the stream definition, hover over the Data Components heading and click New.
The "New Data Component" dialog appears. - Fill in the General information:
- Title - Line Items
- Description - Capture the contract line items.
- Click the Fields tab.
- Under the tab, click New Field.
- Create an enumeration field that lets the user choose one of the services that Acme Corp. provides:
- Title - Service Category
- Type - Enumeration (Choices)
- Fill in the labels for the choices. (The values default to the same text, which is fine when the labels are short, and the values don't need to be numeric.)
- Label - User Subscription
- Add another choice. Label - Support
- Add another choice. Label - Data
- Add another choice. Label - Consulting
You have now defined an enumeration field with four possible choices.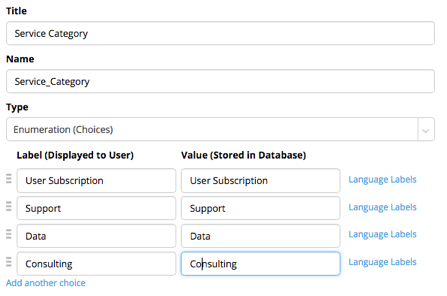
- At the bottom of the window, click Save Field.
In addition to the service category, each line item needs a description, number of units, and unit price. We will add those fields now:
- In the Line Items data component, click New Field.
- Title - Description
- Type - Text Field
- At the bottom of thewindow, click Save Field.
- Click New Field.
- Title - Units
- Type - Number
These values are always whole numbers, so the appropriate type is "Number". - At the bottom of the window, click Save Field.
- Click New Field.
- Title - Unit Price
- Type - Currency
The default format uses commas for thousands, and the decimal point for decimal amounts, but the format can be modified to the European standard, if desired. - At the bottom of the window, click Save Field.
The basic line-item fields are now in place. We just need one more -- a formula field, to calculate a total amount for each line.
Adding a Formula Field
Now it's time to calculate the total for each line item.
- Click New Field.
- Title - Total
- Type - Number Formula
- In the new fields that appear, supply the formula sub-type:
- Sub Type - Currency
It is now time to define the formula Expression:
- Click the magnifier icon to the right of the field.
The field-selection dialog appears.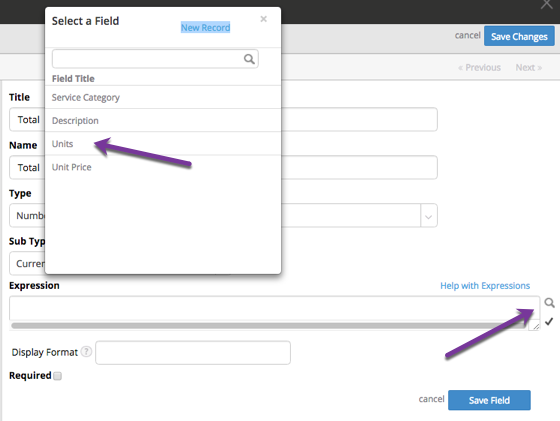
- Select the Units field.
A dialog opens show you the format of the Units variable.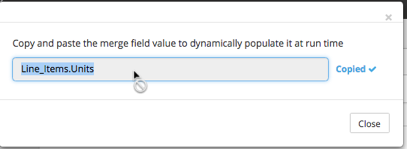
- Click the field in the dialog.
The text is copied to the clipboard. - Click Close.
- Paste the variable text into the formula field.
- Add an asterisk (*) for the multiplication,.
- You can add standard mathematical operators like parentheses, +, -, /, and *.
- Click "Help with Expressions" for other useful tips.
- Use the previous process to add the Unit Price field to the formula.
- To the right of the formula field, click the checkmark icon to make sure the formula is valid. The "Test Expression" dialog opens.
- At the top of the dialog, note that you can edit the expression, should you need to.
- Click Adhoc Data to supply data in the fields.
- Put in some sample data and click Test.
Make sure the results are what you expect.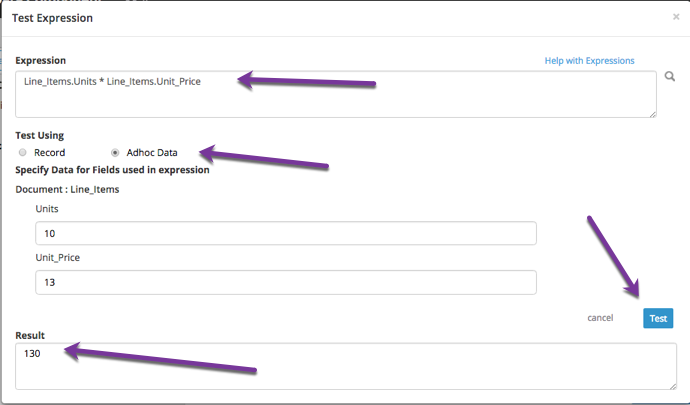
- At the bottom of the dialog click cancel or, at the top, click the "X" in the corner.
- At the bottom of the window, click Save Field.
- At the top of the New Data Component window, click Save Changes.
The new data component is stored on the Pulpstream server, and you are back at the stream definition canvas.
Relating Line Items to Contracts
Each contract will have one or more line items in it. That is the essence of the master/detail relationship, where each master record has one or more detail records associated with it. It is also known as a parent/child relationship, where each parent record has one or more children.
Now that both of the data components are defined, it's time to create that relationship between them. To do that, we will add a field to the Contract records. That field will reference the associated line items:
- In the components list, click the Contract data component.
The edit window opens. - Click the Fields tab. Then click New Field.
- Title - Line Items
- Type - Child Data List
- Data Component - Line Items
- Sort By - None (leave empty)
(There are no sortable fields that could be selected, in any case.
But for a situation like this we want the line records to remain in the order the order they were entered.)
- At the bottom of the dialog, click Save Field.
The field has now been defined at your workstation.
It appears in the list of fields at left. - At the top of the dialog, click Save Changes.
The new field definition is saved on the Pulpstream server and you are once again viewing the stream definition.
The Child Data List field type is pretty special. For one thing, it expects to manage a set of line item records when Contract records are displayed and edited. Perhaps more importantly, every time a line item record is created using the form we are about to create, the line-item record is linked to the Contract record it belongs to.
Technical Note:
When you selected Line Items as the child data component, Pulpstream added a hidden "parent record" field to it. When a Line Item is created, that field is automatically assigned the Record ID of the Contract record. (A Record ID is a long set of characters and numbers that uniquely identify a particular record.) That is how the relationship is maintained.
Creating the Line Item Form
With the Line Items data component defined, the next step is define a form that will be used to enter data:
- In the components list, hover over the Forms heading and click New.
- In the "New Form" dialog, select the data component: Line Items.
- Click Save Changes.
The form canvas appears.
In PulpStream, tabs in a form are called "pages", when they're defined. Note that you could add additional tabs with the "New Page" button. (We don't need to do that. Just know that the capability is there.)
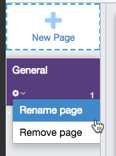
You could also click the gear icon under an existing page to rename it or remove it. We don't need to do either of those things here. As a child data form with only one page, the page title will never be seen by the user, so "Page 1" is fine for the name.
The section heading might be seen by users, however. Let's make things nicer for them:
- Hover over the section title and click the pencil icon that appears at the end of the line.

- In the pop up dialog that appears, you have two options:
- Set the title to Line Item. and click the box, Show Section title at run time.
With that option, the heading appears when the form is displayed. - Leave the option "Show Section title at run time" unchecked.
With that (default) option, the section heading doesn't appear anyway, so it doesn't matter what it's called.
- Set the title to Line Item. and click the box, Show Section title at run time.
- At the bottom of the dialog, click Save Changes.
Now we will drag in the fields from the list of available fields:
- Drag the Service Category field into the form, below the section heading.
- In the dialog that opens, set Field Attributes to Required.
- The default display for this field will be as a dropdown.
Under "Display as", you have other options, as well.
Although "Multi-Select" would be inappropriate for this field, you might
choose to display the options as a horizontal list of radio buttons. - Also note that you could add a "Field Hint". In all Pulpstream forms, the existence of a field hint puts a question-mark-in-a-circle icon next to the field. When the user clicks the icon, the help-text pops up.
- The default display for this field will be as a dropdown.
- At the bottom of the dialog, click Save Changes.
The field appears in the form.
A red asterisk appears next to it, indicating that it is required.
- Drag the other fields into the form:
- Description
- Units - Required
- Unit Price - Required
- Total
When the Total field appears in the form, it is colored gray.
That's because it is a Read Only field that is calculated.
The cursor can't be placed in it, and it can't be edited -- not even here, in the form-definition canvas -- so it appears differently.
- At the top of the dialog, click Save Changes.
A dialog appears that lets you name the form:- Enter Form Title - Line Items
Note that the form name is plural! Because this is a child data form, it will appear as a "subform" in the context of a Contract. In that context, there will be multiple entries -- when the the title of the subform appears in the context of a contract, we want the title to reflect that multiplicity.
- Enter Form Title - Line Items
- At the bottom of the form-name-and-description dialog, click Save Changes.
The form is saved, and you are back at the stream definition.
Adding the Line-Item Grid to the Contract Form
The only task left is to embed the line items form into the Contract form:
- In the components list, click the Contract Form to edit it.
- Drag the recently-added Line Items field onto the form canvas.
A dialog opens for the field:- Field Attributes - Required
It wouldn't be much of a contract without at least one line item, so the field is marked as "required". - Add/Edit Form - Line Items
Here, you tell Pulpstream which form to use when adding or editing child data records. It is possible to define multiple forms, but here there is only one choice that makes any sense -- Line Items. - Grid Fields - Service Category, Description, Units, Unit Price, Total
With the form selected, clicking under "Grid Fields" gives you a list of form elements to choose from. Select each one in turn to add it to the list.
Note:
The "Display as" column shows "Document List". At the moment, that is the only choice. In essence, each line-item is a mini-document, so the list of line items is a list of "documents". Since multiple fields can be displayed for each line item, and since there can be multiple items, the result is a grid or matrix of values to display. - Compute Field - Total
Here, you are defining an additional computation that applies to the collection of line item records that pertain to a particular contract. The value of the Total field is produced by the formula that multiples quantity times unit price for each line item. Now, telling Pulpstream to add up those amounts and display the result under that column, at the bottom of the grid.
- Field Attributes - Required
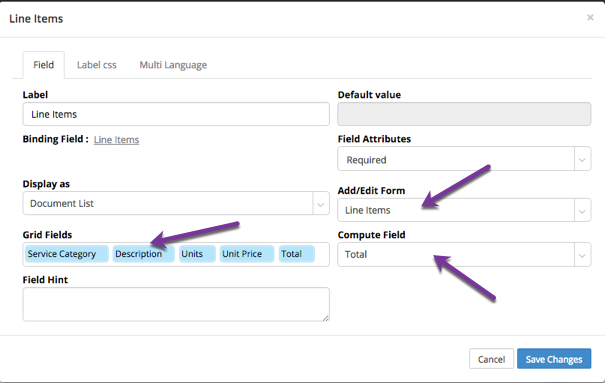
With the settings in place, we're just about done with the initial setup steps. We just need to save our work, so we can begin testing:
- At the bottom of the dialog, click Save Changes.
The revised Contract form appears, showing the Line Items field we added.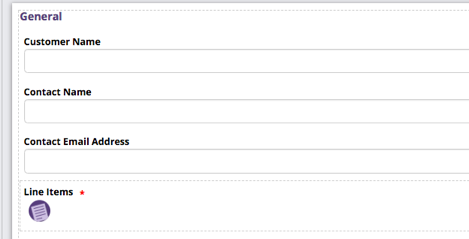
- At the top of the form definition, click Save Changes.
- In the Save Form dialog, where you can modify name or description, click Save Changes.
The form is saved and you are back at the stream definition.
We are now ready for a quick test.
Testing the Data Form
- Click the gear icon above the components list. Select Create Test Record.

- When the Contract field appears, there is an Add button that lets you add line items to the contract.
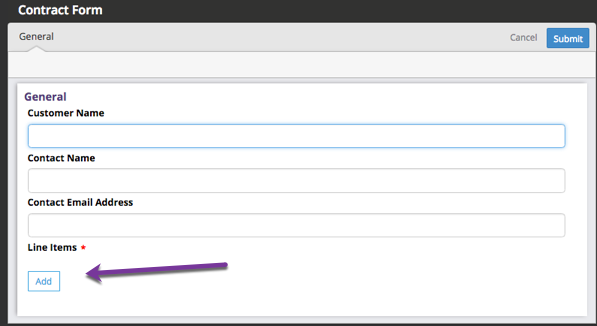
- Click Add.
- Add some data for the line item:
- Service Category - User Subscription
- Description - User per year
- Units - 12
- Unit Price - 230
- At the bottom of the dialog, click Save & Add More to create a second record:
- Service Category - Support
- Description - Regular Support
- Units - 5
- Unit Price - 200
- At the bottom of the dialog, click Save & Close.
The main form appears, with each of the line items in it.
The sum of the line items appears at the bottom of the "Total" column.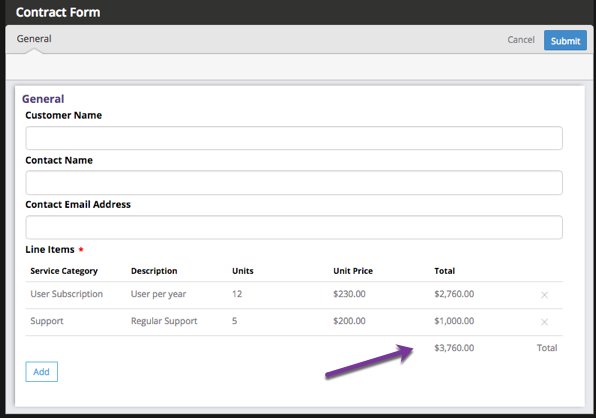
At this point, our preliminary testing is done. We know that the child data list is working correctly, and we know how it appears. But let's add a bit more information and save the record, so we can use it later:
- Fill in the fields at the top of the form:
- Company Name - TEST RECORD
- Contact Name - No one
- Contact Email - nobody@nowhere.biz
- Continent - North America
- Click Submit.
You're now back at the Stream Definition.
We didn't need a real contact-email at this stage, because we have not yet defined the process that sends the contract out for testing. But after you click "Submit", you will find an message in your email inbox that says you created a record.
You can see the last step in the process definition is "Send Report". That's the step that sent you the email. (It's configured to send a "record created" report to the person who submitted the record -- you.)
So you got the message because that is how the process is defined at the moment. We will begin modifying that process at the next skill station. (Later, when we're working with print templates, it will help to have a dummy record to test with. That's another reason we saved it.)
Learn More
To learn more about the kinds of fields you create in a record, and the various attributes you can specify, explore the Field Types pages in the online help system.
In particular, examine the Child Data List field type, and learn more about Working with Subforms.
Note, too, that there are both Number Formula and Text Formula fields.
Take the Next Step
The initial stream has been created, with all data components and child-data subforms. At the next skill station, you will begin modifying the stream process to get the appropriate contract approvals, before sending it to the customer.

