Welcome to the second stop on the Vendor Renewal learning line. At this skill station we will define the renewal process. Along the way we will take advantage of the "Role" field type, and learn how to use a decision-matrix to set a field value.
Learning Concepts at This Station:
Start the process definition
Adding a field of type role
Using a decision matrix to set the field value
Assigning the review task
Adding a decision gateway
Publishing the process without a start form
Start the Process Definition
To get the process-definition started:
- Go to the stream definition.
- In the process-editing canvas, delete the Send Report step and the End step.
- From start to finish, we will be defining a three-step process, so put the Start Process
step at top center, so the main process flow will go down the page.- In general, unless you know you will have a two-step process like the default, it makes sense to arrange the steps vertically.
- Since the process canvas shows three columns nicely, a generally useful arrangement is to position the start step at top left, run the processing steps down the middle, and put the end-step at bottom right.
- Drag a User Task step onto the canvas:
- Task Subject - Supply New Certificate
- Select a Form to show record details ... - Renewal Notification Form
- We will be assigning the task to the vendor. The simple notification form is what they need to see.
- Select an optional form ... to complete this task - Renewal Form
- When will this task be due ... - ... in days specified here
- Enter a number - 5
The vendor will have 5 days to complete the task.
For Extra Credit...
Set up escalations for additional reminders if 5 days have passed and the task is still open.
- In the task Assignment tab, set things up to give it to the vendor:
- Assign task to - Email Address Present in a Field
- (field) - Vendor
- (select object field) - Primary Contact Email
This is another case where you selected a field that references a record in a Smart Object. When you select that field, another list of choices appear with fields in that object. And since you need an email address, only email fields are shown.
- (select object field) - Primary Contact Email
- Under Assignment Options in this tab:
- Send task assignment notification email - No (uncheck the box)
The default assignment notifications are fine for internal users. But for external users, we want to use the template we created to send a custom email. - Action buttons - Complete
The default value is what we want. (That choice is by far the most common, for anything other than review-tasks.)
- Send task assignment notification email - No (uncheck the box)
- In the Event Actions tab. For Event 1, specify:
- Event - Task Created
- Event Condition - Always
- Event Actions - Send Email
- Use template - Vendor Notification
- Recipient(s) - Task Owner
- At the top of the "User task" dialog, click Save Changes.
- Center the User Task step under the Start Process step and wire the start step to it.
Note:
When you have filled out this many fields, it's nice to save the process -- because until you do, the step you created is only saved in your browser. Saving the process uploads your modifications to the Pulpstream server. However, you can't save the process while the User Task is unconnected. (Only valid processes can be saved. In general, that's a good thing -- unless, as now, we want to save work in progress.) The solution is simple: Add an end-step and wire the User Task to it. Then, after you save the process, you can delete the temporary end-step.
Adding a Field of Type Role
Next, we want to create a Review task for the certificate the vendor supplies. The trick is that the appropriate team of reviewers depends on the type of certificate the vendor supplies. (There is one team for Safety certificates, and another for Environmental certificates.)
To keep track of which team is appropriate for this record, in this instance of the stream, we will add a field of type "Role" to the stream data component.
Note:
Although we are building a generic process that applies to any record in the stream, it is helpful to think in terms of the processing we need for a specific record. In this case, the record we are processing has one certificate. It could be a Safety certificate or an Environmental certificate. We need to the right thing in each case. (We could put a lot of conditional logic into the process flow, but it makes a lot more sense to add an additional field to the data component and keep the processing simple.)
To add the new field:
- In the components list, edit the Renewal data component.
- In the Fields tab, click New Field:
- Title - Reviewer Role
- Type - Role
- At the bottom of the dialog, click Save Field.
The field is now saved in your local edit window. - At the top of the dialog, click Save Changes.
Your modifications are now saved on the Pulpstream server.
Using a Decision Matrix to Set the Field Value
Now that we the Reviewer Role field is in place, we modify the process to set its value based on the other data in the record:
- In the process-definition canvas, under Smart Steps.
- Click on Update Fields using Decision Matrix and drag it to the bottom of the canvas.
- Title - Decide Reviewer
- Exit on first row match - Yes (the default)
- Click on Add Condition Columns.
We are now ready to begin specifying the conditions we will test for in the decision matrix, in the form of record properties. When that is done, we will be able to specify values to test those properties against. - In this case, the only condition we need to test is the type of certificate. So, in the "Add Condition Columns" dialog, specify:
- Property - Certificate Type
Note that there are many possible properties you could test against, including:- Fields in the stream record
- Fields in the record that the Vendor field points to.
- A complex expression (a dialog appears with instructions)
- The form that was submitted to the stream. (Useful for streams that can be launched by multiple forms.)
- Operator - Equal to
Note that there many possible operators, depending on the property that is selected. For the Certificate Type field, there are a total of six choices. - Label - Certificate Type (the default)
- At the bottom of the dialog, click Save Changes.
The decision-matrix now allows you specify conditional tests for the properties you selected -- "Certificate Type (equals)", in this case.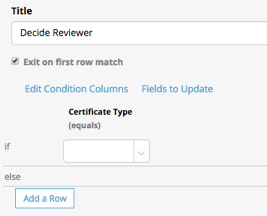
- Property - Certificate Type
- Next, click on Fields to Update.
Another dialog opens that lets us specify one or more fields to update for each condition we specify in the matrix:- Field - Reviewer Role
In this case, there is only field we need to modify. But note that, just as with conditions, we can click "Add More" to make multiple selections. - At the bottom of the dialog, click Save Changes.
We are now ready to specify the conditions to test for and the field-values to assign for each condition.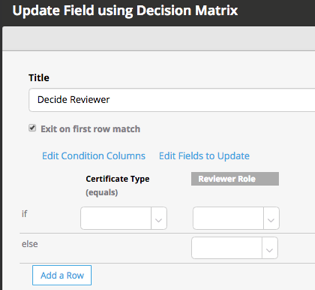
- Field - Reviewer Role
- Specify the first conditional test:
- If - Certificate Type (equals) - Environmental
- Since Certificate Type is an Enumeration field, you have a dropdown list of choices to select from.
- Reviewer Role - Environmental Compliance Team
- Here, you have a list of roles defined in the stream to choose from.
- Scroll down to get to the one you need.
- If - Certificate Type (equals) - Environmental
- There is only one other possible value for the certificate type, so we can use the "else" clause to define the assignment-value:
- else - Reviewer Role - Safety Team
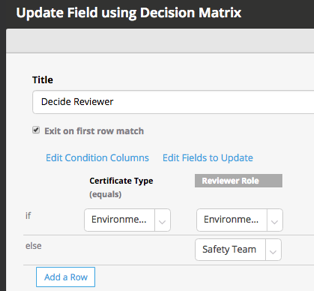
- else - Reviewer Role - Safety Team
- At the top of the dialog, click Save Changes.
The "Decide Reviewer" step now appears in the process canvas. - Align the new step under the "Supply New Certificate" step, and connect the two.
Assigning the Review Task
Now that the process has identified the appropriate reviewer-team, we can create the review task. But before we do that, we need to create a small form the reviewer can use to update the expiration date in the Vendor record when the certificate is approved.
To create the form:
- In the components listing, next to the Forms heading, click New.
- Select a data component ... - Renewal
- At the bottom of the dialog, click Save Changes.
- Modify the heading:
- Title - Certificate Review
- Show section title at run time - Yes (check the box)
- At the bottom of the dialog, click Save Changes.
- Drag in the fields the reviewer will need and set their attributes:
- Certificate Type - Read Only
- Certificate - Read Only
- Certificate Expiry Date - Required
This field will be blank when the reviewer sees it, because it is a stream field. It is not the expiration date currently stored in the Vendor object. (We could populate it that way when we launch the stream if we chose to, but we won't do that.) Later, we will transfer the
- At the top of the New Form dialog, click Save Changes.
- Give the form a name:
- Title - Review Form
- At the bottom of the dialog, click Save Changes.
Okay. Now we're ready to define the review task:
- In the process-editing canvas, drag a User Task step to the bottom of the flow:
- Task Subject - Review Certificate
- Select a form to show record details ... - Renewal Form
- Select an optional form ... to complete the task - Review Form
- Give the reviewer five days to review:
- When will this task be due ... - ... in days specified here
- Enter a number - 5
- In the Assignment tab, specify the task owner:
- Assign task to - Role present in a Field
- (field) - Reviewer Role
The internal users who get this task will get the default assignment email, which is fine. (Although for operations in which agents are always at the ready, it would make sense to turn off email notifications entirely.) - Action buttons available ... - Approve/Reject
- At the top of the User Task dialog, click Save Changes.
The review step now appears in the process. - Position the review step in the flow and connect the Decide Reviewer step to it.
Adding a Decision Gateway
Depending on the reviewer's evaluation, we need to either send the certificate-request back to the vendor, or continue the flow to update the Vendor record with the new expiration date.
- Under Gateways, drag a Decision gateway to the bottom of the form.
- Title - Reviewer Decision
- Use previous task outcome - Yes (click the radio button)
- User Task - Review Certificate
- At the top of the dialog, click Save Changes.
The decision gateway appears in the process flow. - Drag it into position and connect the Review step to it.
- Click on the decision gateway and draw a connection back to the first step, Supply New Certificate.
The Connector dialog appears asking you to select the action that takes this path - Specify the connector values:
- When result is - Reject
- At the top of the Connector dialog, click Save Changes.
- Rearrange the connector-arrow so that it no longer overlaps the other connections in the flow, and so the flow is clear.
At this point, we will save the process the way it is. Later, after we launch the stream based on calendar
- Drag an End-step into the canvas.
- Connect the Decision Gateway to it.
- Specify the connector values:
- When result is - Approve
- At the top of the Connector dialog, click Save Changes.
- At the top of the canvas, click Save Process.
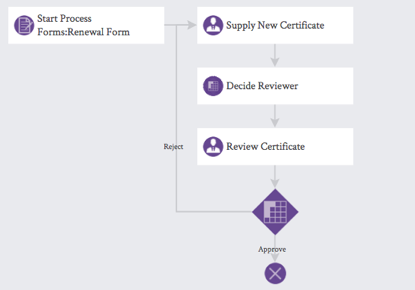
Publishing the Process without a Start Form
To take the next step, we need to publish the stream, so it is available for the Vendors object to use. (When we define the calendar event in the Vendors object, we will need to launch the Renewal stream.)
To publish the stream:
- At the top of the stream definition, click Checkin.
- Enter Checkin comments - Make the stream available to the Vendors object. (One more step is needed before it will be ready to use.)
- At the bottom of the dialog, click Checkin.
- At the top of the stream definition, click Publish.
The "Publish Work Version" dialog appears.
In the publication-dialog, a start form appears to be required. But that is only an illusion, to make sure you don't forget to specify one, when one is needed. To eliminate the requirement:
- Hover over the form row.
An "X" icon appears at the end of the row.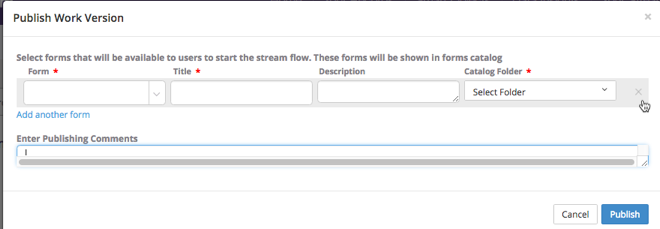
- Click the "X" to remove the row.
- Click Publish.
Learn More
Asa you created the process for this stream, you learned about a new field type -- "Role". To learn more about the many other field types that can be created, see Field Types in the online help.
You also saw how to use decision matrix in process to set field values. You learned that you could examine one or more properties and set values for one or more fields based on tests defined for those properties. For other Smart Steps you can add to a process, see the Process Definition page in the help system. To learn more about other things that can be done programmatically in Pulpstream, see the Automated Actions table.
Take the Next Step
At the next stop on this line, you'll learn how to set up calendar-events that will launch the stream automatically. After that, you'll see how to update the Vendor record with the expiration date supplied by the reviewer.

