Welcome to the 6th stop on the Contract Management learning line. At this skill station, we learn to define process milestones -- flags that let us see at glance the process stage that a contract-record is in.
Learning Concepts at this Station:
Exploring milestones
About milestone colors
Editing milestones and escalations
Adding a milestone and attendant escalation
Changing milestone status from a task
Escalating a task
Adding a "change status" process step
Exploring Milestones
At the end of the previous skill station, you visited a record and were in the Activity tab. There, you saw how to see where the record was in the process flow. But in the same area, you saw two other items under the Milestone Progress heading: Processed, and Contract Submitted.
.png?width=280&height=156&name=Contract-Management-Contract-Show-Flow-Diagram%20(1).png)
Those two items are milestones that are automatically created for every stream. "Contract Submitted" is where the process started. So that icon is a solid green. "Processed" is the state where processing has completed. For a record that has not completed, that icon is gray. When completed, it too turns to green.
In the remainder of this skill station, we will see how to add additional milestones between the process-start and process-end, and we will see how to specify escalation actions that are triggered when a milestone is not being achieved in timely fashion.
Milestones also have a status. Typically, all milestones after the first off the distance, and of little concern. But at some point, each milestone in turn becomes active. When it does, its status will be one of:
- Started (so it becomes active)
- Completed
- At Risk (coming close to its due date)
- Breached (past its due date)
Something important to keep in mind is that there are two ways to think of milestones:
- As a way to track record status.
For this purpose, the only status that really matters is "Completed". Every milestone can be considered "Started" in that case, whether not the process flow has reached it. But what you're most interested in when viewing the record is which ones have completed.
- As a way to track delivery on external commitments.
This is the purpose for which milestones were originally defined. It is the reason for the "At Risk" and "Breached" states. It is also the reason that escalation conditions can be defined for milestones.
About Milestone Colors
As you've seen, milestones that have been completed are darker and/or filled in. The are also colored, to depict their status:
- A milestone that has not yet been activated is gray.
- One that has stareted is yellow.
- One that is "at risk" is orange.
- One that is overdue (or "breached") is red.
- One that is completed is green.
Editing Milestones and Escalations
We'll start by creating a new version of the contract management stream, so we can work on it without impacting anyone else. (The current version will remain in use when new records are created, until our changes are published.)
- Go to the stream Summary page.
- If currently viewing the stream definition, click the Summary tab.
- Otherwise, click the gear icon next to your profile image, choose Streams Management, and then click on the Contract Management stream.
- At the top of the Summary tab, click Create New Version.
The New Version dialog opens.- Comment - Adding milestones
- At the bottom of the dialog, click Create.
You are now at the stream definition for "Version 3 (working)". - In the middle of the components list, click on Milestones and Escalations.
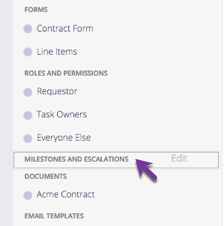
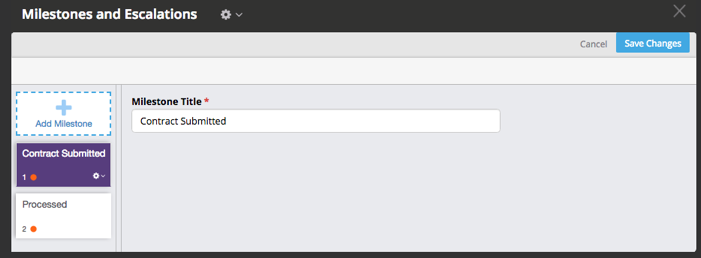
Clicking the heading opens the edit dialog. On the left, you see the two milestones that have already been defined. There is also a new Add Milestone button.
Note:
The order of milestones here is top down, the same way the process definition flows. In the record, they appear in bottom up order, so the most recently completed milestone is at the top, in roughly the same way that the most recently created records appear at the top of a record list, and the most recently created tasks appear at the top of a task list, etc.
On the right, you see the data for the currently selected milestone. There isn't much data for the starting milestone, other than a title. But when you click on the Processed milestone, you see a couple of additional features that will be present for milestones you create.
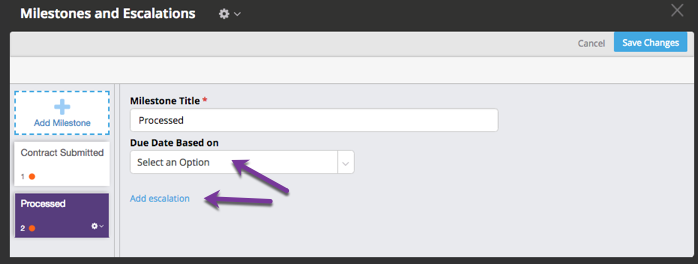
Here, we can set a due date (in one of several ways) and we can set up add one or more escalations (each of which can take one more actions) when things aren't happening in the expected timeframe. We will explore those features next.
Adding a Milestone and Attendant Escalation
In the process we defined for a contract submission, there are several critical milestones we want to identify:
- Supervisor Signoff
- Executive Signoff
- Contract Signed
Now let's add the first milestone:
- In the milestone list, click Add Milestone.
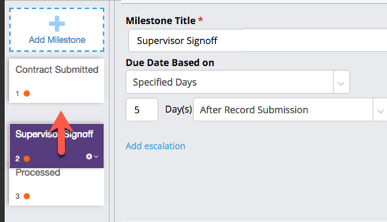
- Milestone Title - Supervisor Signoff
- Due Date Based on - Specified Days
- We could also specify a number of hours, use a date contained in a record field, or use a number of days or hours specified in a field.
- 5 Day(s)
- After Record Submission
- We also start the countdown from the date the milestone began.
(Here, there is no difference. But elsewhere, there could be.)
- We also start the countdown from the date the milestone began.
- As elsewhere in stream definitions, the new thing we add is created at the end of the list, so let's take a moment now to drag it where it belongs, between the starting and ending milestones.
-
In the same way that we can add escalations to tasks in a process definition, we can add them to milestones, so we can take action to expedite things, when needed.
Let's do that now:
- At the bottom of the milestone definition, click Add escalation.
The Escalation section of the milestone definition appears.- Note that we can multiple escalations, and for each escalation, we can add multiple actions.
- Note, too, that we can define trigger conditions for the escalation in multiple ways -- relative to the start of the milestone, or its due date, for example. Or relative the submission date (when the process began), or relative to a date contained in a field.
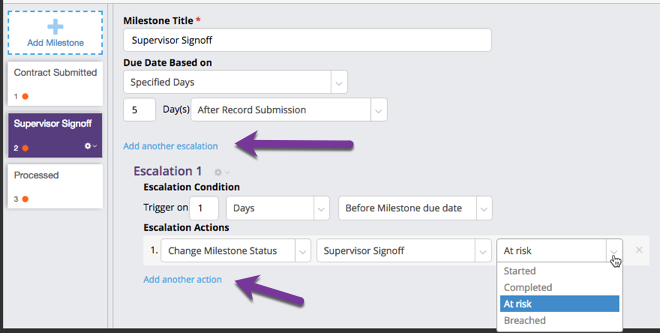
- For Escalation 1, we'll specify the Escalation Condition relative to the due date:
- Trigger on - 1 - Days - Before Milestone due date
(We could also have specified weeks or hours for the time condition.)
- Trigger on - 1 - Days - Before Milestone due date
- For Escalation Actions, let's select:
- Change Milestone Status - Supervisor Signoff - At risk
Notes:
- Other actions we could choose including sending an email or sending a notification in Pulpstream, which the user will see the next time they log in.
- For the milestone status, we could have chosen Started, Completed, or Breached, rather than "At risk". (Escalation conditions are one we can specify milestone status. In a moment, we will see how do it from a process, as well.)
- In particular, note that we can choose which milestone to modify. In a complex system, that capability lets us make downstream milestones reflect the status of the current one.
Next, let's the other two milestones we need, but without any escalations:
- Click Add Milestone.
- Title -Executive Signoff
- Due Date Based on - none (don't make any selection)
- Move the new milestone to above the "Processed" milestone.
- Click Add Milestone.
- Title - Contract Signed
- Due Date Based on - none
- Move it above "Processed".
All of the milestones we need are now defined, and in order.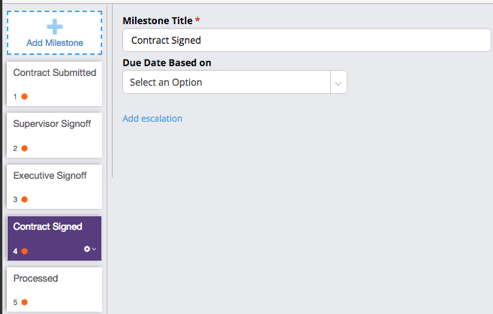
- At the top of the dialog, click Save Changes.
The changes are saved to the server, and we are back at the stream definition.
Changing Milestone Status from a Task
A moment ago we saw how to add escalations to a milestone, and how to use them to change milestone status. We can do the same things from any User Task step in the process. We will start by changing milestone status.
- In the process definition, go to the initial Contract Review step.
- In the Event Actions tab, under Event 1, you see the action that sends an email to the submitter when the task is completed.
- Click Add another action.
- For this action choose:
- Change Milestone Status - Supervisor Signoff - Completed
- Change Milestone Status - Supervisor Signoff - Completed
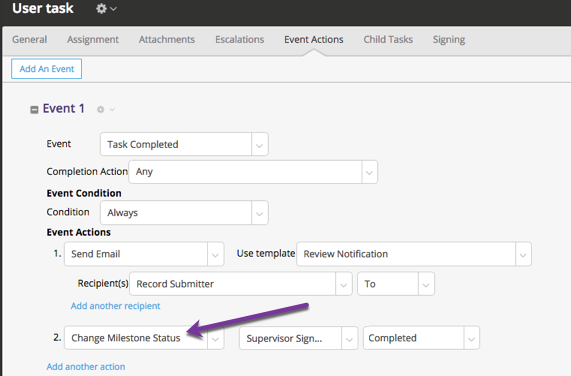
Once completed, the milestone is no longer active, and the escalation we defined in it no longer applies.
For Extra Credit...
In the Additional Contract Review step, use Event Actions to set the Executive Signoff milestone to "Started" when the task is created, and add an additional action to the "Task Completed" event to change the milestone status to "Completed".
Escalating a Task
Not every user task results in a milestone. but user tasks may also need to be acted on if they do not occur in timely fashion. For that reason, user tasks can also be escalated.
Let's examine that capability now:
- While still in the Contract Review step, go to the Escalations tab.
- Notice that here:
- You can also specify conditions based on a number of days before or after some significant date (task created, record submitted, etc.)
- And you can specify a wide variety of actions to take, including the ability to set milestone status. (Among other things, you can also change the task's priority, reassign it, release it, or "auto complete" it.)
In short, you have a lot of options when you escalate a task. Take a moment to explore them.
Note:
If a user task does result in a milestone, it's best to keep escalations together in one place, if you can. For example, after a contract is submitted, we set up an escalation on the "Approved by Supervisor"milestone, requiring it to be completed in 5 days. Since we create a review-task for the supervisor, it is possible to escalate that task, as well. That would give us two sets of escalations, defined in two different places. For sanity in such cases, it's best to keep the escalations either in the User Task, or in the Milestone.
Adding a "Change Status" Process Step
So far, you have seen several ways to set milestone status:
- In response to a milestone escalation.
- When processing a task event.
- In response to a task escalation.
There is just one more situation to handle: The case where the process reaches a stage that needs to be recorded, but with no user task preceding it.
Such situations occur frequently when there are automated integrations (the subject of a different tutorial!). In this scenarios, you receive a response from some external situation and when you do, you want to set a milestone that records the event.
In our scenario, that situation occurs after the contract is signed. As an automated step, it doesn't have the capability for event actions or escalations. So, to make sure the process has the correct milestone status, we will add a special step to the process flow:
- At the bottom of the flow diagram, remove the connector that goes to the End node.
- Move the End node down a bit to make room.
- From the Smart Steps dropdown, drag Change Milestone Status underneath the "Send Contract" step:
- Title - Mark Signing complete
- Choose Milestone - Contract Signed
- Change Status to - Completed
- At the top of the dialog, click Save Changes.
The step appears in the process flow.
- Connect "Send Contract" to the new step, and connect that step to the End node.
- At the top of the flow diagram, click Save Process.
The process revision is saved to the server.
Learn More
To learn more about milestones, see Stages and Escalations in the online help system.
Taking the Next Step
Awesome! You are one skill station away from finishing this learning line. At this point, you have added milestones and escalations to the process, and have seen all of the ways you can set milestone status. At the next skill station, you will find out how to run reports on the stream's Line Items data component and, in particular, how to "roll up" that data in various ways, to produce the most useful possible reports.
