Welcome to the 5th stop on the Contract Management learning line. At this skill station, we will learn how to send the document for a secure, verified electronic signature, or eSigning, using either Adobe Sign (formerly EchoSign) or DocuSign.
Learning Concepts at this Station:
Adding tags for signature fields
Making the tags invisible
Re-uploading the document template
Setting up a trial account
Configuring your Pulpstream account
Adding a "signature declined" field
Adding the signing step to the process flow
Notifying the submitter of the results
Publishing and testing the stream
Tracking record progress
Adding Tags for Signature Fields
The first step is to determine which signing authority you plan to use. You can create a trial account with either one, and in a moment you'll be asked to do that, unless you already have an account established.
By now, you're familiar with the process of adding tags to a document, so insert the appropriate tags from the table below into the fields at the end of the contract template:
| Tag | DocuSign | Adobe Sign |
| Signature | _pulpSigner1 | |
| Signer Title | _pulpSignerTitle1 | |
| Signing Date | For DocuSign, the signing date is in the Certificate that accompanies a signed document. |
The tags for a second signer are similar:
- _pulpSigner2
etc.
In this case, the customer is expected to sign first, so their fields will be "1". Then Acme will sign, so the Acme fields are "2". (In reality, both get the contract simultaneously with eSigning, and their signatures are merged. But historically, the customer signs first.)
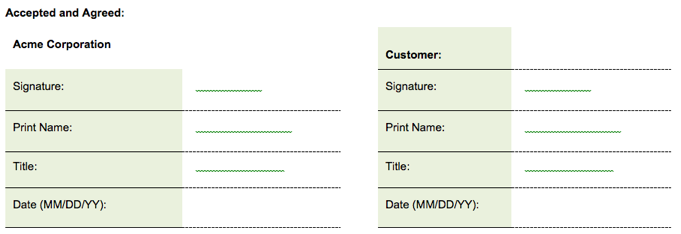
The signing section of the document should look like this:
Accepted and Agreed: <<rs_Contract>>
|
|||||||||||||||||||||||||
<<es_Contract>>
Notes:
- We pre-filled the CFO's name and title.
- The _pulpSignerTitl1 tag lets the customer -contact specify their job title when they sign the contract.
- We use the standard template <<Contact_Name>> tag to insert the contact's name. But to use it, we need to surround the table with <<rs_Contract>> and <<es_Contract>> tags.
For Extra Credit...
Notice that the contract always goes to the customer contact for signature, and that their name is inserted into the contract. But it may be that some other company officer is the one who needs to do so. With a signing services like DocuSign, the person who receives the contract can assign it someone else. (They can't simply forward the notification email, but the document contains a "reassign" operation that can be selected. The only problem in that case is that the wrong person's name is in the contract. To handle that situation, provide an additional field for the signee's name and then use conditional template tags (described in the previous skill station) to determine which name to insert into the contract.
Making the Tags Invisible
With the tags in place, the next step is to make them invisible. That is easily done by changing the font-color of the tags to white. The tags will still be there, but will no longer be visible when the document is converted to a PDF signing form.
Note:
You could also wait and do this step after testing. But let's be optimistic.
With the signing fields rendered invisible, all you see are the squiggly "what's this?" lines added by the spellchecker.
Re-Uploading the Document
We're now ready to re-upload the template document. To do that:
- Save the document.
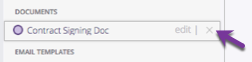
- Go to the Contract Management stream definition.
- Hover the current document and click the "X" at the end of the line to delete it.
- Pulpstream will let you add different documents that you give the same name.
- It will also let you upload the same document, with the same name.
- Either way, you get two items in the component list with identical names.
- That gets confusing, so we start by deleting the current uploaded version.
- Hover the Documents header and click New:
- Document Title - Acme Contract
File - Upload your contract template. - Available ... for End Users for Individual Records ... - Yes (click the box)
- Available ... for End Users for Multiple Records ... - No (unclick)
- Document Title - Acme Contract
- At the bottom of the dialog, click Save Changes.
The document is available for use, and shows up in the component list.
Setting up a Trial Account
For long-term use, Adobe Sign may have edge when it comes to security. As you'll see in a moment when you set up the Pulpstream connection, you log in to Adobe Sign directly. So your Adobe Sign credentials are supplied only once. After that, Pulpstream maintains the connection in the background.
In comparison, you store your DocuSign username and password on the Pulpstream server. Of course, only someone with admin privileges can see them. Still, it makes one more place where the credentials are stored (and where they need to be modified, if something changes).
For a trial account, however, DocuSign is easily the best option, at least at the time of writing. The trial period is longer, there are fewer form fields to fill in and, above all, the tags are shorter -- all of which make things a bit easier for someone who is testing the waters.
Configuring Your Pulpstream Account
With your signing-authority account set up, the only remaining configuration step is telling Pulpstream how to log in to the signing-server. To do that:
- At the top of window, click the gear icon next to your picture.
- Select Account Management.

- In the Company Info tab, click Edit.
- You can now choose the EchoSign or DocuSign tab.
- EchoSign is the old name for Adobe Sign
- In that tab, there is a Setup Connection button.
- When you click it, a dialog appears asking you to log in to Adobe Sign.
- In the DocuSign tab, you fill in your DocuSign username and password.
- At the top of the page, click Save.
Pulpstream is now ready to talk to the signing service.
Adding a "Signature Declined" Field
We are just about ready to add the eSigning step to the process flow. But before we do, we need to prepare the handle the (exceedingly rare!) case where the prospective customer chooses not to sign the contract.
For that purpose, we need to add a single field to the Contract data component (the process step we are about to add will need it):
- Go to the stream definition.
- Under Data Components, click Contract to edit it.
- Click the Fields tab, then click New Field.
- Title - Declined
- Type - Boolean
A boolean field records yes or no, true or false, on or off, one or zero. It is a flag that defaults to off. If the contract is declined, the flag will be turned on.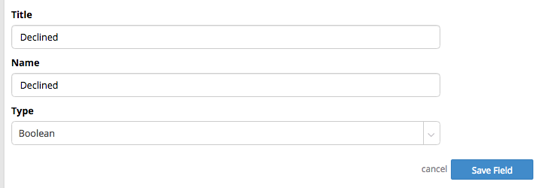
- At the bottom of the form, click Save Field.
The field appears in the field list. - At the top of the form, click Save Changes.
The new field is saved to the Pulpstream server, and you are back at the stream definition.
Adding the Signing Step to the Process Flow
It is now time to integrate the electronic signature into the process:
- At the bottom of the process flow, remove the final End node.
- Deleting that node also removes the connection to it,
"making room" for the step we are about to add.
- Deleting that node also removes the connection to it,
- From the Smart Steps dialog, drag in Send Documents for Signature.
- In the dialog that opens, specify:
- Title - Send Document
- Signing Documents(s) Source - Uploaded Documents
- You also have the option to use files stored in a File Attachments field.
- Signing Document(s) - Acme Contract
- Since you specified an uploaded document, you can choose any of the documents uploaded to the stream. (In this case, there is just the one.)
- Signing Document(s) Title - Acme Service Contract
- eSign Provider - Chose EchoSign (Adobe Sign) or DocuSign, as appropriate.
- Recipients -
- Email Address present in a Field - Contact Email Address
The first recipient.
- Email Address present in a Field - Contact Email Address
- Click Add another recipient.
- Specific Email Addresses - Provide a 2nd (different) address
- Since there are two signatories to the contract, you send it to up to two email addresses. (When both have added their signatures, the contract is considered to be signed.)
- In real life, we would no doubt send the contract to cfo@acme.com.
- Here, for testing, provide a second email address you have access to.
- Alternatively, only send the contract to one recipient, instead of two.
- Specific Email Addresses - Provide a 2nd (different) address
- Post Signing - empty
- If you the Contract data component had a File Attachments field defined for the purpose, you could select here.
- Leaving it empty causes the signed document to appear in the Attachments tab, when viewing the Contract record.
- Signing Declined - store in Declined
- You have a choice of any boolean fields defined in any of the stream's data components. Here again, there is only one.
- At the top of the form, click Save Changes.
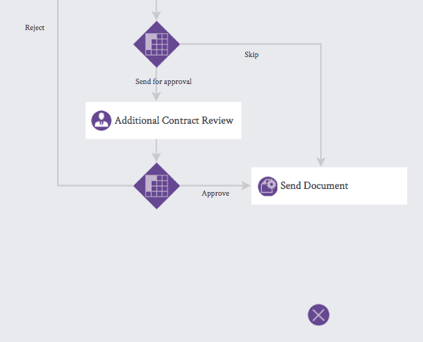
The signing step appears in the process diagram.
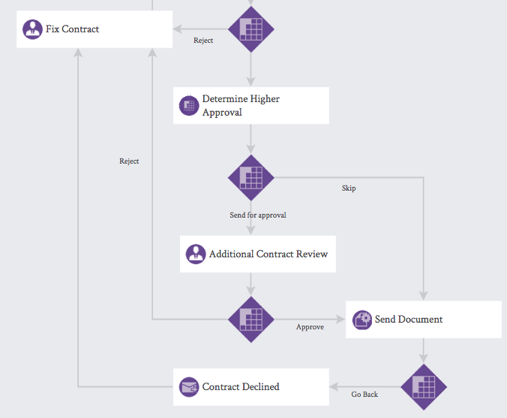
We can now make the process connections:
- Connect the Approve result of the final gateway to the Send Document step.
- Connect the Skip step from the previous gateway to the Send Document step.
(You may find it easier to delete the existing Skip step, first.) - Move the End node down, leaving room for one more decision gateway.
Notifying the Submitter of the Results
Now we check to see if the contract was signed or declined.
- Drag a new Decision gateway below the Send Document step.
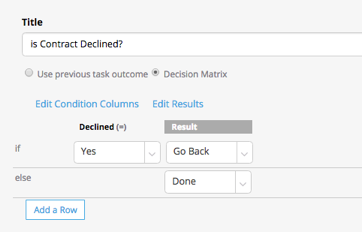
- Title - is Contract Declined?
- Type - Decision Matrix (the default)
- Add Condition Columns
Remember: Here we are only defining the criteria that will be used in the decision-making column. We're not specifying values yet.- Property - Declined (the field)
- Operator - Equal to (the kind of test we will be making)
- Label - Declined (the column label)
- Add Results - for the outcome-column of the decision matrix
- Change "Go Left" to Go Back
- Change "Go Right" to Done
- Click Save Changes.
- Specify the conditions and results for the matrix:
- if Declined (=) Yes (then) Result - Go Back
- else Result = Done
- Connect the Send Document step to the Decision gateway.
Next, we create two small email templates, one for when the contract is signed, and one for when signature is declined:
- From the Email Templates header, click New.
- Title - Contract Signed
- Who is Sender - Record Submitter (it doesn't really matter)
- Subject - Contract with $!Contract.Customer_Name has been signed
- Body
Dear $!record.createdBy.fullName,
The contract has been signed.
Acme Contract Process
- At the bottom of the dialog, click Save Changes.
- From the Email Templates header, click New.
- Title - Contract Declined
- Who is Sender - Record Submitter (it doesn't really matter)
- Subject - Contract with $!Contract.Customer_Name has been declined
- Body
Dear $!record.createdBy.fullName,
One or more of the parties declined to sign the contract.
Acme Contract Process
- At the bottom of the dialog, click Save Changes.
With the templates in place, add the first send-email step to the process diagram:
- Drag a Send Email step to the left of the gateway:
- Title - Contract Declined
- Email Template - Contract Declined
- Recipient - Record Submitter
- At the top of the dialog, click Save Changes.
- From the gateway, drag the Go Back connector to Contract Declined.
- From Contract Declined, drag a connection up to the Fix Contract step.
Then add a second send-email step for the "happy path":
- Drag a Send Email step below the gateway:
- Title - Contract Signed
- Email Template - Contract Signed
- Recipient - Record Submitter
- At the top of the dialog, click Save Changes.
- From the gateway, drag the Done connector to Contract Signed.
- From Contract Signed, drag a connection to the End node.
- At the top of the canvas, click Save Process.
The full process is now in place.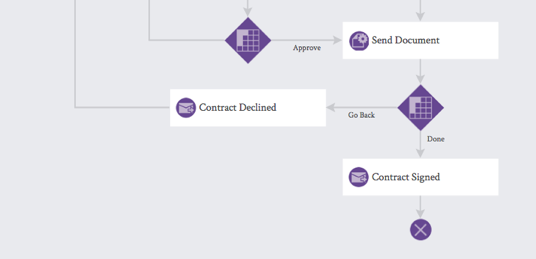
Publishing and Testing the Stream
With the process saved:
- In the stream definition, above the components list, click Checkin.
This is the first step in the publication process. - In the dialog that opens:
- Enter Checkin comments - eSigning enabled.
- At the bottom of the dialog, click Checkin.
- You are now back at the stream summary page.
At the top of the page, click Publish. - In the dialog that opens:
- No changes are needed to the submission form.
- For Publishing Comments, enter something useful like,
Approved contracts are automatically emailed to customers for an electronic signature.
- At the bottom of the dialog, click Publish.
Version 2 now appears as the active version in the stream Summary page.- Any new contract that is submitted will be processed by that version of the stream.
- Any contracts that were submitted to a previous version of the stream will finish up using the process defined in that version.
You can now go to the home page, submit a new contract, and move it through the approval stages.
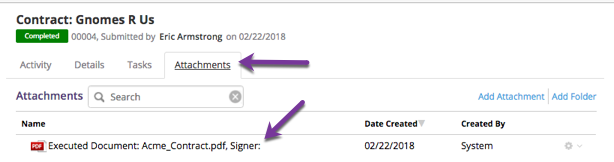
Once you have signed the contract, it takes about 30 minutes before it comes back from the signing server. When it does, the submitter receives an email with the signed contract, and it appears in the contract record's Attachments tab.
For Extra Credit...
Add a “signing date” field to the data component, and update it when the contract is signed.
Tracking Record Progress
After you create the test record, an approval task will appear. Do the approvals needed to get the contract sent out for signing.
While you're waiting for the contract to appear in your inbox for signing, it's a good time to see how you can find out the status of records you created.
- From the top menu bar, click Your Records.
- At the top you see the record you most recently submitted.
So if the contract was for "Garden Gnomes", that contract appears at the top of the list.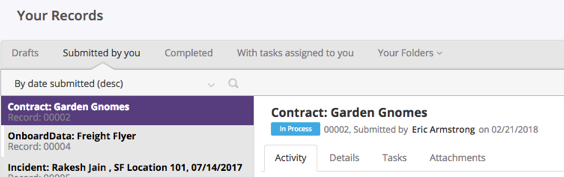
- At the right, under Milestone Progress (an area we will begin to fill in, at the next skill station), there is an option to Show flow diagram.
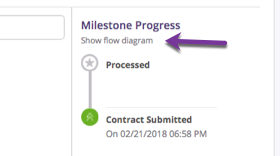
- Clicking that option opens a progress dialog that shows you the process definition, and where the current record stands, with regard to that process:
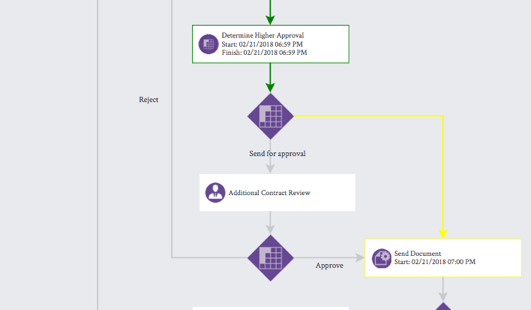
- Green arrows and borders show steps that have been completed.
- Yellow arrows and borders show steps that are in progress.
- Steps remaining to be done have no border.
If the contract has been approved and is awaiting a signature, then the flow will be green down through the last approval step, and yellow from there to the signing step.
Learn More
To learn about document signing, see Get Signatures on Documents in the online help system.
To learn more about checking in, versions, and publishing, see Checkout, Checkin, Locking, Publishing, Versions.
For more about viewing progress on processes and subprocesses, see the Process Flow Diagram page.
Take the Next Step
Congratulations! You have created a fully-defined process that takes a contract through a number of approval steps, and ends with an electronic signature. At the next skill station, you'll learn how to add milestones to the process definition, so you can more easily track each contract and tell where it is in the approval-and-signing process.
