Welcome to the 7th and final stop on the Contract Management learning line. At this skill station, we will learn how to roll up line item data, to create reports that track sales data by Service Category.
Learning Concepts at this Station:
Opening a second window
About reporting fields
Declaring reporting fields
Creating a report on stream data
Acting on child data in a process step
Creating a Smart Object for line-item data
Managing the display of Smart Objects
Storing line-item data
Creating a report on the Smart Object
Learn More: Charts, Graphs, Schedules, and More
Opening a Second Window
At this skill station, it will help to have two windows open -- one where we create and view reports, and one where we modify stream settings.
The easiest way to do that is:
- At the top of the screen, right on the Pulpstream logo.
- Choose Open in New Window in Chrome,
or the equivalent operation in your browser.
Now arrange the windows so you can get to them easily, and we're ready to get on with things!
About Reporting Fields
Reporting Fields are fields that can be used in reports. For a small proof-of-concept case study like this one, we can make all of the fields available for use reports. But a large installation might have several hundred fields -- many of which are somewhat less than useful for reports.
Since report-processing consumes a lot of background resources, it makes sense to limit the fields that are processed to those that are actually needed. To that end, you specify which stream data fields will be available for use when creating a report.
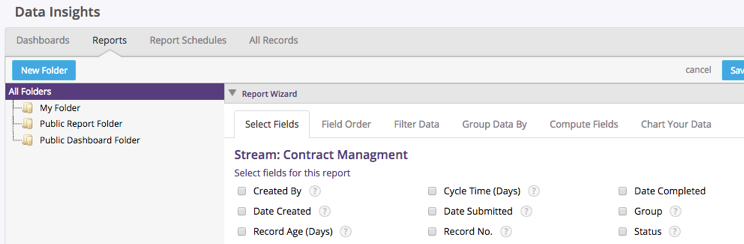
But before we do that, let's see which fields are available for reporting, by default:
- At the top of the new screen, click Data Insights.
- Click the Reports tab.
- At the top of the window, at the end, click New Report.
You are now prompted to choose the type of report you want.- It could be a report on a stream like Contract Management.
(Stream names list the description that was created for the stream.) - Or it could be one on a Smart Object like Groups, as indicated by the phrase "Select this to create a report on data present in {name of the object}"
- It could even be one of the special reports available for streams that have Checklist fields (special fields that are available for inspections, evaluations, and assessments). You'll see them if you've done the Vendor Survey or Inspection and Assessment tutorials. They're in a group of their own, and are indicated by the phrase, "Analysis of completed assessments down to the individual assessment level".
- It could be a report on a stream like Contract Management.
- Choose Contract Management.
- You see the fields that are available for reporting by default -- fields that are present for every record in the Pulpstream system.
- You see the fields that are available for reporting by default -- fields that are present for every record in the Pulpstream system.
- Next to most of the fields there is a question-mark-in-a-circle icon.
Click a few of those icons to see the help text defined for the fields.
(If others will be running reports on streams you create, it's a good idea to add help text on any data-component fields that will be used in reports.)
Declaring Reporting Fields
Back in the stream definition window, let's go about adding some additional reporting fields:
- Above the components listing in the stream definition window, click Settings.
The Stream Settings dialog appears. - Click the Reporting tab.
- In this tab, there are segments for different field types (text fields, number fields, etc.)
- In each segment, you can choose the fields you want to use for reporting.
- In the Text Fields segment, click the down-arrow next to field #1.
You see the text fields you can choose for reporting, each under the name of the data component the field is defined in.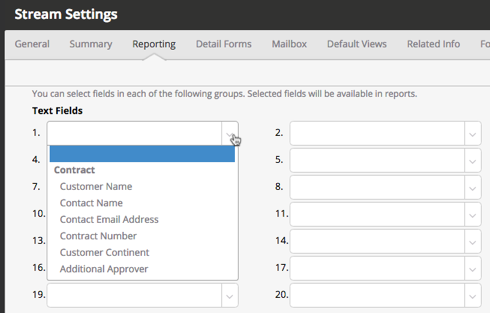
- Notice that the Contract data component is listed, but not Line Items. That's because Line Items is a child data component of Contract records. (We will have more say about that in a moment.)
- Notice too that Contract Number is listed as a text field. That's because it can have format you want, with text added. (In any case, it's not a number you would add to or multiply with.)
- So too, is the email address field Contact Email Address, and the enumeration field Customer Continent -- because in the end, each of them winds up storing textual data.
- Let's choose each of the 6 text fields that are listed, putting one in each of the selection boxes:
- Customer Name
- Contact Name
- Contact Email Address
- Contract Number
- Customer Continent
- Additional Approver
- Notice that:
- Each time you select a field, it is grayed out (and unselectable) in the next set of choice you see.
- Next to each selected field, a pencil icon appears. Clicking that icon lets you specify the help text that will seen by users who are creating reports.
- To remove a field from the list, you click on the field choose the blank line at the top of the dropdown list of choices.
- Now let's choose the other fields in the stream:
- Number Fields - none present
- Number with Decimal Fields - choose Total Value
- Boolean Fields - choose Declined
- Date and Time Fields - none present
- Smart Object Fields - none present
(for when a stream record references a Smart Object record.) - Stream Record Fields - none present
(for when one stream record references another.) - User Fields - none present
- At the top of the dialog, click Save Changes.
A warning appears to let you know that your changes apply only to new records.
When you click OK, you are back at the stream definition. - At this point, we need to Checkin our changes (comment: Added reporting fields).
- Then Publish the stream.
For all new records, data in the fields we specified will be available for reporting.
And, now that the stream has been published, it will be possible to select the fields we specified when creating reports.
Okay. New records are good. What about old records? There are two things to know. The first is that reports defined with the new fields can still be run on those records, but there will be no data in those fields.
The second thing to know is that you can retroactively apply the new field definitions to existing records. To do that:
- Go to the stream definition.
- Click the gear icon under the Settings button.
You see a list of options that includes the one mentioned in the warning dialog. - Choose that option: Mass Update Reporting Fields.
- You get a warning that says it could be an extremely intensive process.
- It very well could be, with a large stockpile of records.
- But since we only have a few, go ahead and click that option.
In a few moments, the mass update is done, and we can define reports on any of the fields we specified.Important:
It was necessary to publish the stream before selecting the Mass Update option, in order to make the change apply to records created in previous versions of the stream. While Version 3 was still a working version, the Mass Update applied only to test records created in Version 3.
Now, let's create a simple report on the Contract Management stream.
Creating a Report on Stream Data
In the reporting window we created, you're still seeing the original list of default fields. To see the changes we made:
- Click the Reports tab to go back to the list of reports.
There are none, at the moment. Let's fix that. - Click New Report.
- Choose the Contract Management report type.
The reporting fields appear.
(At times, it may be necessary to Ctrl+Refresh the page, to clear the browser cache. If the new fields don't appear, try that.)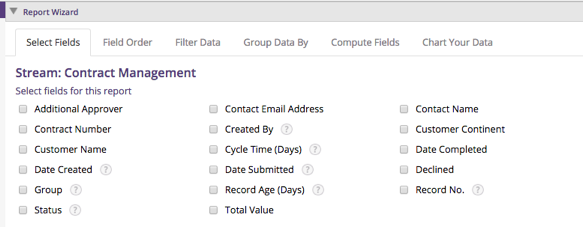
- Let's create a simple report. Start by choosing the fields:
- Customer Name
- Contact Name
- Contact Email Address
- Total Value
- Customer Continent
- Date Submitted
- Click Run to see a preview.
- The Report Wizard segment you were in closes up, and a new Report Preview segment appears below it.

- The Report Wizard segment you were in closes up, and a new Report Preview segment appears below it.
At this point, there are many ways to customize the report. You would start by opening the Report Wizard segment and then click on one or more of the tabs to make a more sophisticated report:
- Field Order - Change the order in which the fields appear.
- Filter Data -- Set up record-selection criteria. For example, you might create a report that shows records created in the last 30 days, or one that shows records for a particular continent (or both).
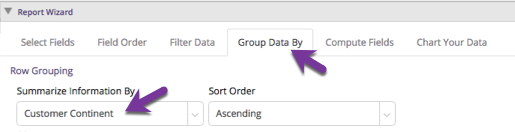
- Group Data By - Set up record-grouping. For example, to sort records so that all North American records are grouped together, and similarly for other continents.
- Compute Fields - Derive average, minimum, maximum, and sums for numeric fields in the report. (When there are groups, computed values appear for each group, as well for the collection of records included in the report.)
- Chart Your Data - Produce charts and graphs to display data visually.
There is a lot to learn in each of those areas, and we won't go into them here. But now is a good time to explore. Consult the online help system for guidance. You'll find a link to it at the bottom of the gear menu next to your profile icon.
For now, let's just save the simple report we created:
- At the top of the window, click Save.
The Save Report dialog opens. - Specify details:
- Report Title - Simple Contract Report
- Folder - My Folder
- We could put it in the public folder, if we want.
- Not much point for this one, though.
- Description - Testing
- At the bottom of the dialog, click Save.
The report appears in the folder listing, along with Edit and Run buttons.
For a LOT of Extra Credit...
Add some more records to the pipeline, leaving some at the approval stage and some at the customer signing stage. Create two new reports: A pipeline report showing contracts that undergoing review, and a pending report that shows contracts awaiting customer signature. Then modify the simple report to show only signed contracts.
Hints:
- While there is an generic "Status" field in every stream record, it is a very generic setting. To track milestone status, you'll need to create a field for that purpose in the stream data component.
- Make it an enumeration field with values like "In Approval", "In Prepraation" (for when it is sent back to the submitter for fixing), "Awaiting Signature", "Declined", and "Signed". In the process, add action events to set those flags.
- Then, for each report, use the "Filter Data" tab to select the appropriate records.
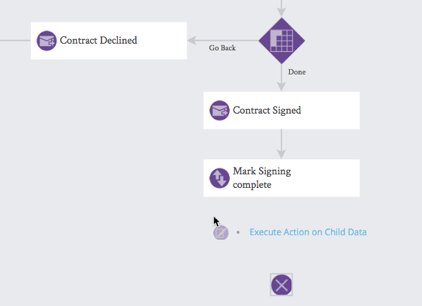
Acting on Child Data in a Process Step
We can easily get a report that shows sales by continent, simply by going to the "Group Data By" tab in the report, and selecting the "Customer Continent" field.
But how can we produce a report like this one, to shows sales by service category?
| Service Category | Month | Total Sale |
| User Subscription | January, 2018 | $50,000 |
| Support | January, 2018 | $23000 |
| Support | February, 2018 | $24,000 |
Remember that when we chose reporting fields, we could select any fields we want, from any of the data components defined in the stream, except for data components like Line Items that are child data for other components.
Note:
While it is theoretically possible to include such data in standard reports, it turns out to be impractical.
It is still possible to get such reports, however. To do that, we start by putting a special Smart Step into our process, called "Execute Action on Child Data".
That process step lets iterate over fields that have multiple values, including:
- Multi-select enumeration fields
- Multi-select Smart Object fields
(fields that contain a link to record in a "Smart Object" -- part of a reference-database you can define that lives outside of any particular stream.) - User Fields (fields that point to one or more users)
- Child Data fields (such as our Line Items field)
We are going to take advantage of that last capability in a moment. When we do, you will notice that there several actions that can be taken for each item referenced in the field:
- Create a record in another stream (kicking off the associated process)
- Create a user task
- Update fields
- Execute a Rule (automated processes you can define that take input data, transform it in some way, and return output data)
- Send an Email
- Start a Subprocess
- Create a Smart Object record
We're going to use that last action to create a Smart Object record. We will then be able to run reports on the Smart Object to get the insights we want.
Creating a Smart Object for Line Item Data
To create the Smart Object we need:
- Go to the browser window you're using to define your stream, or create a new window.
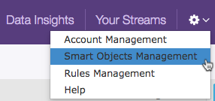
- In the gear menu next to your profile icon, click Smart Objects Management.
- Note that there is also a "Smart Objects" tab at the top of the screen. That one lets you see and work with records in Smart Objects that have already been defined.
- Here, we want to create a new Smart Object, so we want the "Management" page.
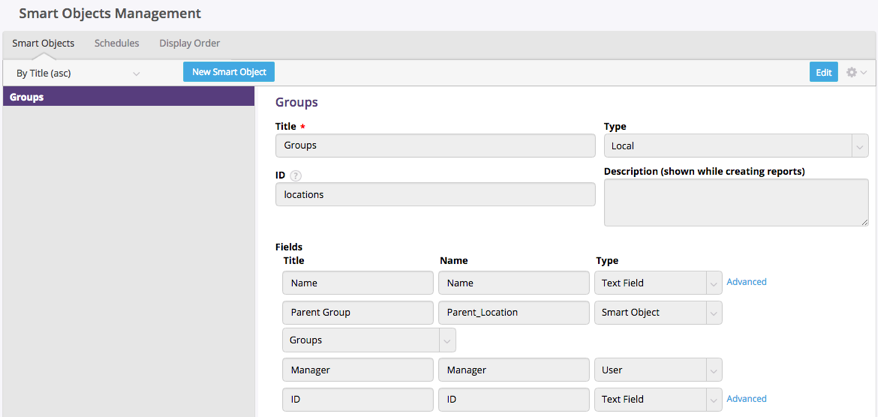
- The "Smart Objects Management" page opens, showing the "Groups" object (typically used to specify where each user is located).
- Since that object is selected, the page shows the fields that are defined for it.
- Since that object is selected, the page shows the fields that are defined for it.
- At the top of the window, click New Smart Object.
- Specify the object's main attributes:
- Title - Contract Line Items Data
- Description - Data for the line items contained in each contract.
Note that one of the attributes in the Smart Object definition is Type. That field has multiple options:
- Local - The default value, and the one we are using. It specified a reference table we create in our Pulpstream database.
- Remote - A table in a remote database we access and update using APIs defined by that database.
- SalesForce Object - Once you have set up your SalesForce connection, you don't have to worry about APIs. You simply access and update objects you have defined there.
Now let's define the fields for the smart object, matching those in the Line Items data component:
| Title | Type |
| Contract Number | Text Field |
| Service Category | Text Field |
| Units | Number |
| Unit Price | Number with Decimals (2) |
| Total | Number with Decimals (2) |
Then:
- At the top of the window, click Save.
- The smart object is created, and appears in the object list at left.
- Since it is currently selected, the page shows the fields and attributes you defined, but they cannot be changed until you click "Edit".
Managing the Display of Smart Objects
With the Smart Object defined, you can see that it appears under the "Smart Objects" menu item at the top of the screen.
You can specify which objects appear there, and their order, in the Smart Objects Management page, in the Display Order section.
In that section, you choose which user profile is affected (all of them, by default -- or you could select one one predefined profiles: "System Administrator" or "Regular User"). You can then select which items will appear, and in what order.
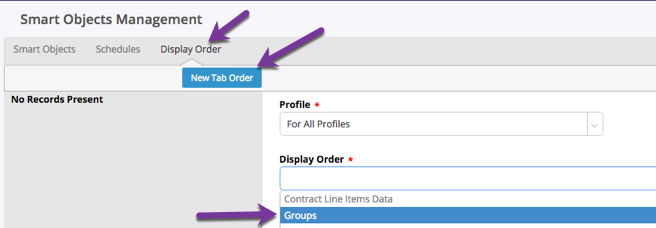
For example, by selecting Groups, but not Contract Line Items Data, you can make the line items object disappear from the display list entirely.
That's a good idea in this case, because we don't want people manually adding and modifying records in that object.
For Extra Credit...
Create a new tab order that allows users who have the System Administrator profile to see both "Groups" and the line-items object.
Storing Line Item Data
Now that the Smart Object has been defined, we can modify the process to store line-item data in it. We will do that as the last step in the process.
Note:
That means that the Smart Object will contain data only for signed contracts. So when we're creating reports, we don't have to worry about contracts that are in the approval stage or that have yet to be signed.
At this point lets go to the Contract Management stream. In the Stream Definition tab, notice that while you can view the process and stream components, you cannot edit them.
In fact, when you hover an item like the Contract data component, the Edit operation no longer appears. What appears instead is View -- so while you can view that component, you cannot modify.
That's because the stream has been published. To make changes now, our choices are to create a new version, or "unlock" the stream, which would allow us to make changes.
In general:
- If you're making small changes like a field label or help text -- changes that don't affect the fundamental operation of the stream -- then it's okay to choose "Unlock", make your changes, and then "Lock" the stream back up again.
- On the other hand, making changes to the process tends to be significant. In such cases, it is generally wiser to create a new version.
So here:
- Choose Create New Version.
- In the dialog that opens:
- Comment - Store line item data in Smart Object,
- Click Create.
- In the process diagram, remove the final connection arrow.
- Move the End node down to make room.
- From under Smart Steps, drag in Execute Action on Child Data.
- In the dialog that opens, fill in the step attributes:
- Title - Collect line items for reporting
- Select a field holding multiple records - Line Items
- Action to Execute - Create Smart Object Record
- (conditions) - none
(The action is always to occur, so there are conditions to add.)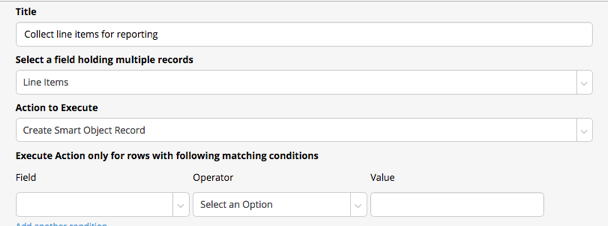
- Next, we select the Smart Object:
- Choose Smart Object ... - Contract Line Items Data
Now it is time to specify the mapping:
| (target) Field | Map Type | Value/Expression |
| Service Category | Field | Service Category |
| Units | Field | Units |
| Unit Price | Field | Unit Price |
| Total | Field | Total |
| Contract Number | Field | Contract Number |
Notes:
- Most of fields selected above are found under "Line Items" -- the heading that signifies fields in the Line Items data component. (Previously, whenever you have been selecting fields, they have almost always been in Contract data component.
- To find those those fields, you need to scroll a little further down the list.
- All except for the last field, "Contract Number". That one comes from the Contract data component.
- So it is now clear that we are mapping a stream record to the Smart Object, including any data components it defines. (In other words, we are not mapping an individual data component).
- The other mapping types you could select are Literal (you specify a value), and Expression (which lets you access record meta data like the internal record ID and record "Name", as well as the record's data fields.
For Extra Credit...
Ad another row for a target field. Even though there are no target fields left to select, choose the Expression mapping type. Notice how a large box appears on the right. Click the magnifier icon next to the box, and see which fields you can access. Click Help with Expressions to see additional functions you can use. Add a mathematical operation of some kind, then click the checkmark icon to see of the resulting expression is valid. When done, hover over the row, go to the end, and click the "X" to delete it.
We can now finish the process definition:
- At the top of the Child Data action-dialog, click Save Changes.
The step appears in the diagram. - Make the connections to and from this last step.
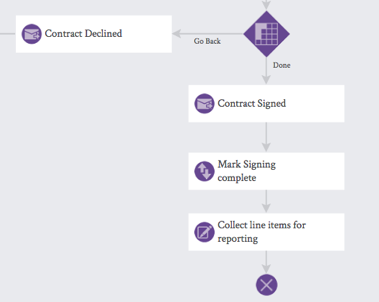
- Above the components list, click Save Process.
- Click Checkin.
- In the "Checkin comments" dialog
- Comment - Line Items are now stored for reporting.
- At the bottom of the dialog, click Checkin.
- Click Publish.
- Make any changes you need to make in the publication dialog.
- A the bottom of the dialog, click Publish.
The stream is ready for use.
Creating a Report on the Smart Object
Now that the Smart Object is place, we need some data to test on. There are a number of ways to do that:
- Use the Records tab in the stream definition to see existing Contract records and then, under the gear icon for each record, choose Restart Process. But then, approvals would need to be redone and the test Contracts would need to be re-signed. So we won't do that.
- Submit new contracts and work them through the process. (The ideal way to test.)
- Or, if we're being lazy, go back to the Smart Objects' Display Order tab and make the line-items object visible again. Then we can add test records directly.
That last option is the easiest, so let's do that. We'll just make sure we remember to delete the records we create after testing, and hide the object once again.
- Go to the Smart Objects Management.
- In the Display Order tab.
- Click Edit, so you can make changes, and add back the line-items object.
- At the top of the window, click Save.
- At the top of the screen, click Smart Objects.
- Choose Contract Line Items Data.
- At the top of the window, click New.
(Remember that we are making up data here!)- Contract Record Number - 21
- Service Category - User Subscription
- In Line Items, the category is an enumeration field the user chooses.
- But this is the text field that data will be transferred to.
- So for these test records, we need to type in the values.
- Total - 50000
- Remember that we are making up data here.
- Ignore Units and Unit Price. They won't figure into our report.
- At the top of the dialog, click Submit.
The record appears in the record list.
- Click New again, and add another record:
- Contract Record Number - 22
- Service Category - Support
- Total - 24000
- At the top of the dialog, click Submit.
Now let's create a report:
- Go to Data Insights.
- In the Reports tab, click New Report.
- For report type, choose Contract Line Items Data.
- Select the report fields:
- Contract Number
- Service Category
- Date Created
- Total
- Click the Field Order tab.
- Move the Contract Number field to the top of the display order.
- Run the report.
The fields you selected are displayed.
For Extra Credit...
It's now pretty clear that it would be nice to have stored the contract signing date. Your task, should you decide to accept it, is to add a Data field for that purpose, then add an Update Field step to the process to stores the date. (Hint: Use an expression to update the field, and use the Now() function in that expression.)
For Extra Extra Credit...
If you have added a signing-date field, use that. If not, use the Date Created field for this exercise. In the report, group the Line Items by the Date field. (For Date Created, create a couple of records on a different day and group by Day. For a signing-date, add test records with different signing dates, and group by month.)
Finally, let's clean up a little:
- Go to the line-items Smart Object and delete the test-records we created.
- Go to Smart Objects Management.
- In the Display Order tab, remove the line-items object from the display list.
Learn More: Charts, Graphs, Schedules, and More
There is a lot more that can be done with reports, including the creation of charts and graphs. Reports can be scheduled, as well.
Learn more in the online help system:
See Stream Settings for other aspects of a stream you can customize, including summary fields and detail forms, in addition to general characteristics and reporting fields.
Also learn more about:
If your business involves processing questionnaires of any kind -- especially those that may be accompanied by a photo or that indicate a corrective action that should be taken, then you may also want to explore the special features of Checklist Fields. Then take a look at the two PurpleExpress primers that deal with them: Vendor Surveys, or Inspections and Assessments.
Take the Next Step
Congratulations! You have completed the Contract Management learning line. You have done quite a lot to get here, too. You created a reasonably sophisticated approval process, put electronic signatures in place, created print templates, defined process milestones, and created reports. You are now ready to build similar systems of your own, or do more
to learn even more!
