Welcome to the 4th stop on the Contract Management learning line. At this skill station, we will learn how to create a document that can be used as template to generate a printable version of the contract.
Learning Concepts at this Station:
Print templates and template variables
Generating a print template
Testing the template
Re-testing with a modified template
About documents
About template variables
Adding template variables to an existing document
Adding repeating rows
Viewing template variable tags in your browser
Adding conditional tags
Adding record meta data tags
Adding the total value tag
Uploading the document template
Print Templates and Template Variables
A print template is a Word document hat has been populated with template variables and uploaded to a stream.
Template variables, in turn, are stand-ins for data stored in the stream's data components. (You have seen template variables when creating email templates -- the format of the variables is different for a print template, but the concept is the same.)
When a document is generated from the template, stream data replaces the variables, producing a customized document.
It is also possible for a stream record to reference a Smart Object -- a reference table in a database that, like a stream, has additional capabilities. (It is the addition of those capabilities that elevates an otherwise-normal database table to the status of an object.)
When a Smart Object is referenced in that manner, and field in the object can be referenced. And since smart objects can reference other smart objects, any data that a print document needs can eventually be accessed, once the required references are in place.
Note:
Any kind of document can be uploaded and referenced in a stream, but Word documents are processed as templates. So, when template variables are included in a Word document, those variables are replaced by stream data whenever the document is accessed.
Generating a Print Template
Most organizations have an existing document they want to use. If you have one, the question is where to find the variables you need to add to the document to make it a template.
One easy way to find out the names of those variables is to generate a print template from a form defined in the stream. That's also the place to start when you don't already have a document in mind, because a document is created for you that contains all of the relevant variables.
Later on, we'll see how to view all possible variables in your browser, but for now generating a template from a form is the way to go.
To generate a print template:
- Go to the stream definition for the working version of the stream.
- In the components list, under Forms, double-click the form you want to use as the basis for the document.
- In this case, we want to generate a contract, so click on the Contract form.
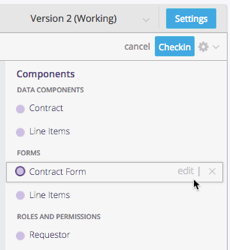
- The Contract Form editing canvas appears.
- In this case, we want to generate a contract, so click on the Contract form.
- Open the gear menu next to the form name.
- Take a moment to scan the options, just so they're in your "mental library".
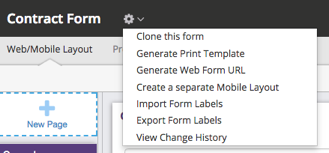
- Take a moment to scan the options, just so they're in your "mental library".
- From that list, choose Generate Print Template.
A dialog appears asking where you want to store the generated document. - Edit the file name, then choose a folder and click Save.
- Open the document in Microsoft Word.
- You see that all of the Contract fields appear. There is even a grid (table) for the line item fields!
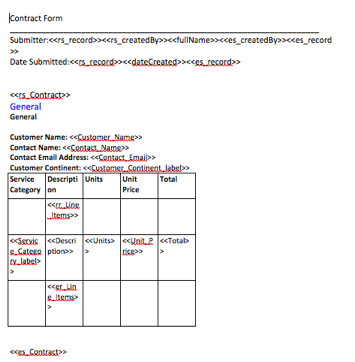
- You see that all of the Contract fields appear. There is even a grid (table) for the line item fields!
Testing the Template
Now that we have at least a basic template to use, we can test it right away:
- In the stream definition, above the components list, open the gear-menu drop down.
- From that list, choose Test Document Print Template.

The Test Template dialog opens. - At the top of the dialog, choose the test-record you created at the first skill station.
- At the bottom, under Select Word Template, click Choose a file.
- Upload the template you saved.
- At the bottom of dialog, click Generate.
A dialog appears, asking you where to save the generated PDF.
When you examine the saved document, the document has the same format as the template, but with record data filled in.
As with the template, the document we generated was a "bare bones" version. There was no formatting and none of the boilerplate text the lawyers want to see in the contract. But all of the fields are there, so now we have a place to start!
So at this point, we could either edit the generated document directly, or (more typically) copy the template variables to a pre-formatted document of your own. We will copy those variables in a few moments, in fact. But first, let's see how to re-test after we make modifications to the template.
Re-Testing with a Modified Template
After you saved the PDF, you are still at the Test Template dialog. That makes it easy to select another record and see how the template works in that case.
You can also modify the template, re-load it, and re-test. The trick is to remove the existing test-template first. To do that:
- Notice that there is an "X" at the end of the line that displays the template name, just above the "Generate" button.
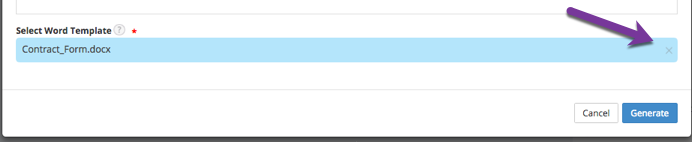
- Click that "X" to delete the current template.
The "Choose a file" button reappears.
You can now upload a new template or a modified version of the old one.
For Extra Credit...
In the generated document, you see the same narrow columns that were in the template we generated -- because, unlike an HTML page, table columns don't automatically resize themselves in a Word document. (A lot of the time, that's a good thing.) As a useful exercise in re-testing with a modified template, edit it to resize those columns, then re-select it and generate a new test document.
When you're done:
- At the top of the Test Template dialog, click the "X" to close it.
- Alternatively, at the bottom of the dialog click "Cancel".
The dialog closes and you are back at the stream definition.
About Documents
When we were testing our document template, it was uploaded only temporarily. But to make use of in the stream, we will first need to upload it as a component.
In the stream components list, you see a heading for Documents. Just below that, there is a heading for Email Templates. But where is the heading for document templates?
It turns out that any Word document that is uploaded to the stream is treated as a template, as long as it contains the appropriate variables (also called tags).
Most any kind of document can be uploaded to a stream, actually, but Word documents are treated as templates. (The only difference between a Word document that is a template and one that isn't is the presence of one or more template variables.)
Once uploaded to a stream then, any Word document that contains template variables is automatically treated as a print template whenever it is referenced.
Documents can be added to an email as an attachment, attached to a File field in the stream record, or sent for an electronic signature. When viewing a record, they can be used for printing. In any of those cases, an uploaded Word document is a template.
About Template Variables
If you open the generated template file, you can observe the following:
- Template-variable tags start with "<<" and end with ">>".
- At the very top are tags for record-meta data (who submitted the form the stream, when it was done, etc.) We can ignore those.
For the remaining tags look like this:
- <<rs_Contract>>
- "Record Section". Defines the start of a section that specifies fields from one of the stream's data component.
- Everything from here to the closing tag comes from the Contract data component.
- <<es_Contract>>
- "End Section." Appears at the bottom of the section that contains variables.
- This is the "End" of the Contract data section.
Note:
The tags are defined by the Docmosis template processor.
The meaning of the prefixes (rs, es, etc.) is a bit cloudy.)
- <<Customer_Name>>, ...
- This tag and others like it refer to fields in the Contract data component.
They work because they are between the opening <rs_Contract>> and corresponding closing tag.
- This tag and others like it refer to fields in the Contract data component.
- <<rr_Line_Items>>
- This tag starts a series of repeating rows -- in this case, one row for each of the Line Items associated with this Contract.
- The tag occurs in the first row, all by itself.
- <<er_Line_Items>>
- This tag ends the repeating row-series.
- It occurs in the last line of the grid, once again by itself.
- <<Description>>, ...
- This tag and others like it reference fields. But since we are in an "<<rr_" segment, the fields are from the Line Items data component.
- <<Service_Category_label>>
- This tag deserves special mention.
- Recall that when you define an enumeration field, you specify both externally-displayed labels, and internally-stored values. For example, "NA" could be a stored value, while "North America" is the label displayed to the user.
- In that scenario, <<Service_Category>> would display the internal value stored in the enumeration field. So for such fields it is almost always a good idea to specify the "_label" in the tag name.
Adding Template Variables to an Existing Document
Now we'll practice putting template variables into an existing document.
- Start by downloading this sample contract document: Acme Contract.
- It's a typical two-page contact with customer and contract information at the top, places for signatures and dates at the bottom, and a lot of legal boilerplate in between.
- Let's say this is the kind of document you want to generate. The trick is to move the variables (known as tags) from the template Pulpstream generated to your standard document. We will do that now.
- First, add the start and end-tags for the Contract data component:
- Above the customer information table at the top, put the <<rs_Contract>> tag.
- Below the contract details table that follows it, put the <<es_Contract>> tag.
- In the company information table, put the field-name tags:
- <<Customer_Name>>
- <<Contact_Name>>
- <<Contact_Email_Address>>
- Clean the data out of the items grid and save what you have.
- Test this version of the print template.
- If there are syntax errors in any of the tags, the resulting document contains tag names but no data.
- Error messages appear in the document footer.
- When no syntax errors remain, the document is generated with data.

- Hints:
- Zoom in on the document to make it easier to check the syntax of the tags.
- Make sure that the start- and end-section tags are not in a table.
Adding Repeating Rows
Now we can add the line item tags. Unlike the main section tags, these tags must be in table, or grid. Remember: Any formatting you specify in the template is preserved in the generated document. So make sure tag paragraphs are left-aligned, center-aligned, and right-aligned, as appropriate.
Here is the pattern to follow:
As long as there are no syntax errors, the generated document now shows the data for each of the line items.

Tip:
If you're not getting the results you expect, try comparing your document to this sample template: Contract Template.
Viewing Print Variable Tags in Your Browser
So far, we have been copying template-variable tags from a generated printed template. But it is also possible to see a complete collection of tags for any record in the system, along with the data they contain.
Note:
In addition to the tags, you also the record data -- which can be invaluable for testing.
And, as you'll see in a moment, the available tags can depend on the data in the record. That's why you get the tags from a record, than from the definition of a data component.
The tags are displayed using JSON ("JavaScript Object Notation", should you happen to care). That's a very compact notation, so your browser needs to be able to format the data, to make easier to read.
Start by obtaining the record ID for the test record:
- In the stream page, click the Records tab.
The list of records in the stream appears.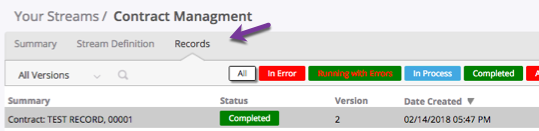
- .Click a record in the list.
- Get the ID of the record from the browser's address bar.
- The long string of characters from"recordID="to the end of the line is the ID.
- For example: https://...?type=report&recordId=1d507f5...ca95ace4
- The ID is the text "1d507f5...ca95ace4"
Then use the record ID to see the list of tags:
- Go to https://us.Pulpstream.com/vfr/api/streamRecords/{recordId}/templateData
- In place of {recordID}, put the long string of hieroglyphics you just got.
- The data for that record appears.
- If everything is squished together into one long string of text, you need a plugin for your browser to make the results readable.
- For Chrome, install the JSON Viewer extension.
- For other browsers, search on the name of your browser, plus "JSON viewer".
- After installing the viewer, refresh the browser page.
Scroll down 60 lines or so to get past the record meta data, and you come to a collection of tags you recognize:
"Contract": {
"Contact_Email": "nobody@nowhere.com",
"Customer_Continent_label": "North America",
"Contract_Number": "0001",
"Customer_Continent_value": ",North America",
"Total_Value": "$3,760.00",
"Customer_Continent": "North America",
"Contact_Name": "No one",
"Customer_Continent_North_America": 1,
...
},
There are fields like "Contact_Email" that you recognize right away. But when you examine the data structure, you'll see that the enumeration choice is coded several different ways. Here is the list for the test record, with everything pertinent collected together:
"Customer_Continent_label": "North America",
"Customer_Continent": "North America",
"Customer_Continent_value": ",North America",
"Customer_Continent_North_America": 1,
"Customer_Continent_Europe": 0
"Customer_Continent_Other": 0,
Notes:
- You have already seen the first tags, used for referencing the label or logical value of the Customer's Continent field.
- You can ignore the commas at the end of a line. Those are part of the JSON format. (Some lines don't have them, because they're at the end of a list.)
- Commas inside of quotation marks, however, are significant. Anything in quotation marks is a text string. Numbers (like those at the end of the last three lines) don't have quotation marks,
- The third item in the list is special. The "Customer_Continent_value" tag is the actual, literal value stored internally. That value is in quotation marks, because its a string. And since it's taken from a list of strings, it happens to include a comma -- which is significant, should you happen to reference that tag.
- The remaining three tags are for conditionals that say things like, "If the customer's continent is Europe, then ..."
Adding Conditional Tags
Sometimes, there are things that need to be in contract in some cases, but not others. In this section, we'll explore ways to add conditional tags that create a customized version of the printed document, depending on the contract data.
All "conditional segments" with <<cs_{...some test here...}>> and end with <<es_>>. Anything between those tags is included in the document only when the conditional test is true.
Here are some samples. In this case, they all reference Contract fields, so they should appear within a <<rs_Contract>> segment.
- Special clause for North America
- <<cs_{Customer_Continent = 'North America'}>>
Since you are located in North America, you will be governed by NAFTA treaty tax rules.
<<es_>> - Here, we are comparing against the Customer Continent value, rather than the label. (In this case, they are the same, but when labels are long and may change, it's good to compare to enumeration values.)
- Since the value is a string, it is enclosed in single-quotes ('North America'). If the value were a number, the quotes would not be present.
- <<cs_{Customer_Continent = 'North America'}>>
- Special clause for Europe
- <<cs_{Customer_Continent_Europe = 1}>>
Please note the VAT will be added to all the contract as per the prevailing rate.
<<es_>> - Here, we are performing the same kind of test, but in a different way. In essence, this is a true/false comparison, where 1=true and 0=false.
- In the previous section, you saw that Pulpstream creates different kinds of tags for enumeration choices. With those options, you can set up your decision-logic in the most natural way possible.
- <<cs_{Customer_Continent_Europe = 1}>>
- Compare to a numeric value
- <<cs_{Total_Value > 1000}>>
Your contract is more than $1,000.
<<es_>> - Here, we are referencing a numeric field and using a numeric operator (>) to compare it to a specified value. Other operators like < or >= can be used, as well.
- <<cs_{Total_Value > 1000}>>
- Referencing an internal count
- Total items in contract: <<Line_Items.size()>>
- Here, we are applying the size() function to the Child Data field. That field contains is a list of items (or an array, in programmer parlance), so functions like size() can be applied to it.
- That function could also be applied to File Attachment fields, User fields, and any other kind of field that can contain one or more value.
- The only thing left to explain is the "dot" between Line_Items (a field you recognize) and size() -- which you now is a function. That "dot operator" says to apply the specified function to the specified field.
- Conditional content based on the count
- <<cs_{<<Line_Items.size() > 0}>>
This line is printed if there is at least one line item in the contract.
<<es_>> - At this point, you have been introduced to all of the elements that go into the tag and the expression it contains, so it should be reasonably easy to read.
- <<cs_{<<Line_Items.size() > 0}>>
For Extra Credit...
Add one or more of the conditionals above to your contract template, and experiment with the results.
Adding Record Meta Data Tags
In addition to extracting data from stream data components, you can also extract "meta data" values like those you saw in the first 60 lines of the tag-listing in your browser. Those values include things like date created, the ID of the user who submitted the record, the ID of the record itself, and similar data that is stored for every single record in the system.
All such tags must appear inside a segment that starts with <<rs_record>> and ends with <<es_record>>. For example:
<<rs_record>>
Date Prepared: <<dateCreated>>
Record ID <<id>>
<<es_record>>
However, it is important to note that field like <<createdBy>>, which points to the user who submitted the contract. But that pointer, in turn, references a user record -- a record in the system that stores information about that user.
To put useful information about that user into the print template, we need to create a new segment to reference those fields:
<<rs_createdBy>>
Prepared By: <<fullName>>
Email: <<email>>
<<es_createdBy>>
Of course, that segment must itself be within an <<rs_record>> segment, so the createdBy field can be found. So the resulting template needs to look something like this:
<<rs_record>>
...
<<rs_createdBy>>
...
<<es_createdBy>>
...
<es_record>
For Extra Credit...
Add tags to the bottom of the document to include the Date Prepared and Prepared By data.
Adding the Total Value Tag
Now that we've seen how to find all available tags, let's add the final total to the contract template:
- Find the Total Value tag in the browser list.
- Add that tag underneath the line item totals in the template, with the label "Total Cost".
Hints:- One way to do is to add a fourth row to the table.a
- Then turn off most of the borders on the empty fields in that row.
- The tag you'll need is <<Total_Value>>.
- Make sure it comes after <<er_Line_Items>> , but before <<es_Contract>>.
- That way, the field is found in the Contract data component.
Uploading the Document Template
With the template finalized it's time to upload it to the stream as a document.
- In the stream components list, hover over the Documents heading.
- Click New.
The Add Documents window opens. - Fill in the document attributes:
- Document Title - Acme Contract
In the next skill station, we will prepare the document for an electronic signature. - File - Upload your contract template.
- Available ... for End Users for Individual Records ... - Yes (click the box)
This option allows a user who is viewing the record to print the contract. - Available ... for End Users for Multiple Records ... - No (unclick)
This option would allow someone viewing a report to generate multiple contract documents at one time.
- Document Title - Acme Contract
- At the bottom of the dialog, click Save Changes.
The document-template is uploaded, and appears in the components list.
Learn More
See the help system to learn more about uploading templates and generating Documents.
Learn more about Smart Objects, as well as and File Attachments (File fields), and Image Attachments.
Take the Next Step
At this skill station, we've learned a lot about documents, print templates, and template variables. In the end, we produced a contract that is ready to send to a customer. In the next skill station, we will prepare it for an electronic signature (eSigning).
