Welcome to the 3rd stop on the Contract Management learning line. At this skill station, we implement the decision matrix that determines when additional approvers are needed for a contract and, if so, who they are.
Learning Concepts at this Station:
Creating a new stream version
Updating a field using a decision matrix
Adding a task for the additional reviewer
Creating the additional approver review task
Adjusting a Condition Field
About this Skill Station
The process defined for Contract Management so far is complete, up through the supervisor's review. The only remaining part of the process is to implement the decision matrix that is used to determine when additional reviews are needed.
As noted in the second skill station, the matrix we need to implement looks like this:
| Total Value | Continent | Additional Approver |
| 0 – 10,000 | Any | None |
| 10,001 – 100,000 | North America | john@acme.com |
| 10,001 – 100,000 | Europe | mary@acme.com |
| 10,001 – 100,000 | Other | tom@acme.com |
| 100,001 – 500,000 | Any | mary@acme.com |
| 500,001 onwards | Any | cfo@acme.com |
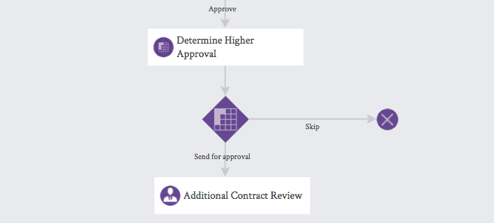
At this skill station, we will automate the decision making process. To do that, we will update the "Additional Approver" field with the appropriate value, depending on the contract. Then we will add an additional step to the process whenever that field is not empty.
Creating a New Stream Version
Since we already saved the initial version of the process, to make changes the first thing we need to do is to create a new version. (The nice thing about having a saved version is that we can always fall back on it, should we ever need to).
To create a new version:
- Use the steps you have learned so far to go to the stream definition.
- Above the components list, click Create New Version.
- Note that you could also "Unlock" the stream temporarily, to make a minor adjustment. But here, we are contemplating large changes, so will make a new version instead.
- In the dialog that opens, you can add a comment to describe what you have in mind for this version. It's a good habit to get into, so add something like this:
- Comment - Adding the additional-approver decision matrix.
- At the bottom of the dialog, click Create.
The new version is created.- In the Summary page, you see the new Working Version (Version 2), as well as the Published Version (Version 1).
- In the Stream Definition page, you see that you are viewing "Version 2 (Working)" by default -- but you could also select Version 1 from the dropdown menu.

Updating a Field Using a Decision Matrix
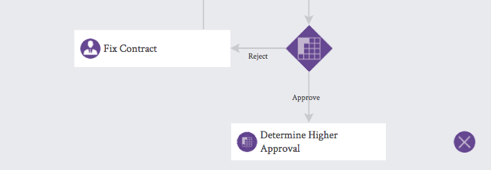
- Delete the current "Approve" path in the diagram and create a new one that joins the gateway to the new step and move the End node down a bit.
- In the process diagram, click on Smart Steps to display a dropdown list of choices. (Many of them!)
- From the dropdown, drag Update Fields using Decision Matrix onto the flow diagram.
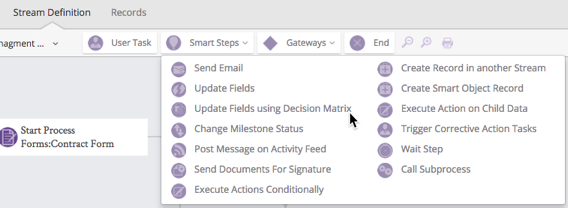
- Drop it below the branching-gateway.
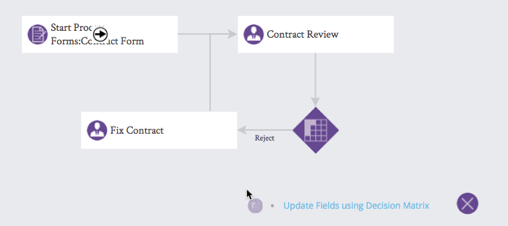
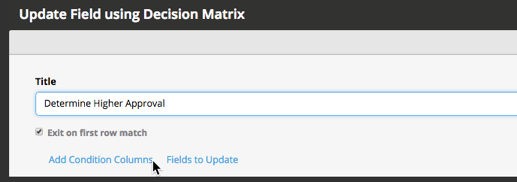
- In the dialog that opens, give the step a name:
- Title - Determine Higher Approval
Next, we add the columns in which to specify decision conditions -- the things we'll check when making our determination (total contract value and customer continent):
- At the bottom of the dialog, click Add Condition Columns.
- For conditional columns, add the following:
- Property -- Operator -- Label
Total Value -- Greater than or equal to -- Total Value - The label becomes the heading of the condition column.
- Property -- Operator -- Label
- Click Add More:
- Property -- Operator -- Label
Total Value -- Less than -- Total Value - Notice that the label for this column is identical to the label for the first column. (Pulpstream automatically adds the ">" and "<" indicators to the column headings.)
- Property -- Operator -- Label
- Click Add More:
- Property -- Operator -- Label
Customer Continent -- Equal To -- Customer Continent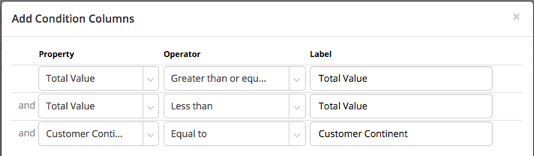
- Property -- Operator -- Label
- At the bottom of the dialog, click Save Changes.
At this point, the three condition columns have been specified, and they appear in the dialog, with the selected operators shown in parentheses, after each column heading.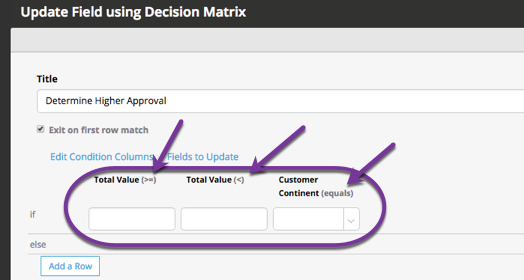
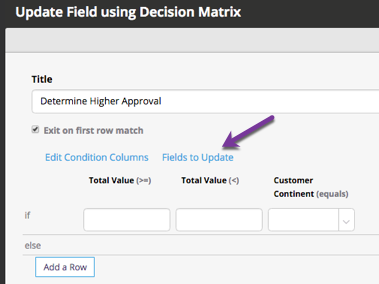
Now that we have created the columns in which to specify decision conditions, we next need to specify the columns we will use to specify decision results. For that:
- Click Fields to Update.
- In the dialog that opens, select the Additional Approver field.
- Note that at the bottom of the dialog, you could choose to add additional fields.
- For different combinations of conditions, then, it is possible to update several fields.
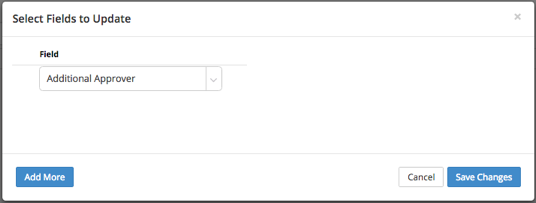
- At the bottom of the dialog, click Save Changes.
- The Additional Approver column appears to the right of the condition columns.
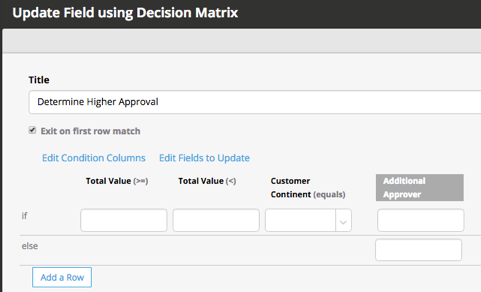
- The Additional Approver column appears to the right of the condition columns.
We can now begin to specify the conditions and the resulting field value for each. Each combination will be specified in its own row.
By default, there is an initial row for the first condition we want to specify, and an "else" row that is used when none of the specified conditions are matched.
To add additional "else if" rows, click Add Row, and specify the following:
| Total (>=) | Total (<) | Continent | Approver | |
| if | 0 | 10000 | ||
| else if | 10000 | 100000 | North America | john@acme.com |
| else if | 10000 | 100000 | Europe | mary@acme.com |
| else if | 10000 | 100000 | Other | tom@acme.com |
| else if | 100000 | 500000 | mary@acme.com | |
| else if | 500000 | 1000000 | cfo@acme.com | |
| else | tom@acme.com |
Note that:
- When the Customer Continent condition-field is left empty, it means that any value is matched.
- When the Approver field is left empty, it means that no value is assigned.
- The else clause in this case is a catch-all, just in case there is an error in the way the conditions are specified. (For example, it would be easy to specify "0 - 1000" in the first row, and "10001 to 100000" in the second. But in that case a contract value of exactly $10,000 would not match either row! Adding a catch-all provides a safeguard against that kind of oversight.)
Adding a Conditional Task
It is now time to add a conditional step that gets executed when the Additional Reviewer field is not empty.
- Drag a new "Approve" connector from the decision gateway in the flow diagram to the step we just added.
- Drag a new Decision gateway to the bottom of the diagram.
We will use that one to test if the Additional Reviewer field is empty.- Title - Additional approval needed?
- Click Add Condition Columns.
This "matrix" is easy. There is only one field to check:- Property - Additional Approver
- Operator - is Empty
- Label - Additional Approver (default)

- At the bottom of the dialog, click Save Changes.
- Next, click Add Results.
- Specify Possible Outcomes:
- Skip (on top)
- Send for approval (on bottom)
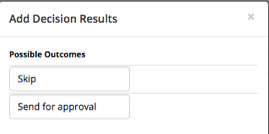
- No additional decision results are needed, so there is no need to "Add More".
Instead, click Save Changes at the bottom of the dialog.- The single-row, single-field "matrix" is defined.
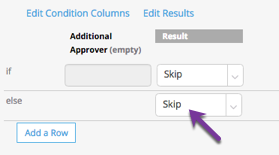
- The single-row, single-field "matrix" is defined.
In the displayed matrix, both outcomes have defaulted to the first of the two possible results. That's pretty helpful, really. After all, one of them has to be right. So only one needs to change. In this case, it's the second one:
- In the else clause, change "Skip" to Send for Approval.
- At the top of the decision matrix, click Save Changes.
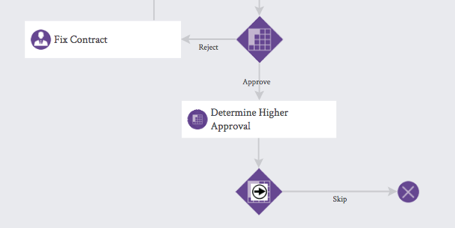
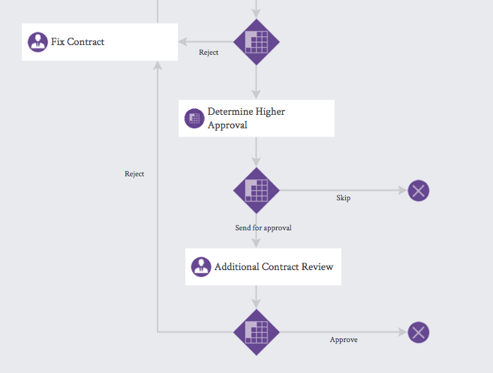
The Decision gateway appears in the flow diagram. - Position the gateway, and connect the step above to it.
- Move the End node even with the second gateway and connect the "Skip" step to it.
Creating the Additional Approver Review Task
Next we need add a review task for the additional approver and branch the process flow depending on the outcome of the review:
- Drag a User Task to the bottom of the process canvas.
- Task Subject - Additional Contract Review
- When will this task be due ... - ... in days specified here
- Enter a number - 5
Give the additional approver 5 days to review the contract.
(They're busy, or traveling, or both.)
- In the Assignment tab:
- Assign task to - Email Address present in a Field
- (field) - Additional Approver
- Action buttons available - Approve/Reject
- In the Event Actions tab, use the email template we defined to notify the submitter of the decision:
- Event - Task Completed
- Completion Action - Any
- When a contract is approved by the employee's direct supervisor, they will find out in the course of normal interactions. So we only sent the message when the contract was rejected, so the supervisor could detail the necessary changes.
- But when the contract is approved at a higher level, we want to tell the submitter, either way.
- Condition - Always
- Event Actions - Send Email
- Use Template - Review Notification
- Recipients - Record Submitter
- Click Add another recipient
- Recipients - Manager of Record Submitter
- Here, we add the submitter's supervisor to the address list.
- At the top of the dialog, click Save Changes.
- Wire the Send for Approval path from the gateway to the user task.
- Now, drag one more Decision gateway to the bottom of the flow:
- Title - Additional Approver decision
- Use previous task outcome - Yes (click the radio button)
- User Task - Additional Contract Review
- Click Save Changes.
The gateway appears in the diagram. - Position the Decision gateway and connect the Additional Contract Review to it.
- Drag in a new End step, in line with the gateway.
- Connect the "Approve" path from gateway to the End step, and connect the "Reject" path to the Fix Contract step.
For extra credit...
At this point, we are telling people who need to know about the results of each review, but we haven't told the submitter or their supervisor when a contract is kicked up the ladder. For extra credit, create an email template for that purpose, then capture a "Task Created" event on the Additional Contract Review step. When that event occurs, notify the submitter and his or her supervisor.
Adjusting a Condition Field
The only thing left at this stage is to make sure that process works the same way the second time through the loop (after the contract is fixed) as it did the first time.
To make sure that happens, we need to clear the Additional Approver field, so it is appropriately by the process after the contract is modified and re-submitted.
To do that:
- Double click the initial Contract Review step, to edit it.
- At the top of the Event Actions tab, click Add An Event.
"Event 2" is created. To fill it out:- Event - Task Created
- Condition - Always
- Event Actions - Update Fields
- Field - Additional Approver
- Map Type - Literal
- Value/Expression - none (leave the field empty)
- These settings ensure that the Additional Approver field is empty when the review process starts.
- At the top of the dialog, click Save Changes.
You're back at the flow diagram. - Above the components list, click Save Process.
Your changes are now saved on the Pulpstream server.
Learn More
Once again we have covered a lot of ground! For additional information on stream versions and related concepts, see Checkout, Checkin, Locking, Publishing, Versions in the online help system.
You may have noticed, too, that the settings you specified for "Decision gateways" look very similar to the settings you put in place when updating a field. That's because both kinds of process steps use the concept of a decision matrix to carry out their functions.
To learn more about those subjects, see Process Gateways and Endpoints in the online help, and the Process Definition page for more about the kinds of steps you can create.
Take the Next Step
Congratulations! You have established a fairly significant review process. At the next skill station we will generate a PDF version of that contract for the customer to review, and eventually sign.
