Today we will learn how to use Smart Objects to organize and pre-populate information.
Learning Concepts at this Skill Station:
What are smart objects?
Introduction to groups
Adding smart objects to forms
Adding smart object data to reports
Video Tutorial:
What are Smart Objects?
Pulpstream uses Smart Objects to store master data lists, such as locations, employees, business units, products, etc. Smart Objects are basically Excel workbooks with multiple sheets. Each sheet is a Group. We use Smart Objects to access information that is stored in a Group.
In addition to acting as a reference table in a database, a smart object has additional capabilities, as well. (It is the addition of those capabilities that elevates an otherwise-normal database table to the status of an object.)
What are Groups?
Groups store hierarchical information, such as departments, divisions, or business units. When you make user accounts for your team, they will be assigned to a Group, based on their department or business unit. Group membership determines what data a user is able to see in the system. Unless a user is a designated admin, that user will be limited to to the data of their group and/or subgroup.
Now that you know, let us begin.
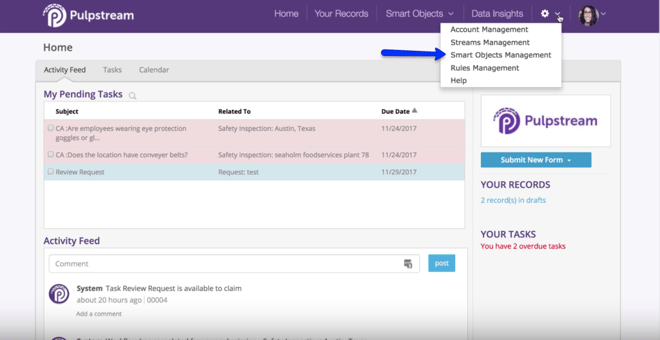
While logged into Pulpstream, access your Smart Objects Management area. In the top right corner of the screen, click on the gear icon to reveal the pull-down menu. Select “Smart Objects Management.”
On your Smart Object Management dashboard, we see our starter Groups. Notice that every Smart Object has fields. (These are like columns in an Excel spreadsheet.) It also has options to design a corresponding form and specify other attributes that we’ll learn about later. Let's edit this Smart Object. In the upper right corner, you’ll see an Edit button. Click on that.
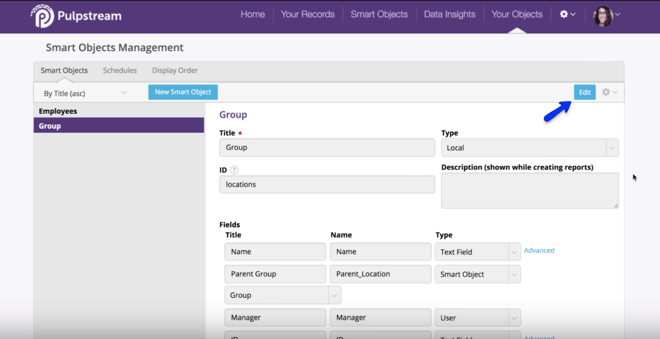
In our inspector use case, we will need a safety contact to own inspections. Lets add a new field to the Smart Object called Group to store that person’s information. Below all the fields, click on the text that says “Add another field.”
In the Title field, type in “Safety Contact Name.” The Name field will auto populate. The Type should be Text Field. Choose that in the pull-down menu.
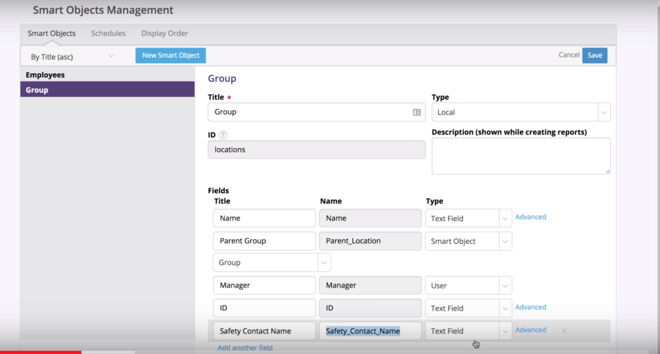
Save our changes.
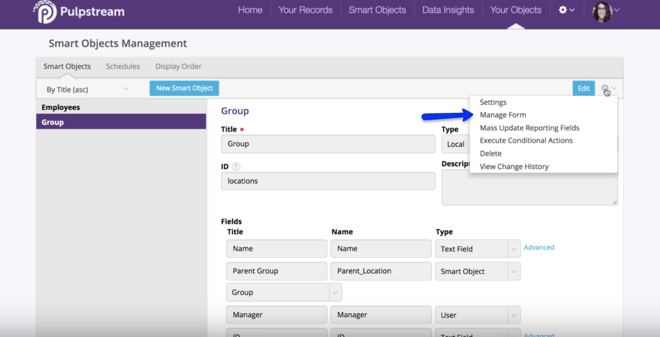
Next, we need to add this new field to our Smart Group Form. In the top right part of the screen by the Edit button, click on the gear icon. Choose “Manage Form.”
Your Basic Smart Group form will pop up.
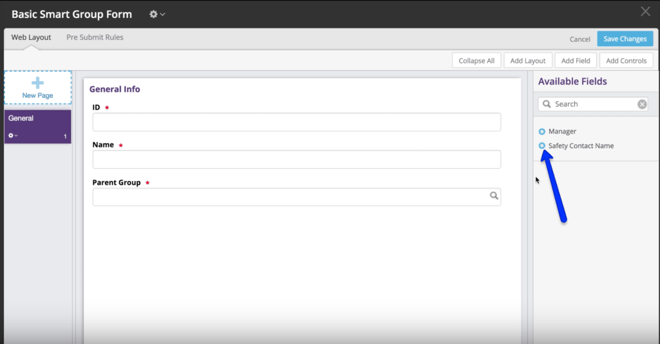
Drag the Safety Contact Name over from the Available Fields into the General Info section of the page.
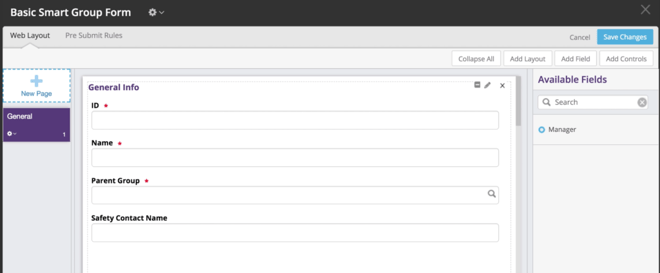
Save your changes to the form.
Next we will modify the records to set up a safety contact name. Click on the Smart Objects tab in your main, Purple navigation menu to access Group records.

Add a safety contact person.
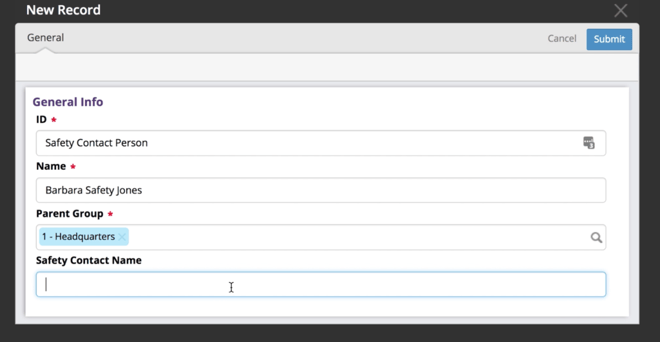
Type in the safety contact name into that last field. Use Barbara's name for now.
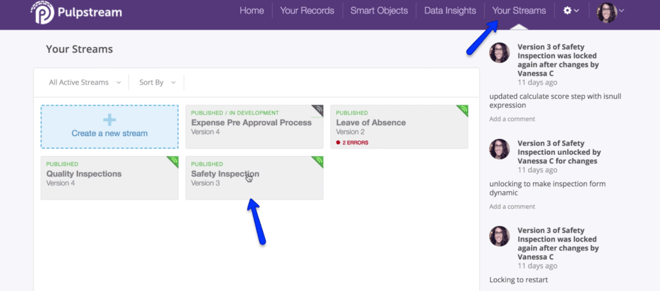
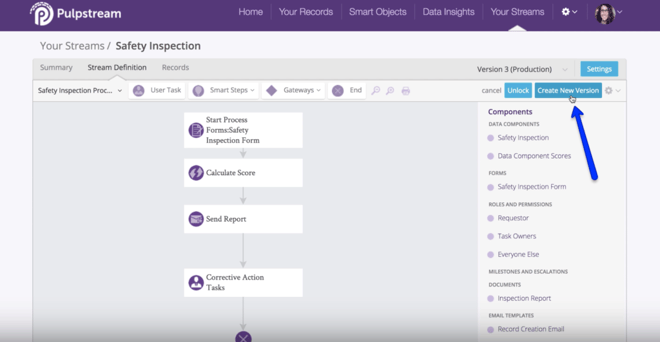
Next we shall modify our work stream to allow the user to select a location from a list of groups present in the system.
Lets create a new version of our stream. Go to Your Streams. Select the Safety Inspection Stream.
Click on Create New Version. Add comments for the change logs. eg “Swapping text area for location with Smart Object.”
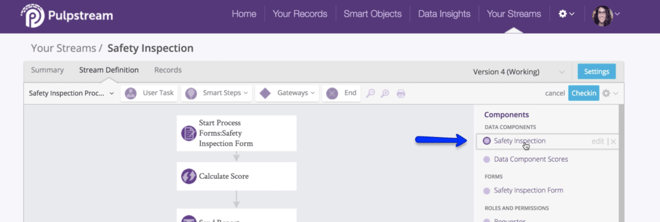
We will be deleting the current location field, and add a new one that is of the type Smart Object.
On your Stream Definition Canvas, go to your Inspection Data Component. It is located on the right side of your canvas in the components catalog under Data Components. Hover your mouse over it reveal the edit function. Click on that.
In the popup screen, click the Fields tab. We need to add a new Field, so click on the New Field button.
Lets Title it “Inspection Location” to differentiate it from the first original location field we made. The Name field will auto populate. In the Type pull-down menu, choose Smart Object. Underneath that, there’s another pull-down menu. Select “Groups.”
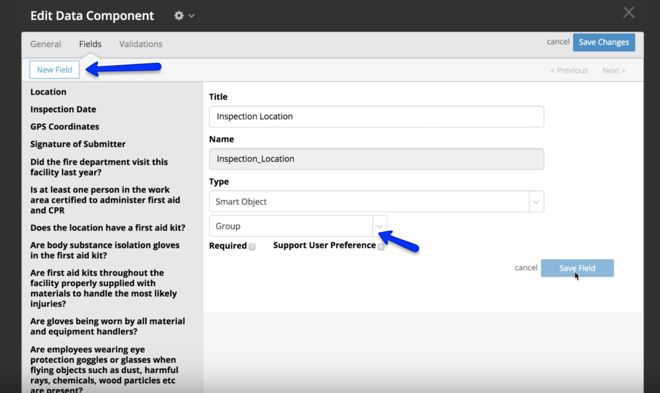
Save the field. Save your changes to the Data Component.
Adding Smart Objects to Forms
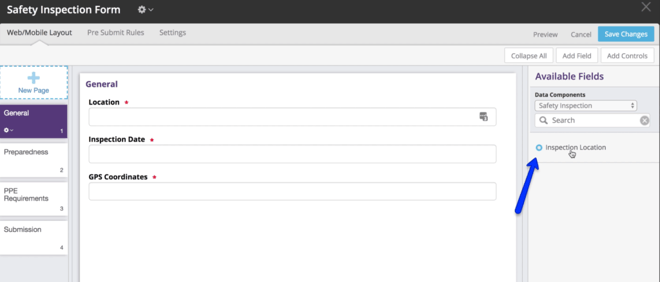
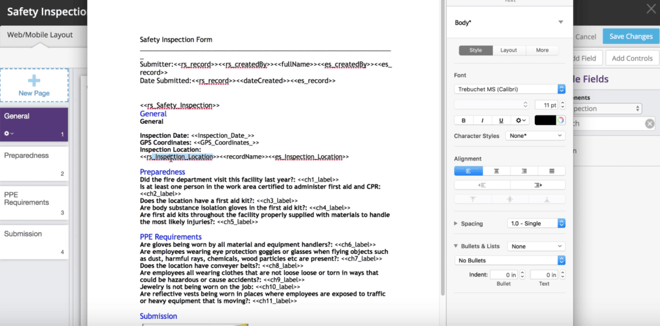
Now that the data component is available, let's add it to the Inspection form. On your Stream, Open your Inspection Form.
Select the “General” page. On the right side, in the Available Fields, you’ll see the Inspection Location field. Drag that over into your General page.
In the window that pops up, you’ll start on the Fields tab. Configure it so the user needs to be logged into see this. In the Default Value pull-down menu, select that option. Make this a required field. In the Field Attributes pull-down menu select “Required.”
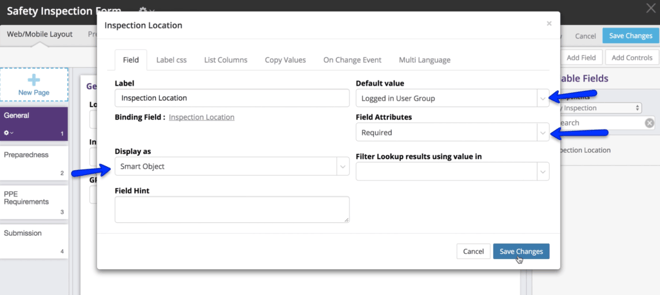
Save your Changes.
Back on the General Tab, remove the old location field. Hover your mouse over the field to reveal the dotted lines and editing options. Click on the X to delete that field.
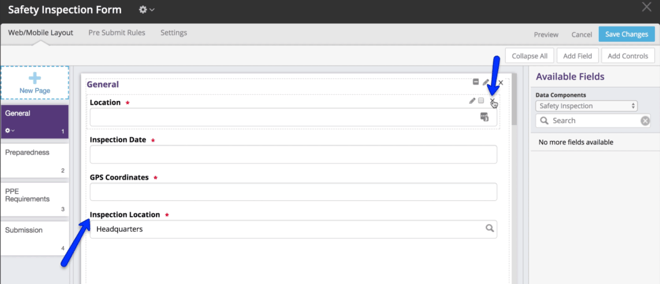
Save your Changes.
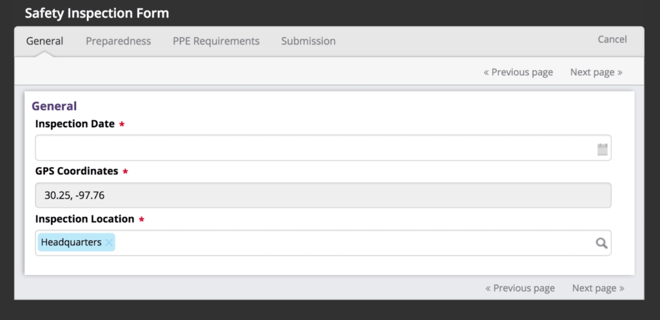
After saving the form, we can preview it to see how it works. On the Stream Definition canvas, click on the Inspection form. To the left of the Save Changes button, you will see the words “Preview.” Click on that. The Inspection Location is now pre filled with the logged in user group. If you want to search through your groups, click on the magnifying glass icon on the right side of the field.
Adding Smart Object Data to Reports
Now that we’ve changed our location field to be a Smart Object field, let's regenerate the report template to see the difference. Open the Inspection Form.
In the top left, near the title Inspection Form, there is a gear icon. In the pull-down menu select Generate Print Template.
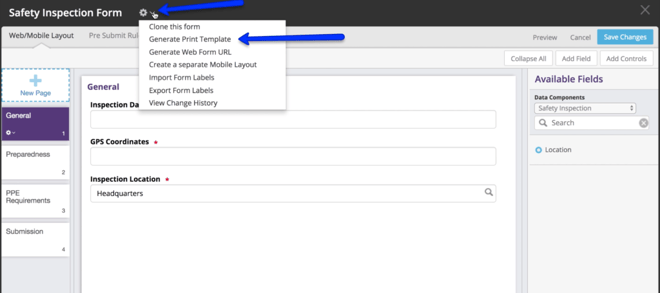
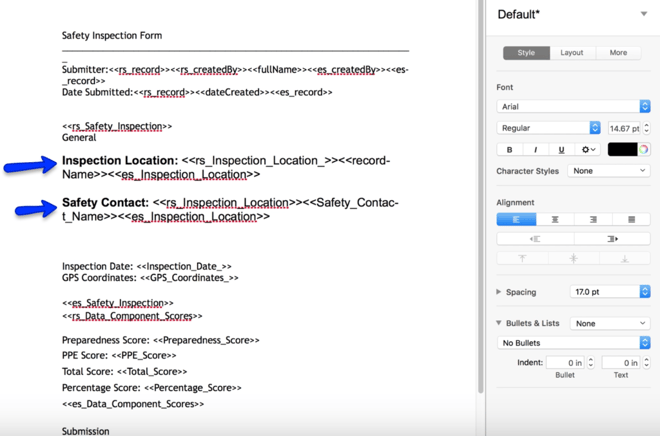
A Word document that contains our report template will start downloading. Open that up and look at the Inspection Location in the report template. Notice that the Inspection is a Smart Object field, which will extract data present inside the Smart Object field.
Notice that the first reference is the Smart Object. We can tell because of the name difference. The second is the field inside the object. Every field inside the Smart Object can be referenced and printed here. For example if we modified the Group to have a field Safety Contact Name with the field name as “Safety_Contact_Name” we could print that in the template using tags.
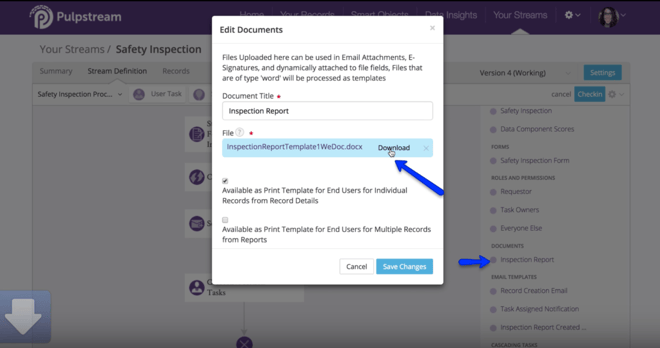
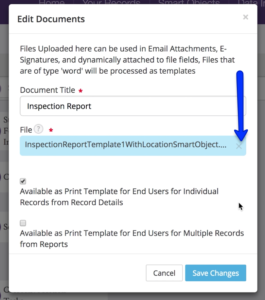
Let’s update our report template. Go back to your Stream Definition canvas. In your Documents, click on the Inspection Report to edit it. Download the version of the Inspection Template. The template will start downloading.
Under the General section in the template, replace the Location tag with these two tags:
Inspection Location: <<rs_Inspection_Location>><<recordName>><<es_Inspection_Location>>
Safety Contact: <<rs_Inspection_Location>><<Safety_Contact_Name>><<es_Inspection_Location>>
A word of caution: Double check the name field that autopopulated in your data component and compare it to the one in your template. If you had an extra space at the end of your field title, the system would have generated an underscore symbol in the name field to represent that in the database.
After adding those tags to the report template, upload it back into your documents. (Replace the old one with this updated version.)
Save your changes. Checkin your stream. Make some notes for the change logs.
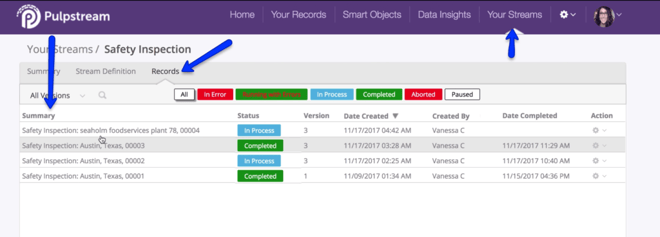
Lets make one last change before testing. From this Streams Summary tab, click on the Records tab. On this page you will see every record of every time a work stream has been used. Each instance of the stream has created a record. Each one has a summary, which often contains a location. Since we’re not going to use the location field anymore, we need to reconfigure how this summary is printed.
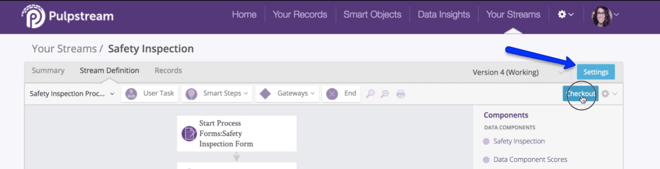
So go back to your Stream Definition canvas. Check out your Stream. Then, in the upper right hand corner, click on the Settings button.
In the Stream Settings popup, click on the Summary tab. Click on the Summary tab. You can change how the system identifies records here. You can use a combination of static text, as well as field merge values that access information in data components.
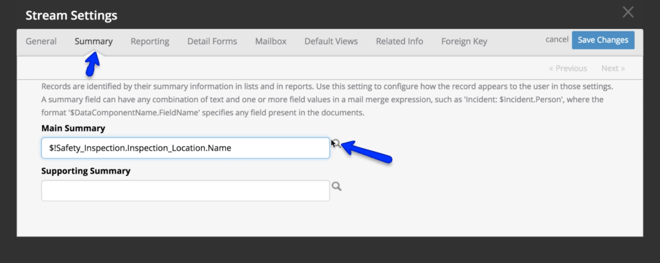
Click on the magnifying glass to search for our new location field name. Search in the Data Components tab for “Inspection Location.” Select that. In the subsequent tab, select “Name”.
Copy the merge field value. Paste it into the Main Summary field. Save your settings.
And voila. We now have Smart Objects in our work stream. Create a test record to make sure everything works.
Thus concludes our visit to this Skill Station. At the next Skill Station, we will learn how to track data in a group
