At this Skill Station, we will learn how to use form validations to prevent incorrect data from being entered. We will also refresh our knowledge of stream version control features.
Learning Concepts in This Skill Station:
Using form validations
Unlocking work streams
Building and testing expressions
Video Tutorial:
Our goal today is to prevent the person who is approving an expense from approving an amount that is greater than the amount that was requested.
Let's access our stream to get started. Go to your Streams Management area by clicking on the gear icon in the top right side of your screen by your profile photo.
![]()
Go to Your Streams. Click on the Summary tab. Click on the latest published version. On your Stream Definition canvas, you will see 2 stream version control buttons: “Unlock” or “Create New Version.”
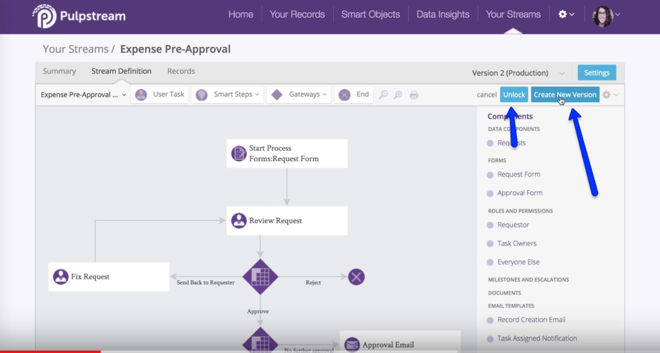
The Create a New Version feature does precisely what it it is named. You use this to create a new, working version of the stream to make changes to it while another version of the stream is in production or in use.
The Unlock feature lets you make changes to an existing version. Whenever we want to make minor changes to a production version, such as reorganizing fields on a form, or adding a field, you can do that with the “unlock” feature. While a stream is unlocked, you would be making a hot edit to a live version. It is safe to do if you are sure about what you’re doing.
We are going to unlock our stream today. Click the “Unlock” button. Add comments for the change logs if you like. These are useful during debugging and audits.
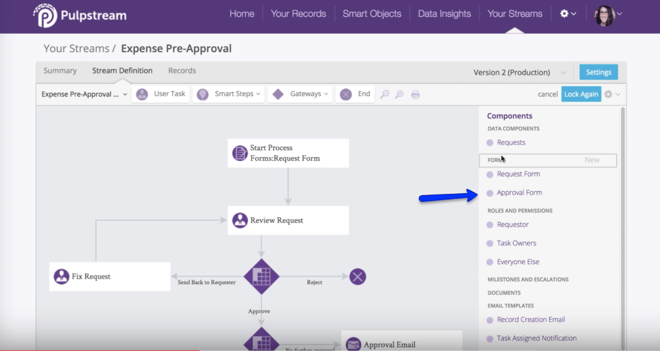
On the right side of your canvas, in your Components Catalog, go to the Forms section. Click the Approval Form to edit it.
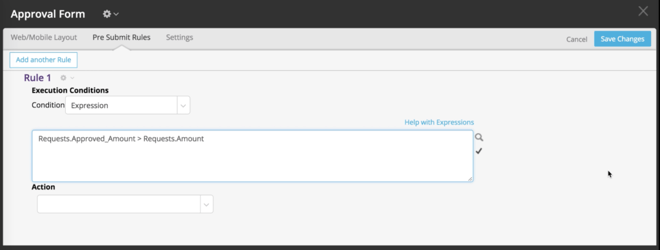
In the Approval Form popup, you have a few tabs. Click on the Pre Submit Rules tab. You’ll see an Add Another Rule button. Click on that.
Now we shall configure our Rules. We want our execution condition to be a expression. Select that in the pull-down menu.
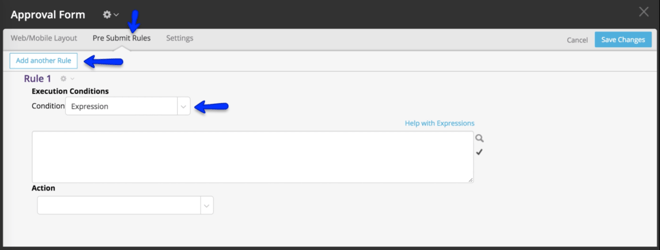
Our expression will be quite simple. It will be: If the approved amount is greater than the requested amount, trigger an error.
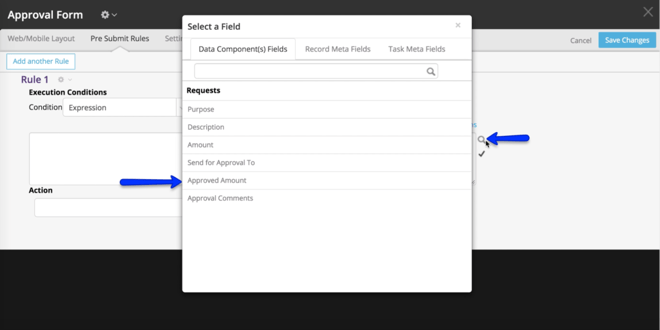
To the right of the field in which we’ll put our expression, you’ll see a magnifying glass icon. This is our merge field value finder. Click on it to access all the merge field values that we can use to build expressions. As you know by now, Merge field values are what the Pulpstream engine uses to organize information on the back end.
On the Data Components Fields tab, find the “Approved Amount” and click on that. Copy that merge field value. Paste it into the field.
Type in a greater than sign to the right of this first field merge value. Use the merge field value finder again to find the tag for the request amount. Copy that and paste it to the right of the greater than sign. If at any point you need help building an expression, click on that “Help with Expressions” text that is atop the right side of that expression box.
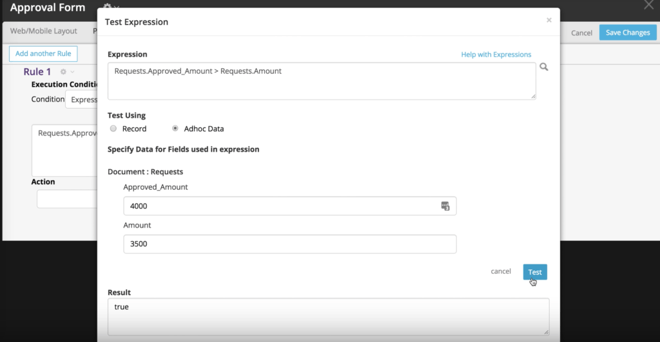
You can test whether an expression is correct with that check mark icon to the right of the expression field. There are 2 ways to test an expression. You can use data that is present in a record. Or you can use adhoc data. This is what it looks like when you use Adhoc data:
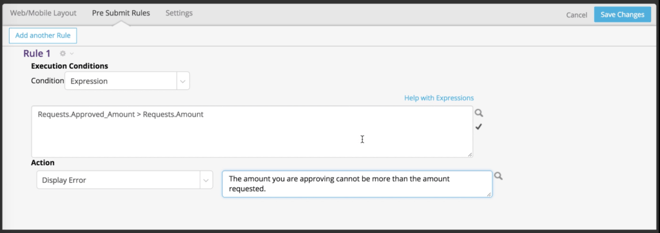
Back on the Approval Form, let's specify the action. If the condition is true, you would want to display an error, so choose “Display Error” in the Action pull-down menu. Type in the error message you want displayed. eg “The amount you are approving cannot be more than the amount requested.”
Save your changes to the Form. You will land back on your Stream Definition Canvas.
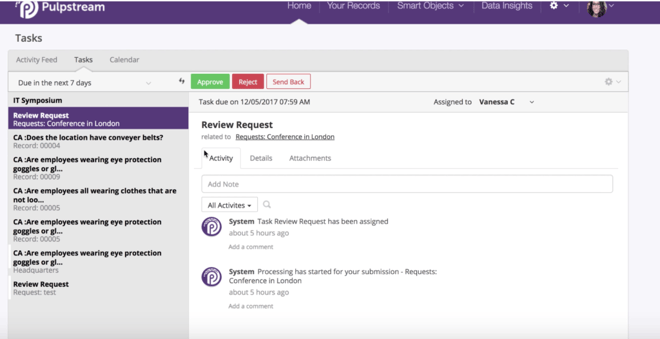
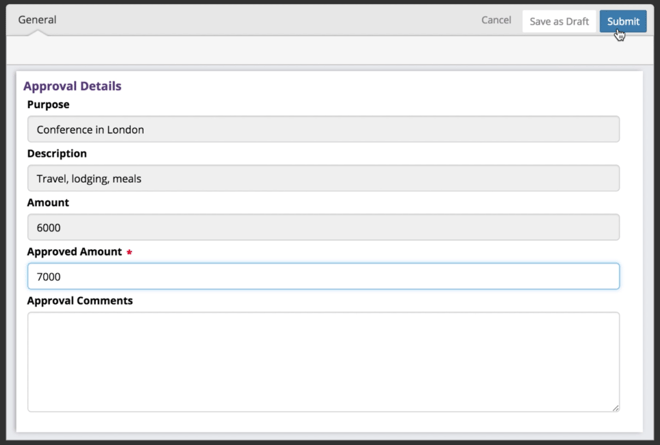
Now because we made our changes in an unlocked version of our stream, no new records need to be created to test our changes. Go to one of the pending tasks that we already created. Go to the Home page. Click on the Tasks tab. Click the Approve button on the record.
Enter an amount that is greater than the one requested. Press the submit button.
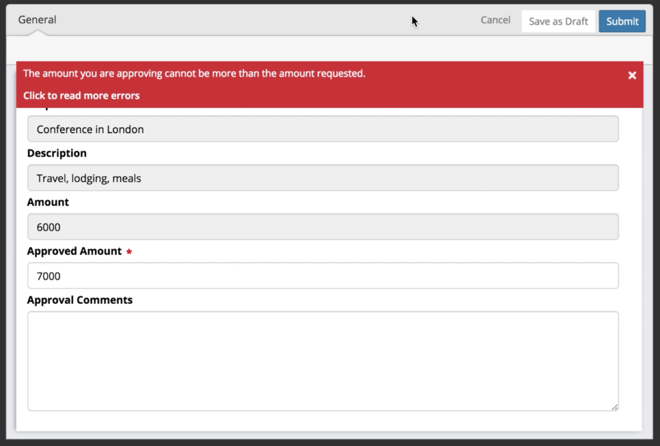
A red error message will appear. This is the desired effect. There is our custom error message displayed in all its glory.
Since our changes are working, it is time to lock our version. On the Stream Definition canvas, click on the “Lock” button.
This concludes our visit to this Skill Station. At the next Skill Station we will learn how to add supervisor approvals.
