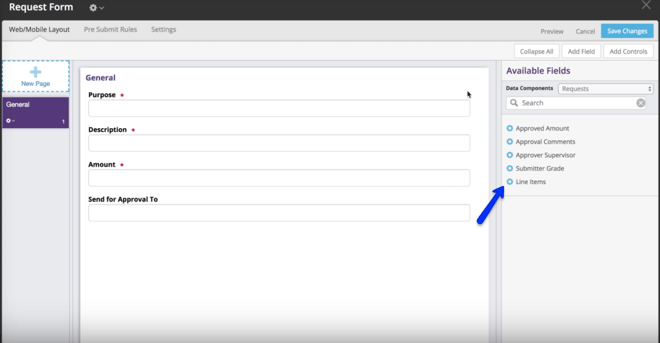
Welcome to Skill Station 10. Right now we have a robust work stream for processing expense pre-approval requests. However, our request forms could use more detail. Requesters need to be able to add a description of the expense and the amount they are requesting. Let's give them the opportunity to add line items to explain where the money is going.
Learning Concepts at this Skill Station:
Adding a data component
Using a child data list
Video Tutorial:
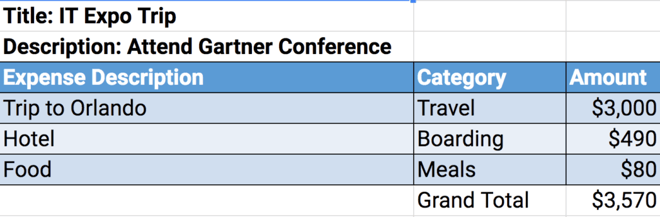
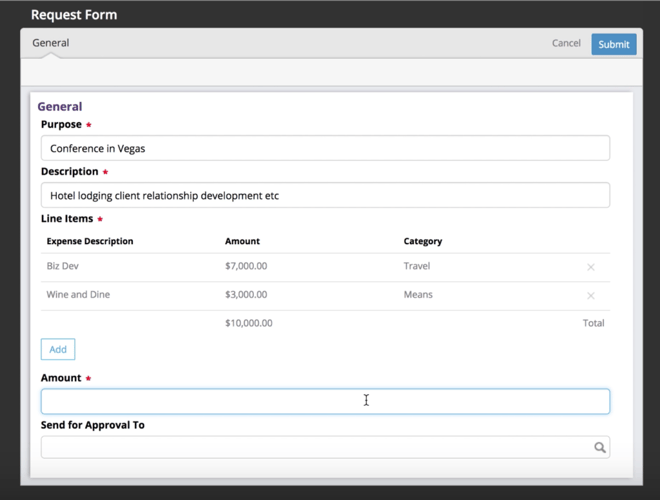
Today we will enhance our forms to enable requesters to submit requests with information such as this:
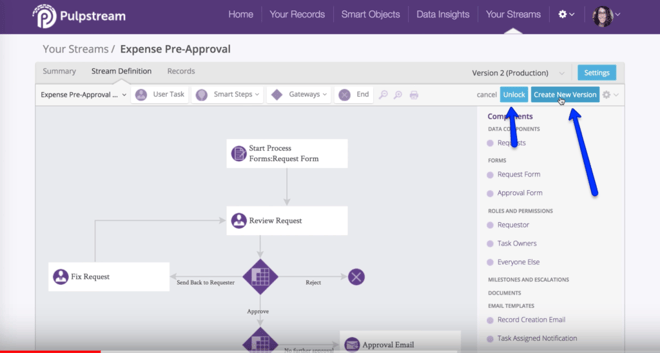
We will accomplish this with subforms and rollup fields. Lets create a new version of our work stream. Go to your Streams Management area. Click on the Summary tab. Click on the Create New Version button.
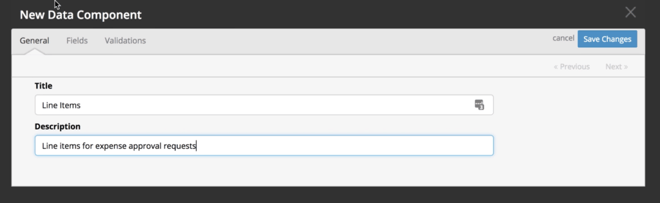
We will start by creating a new Data Component in which we will store expense line items. In your Components Catalog, hover your mouse over the Data Components title to reveal the “new” function. Click on it to make one.

Notice that there are multiple tabs. On the General tab, give it a Title. We will call this data component “Line Items.”
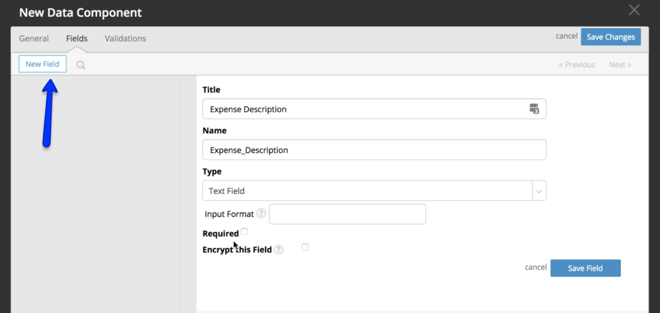
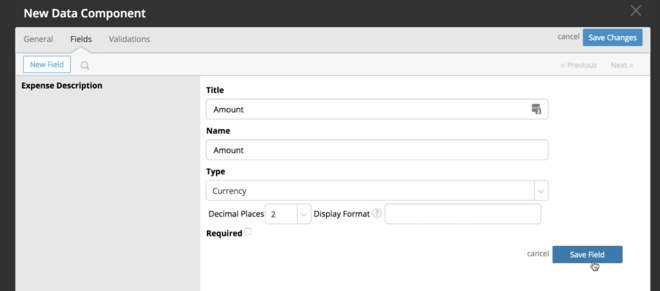
Next, on the Fields tab, we will add a New Field by clicking on the New Field button. We will give this a Title of “Expense Description.” The type of information this field will contain will be text, so select that in the Type pull-down menu.
Add a second field by clicking on the New Field button. Give it a Title of “Amount.” Tell Pulpstream that the type of information this field will contain will be Currency by choosing that in the Type pull-down menu. Underneath that pull down menu, appears another that’s related to the currency information type. We want to see up to 2 decimal places.
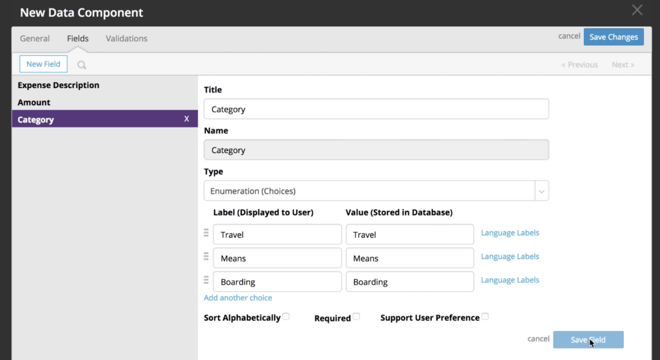
Add a third field. Give it the Title of “Category.” In this field, we are going to give requesters choices with which they can categorize their expense requests. In the Type pull-down menu, select “Enumeration.”
This will unfurl a row with two columns. The Label column is what will show in the user interface, while the Value column is what is stored in the database. Thus you can make the two identical, or create internal values that correspond with your systems of record. For example, the Label could be “Travel,” while the value is “TRV.” Labels can be changed at any time without impacting what is stored in the database.
Click on the “add another choice” text until we have 3 rows. We will give users 3 choices: "Travel, Means, and Boarding." Type those into the Labels.
Save the change to the field. Save the Data Component.
You should now have 2 components in your Data Components catalog.

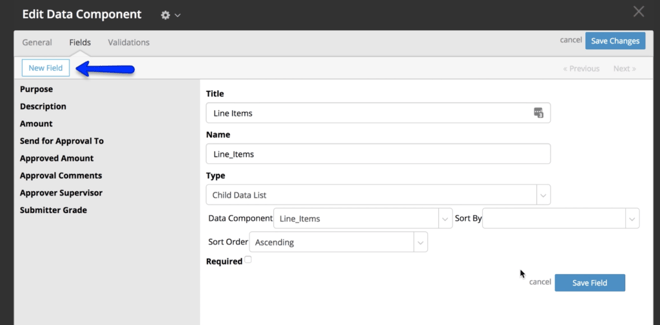
Now because one request can have multiple line items, we need to link the Line Items data component to the Request data component. Click on the Request data component to open it. Go the Fields tab to add a new field. Give it the Title “Line Items.” Tell Pulpstream that this type of information is in a Child Data List by selecting that in the type pull-down menu.
With the pull-down menu options below, you can sort the items that are present in this field by Item Description. Select Sort by “Ascending” if you would like to organize these. If you like, you can leave them unsorted. This would lead to items staying in the order that they were entered. It will look like this when you have completed these edits:
Save the field. Save the changes to the data component.
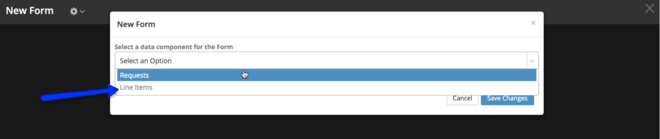
Next we are going to create a new form with the Line Items data component. In the Components Catalog on your Stream Definition canvas, hover your mouse over the Forms title to reveal the “new” function. Click on that.
In the New Form popup menu, we will select the data component for the Form. We will choose “Line Items.” Save your changes.
This will take you to the Form editing page. On the right side of the screen in the Available Fields section, you will see the 3 fields we just created.
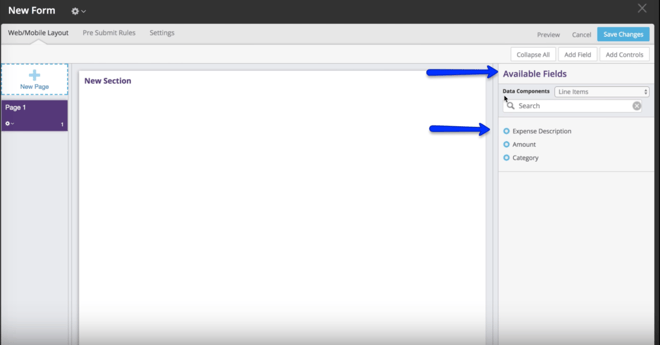
Drag all three of them onto the form and make them required. (If it does not automatically popup, double click the field to open the Edit Field popup.) Field Attributes are found on the Field Tab. Also on this Field tab, there is an option called Display As.
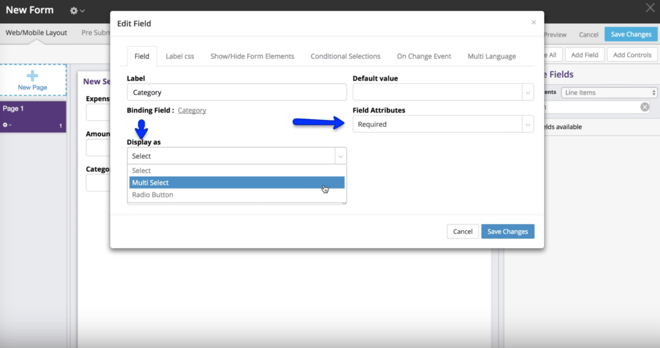
This option appears when text and enumeration fields are dragged onto a form. For enumeration fields, Display As allows you to configure the way this is displayed on an interface. Your options include multi select, single select, or radio buttons. We’re going to leave that as is, which will default to displaying the choices in our enumeration field as a pull-down menu.
Save the form as “Line Items Form.”
There are now 3 forms in the Forms section of your Components catalog.
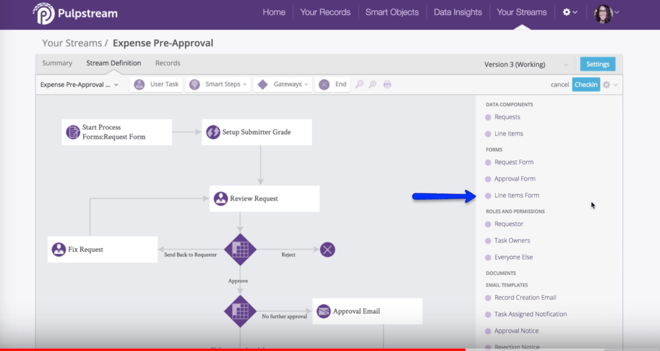
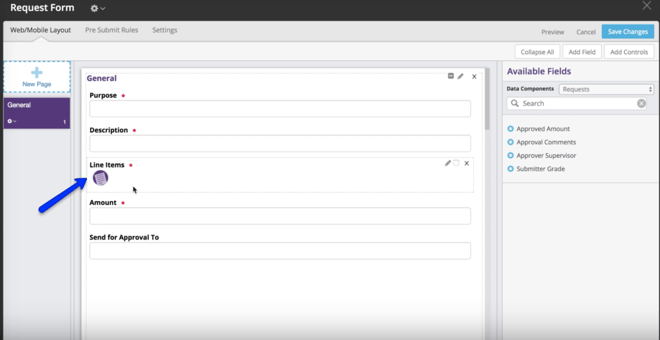
Next we will edit the Request form to embed the Line Items field that we created earlier in our Request data component. Hover your mouse the Request Form that is in the Forms section to reveal the “edit” function. Click on that. On the right side of the Request Form edit popup, in the Available Fields, you will see that Line Items is a field available for use.
Click on it and drag it onto the body of your General page. Put it directly below the Description field.
Since this is a Child Data List field, you will see additional fields in the configuration popup window. They will appear right after you drop the field onto the page.
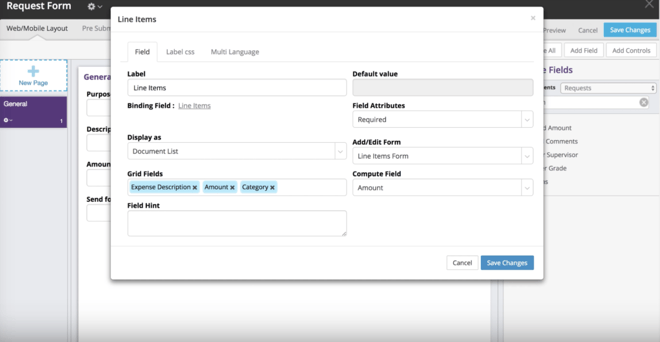
The Add/Edit Form is the form that will be used to enter each line item. We will use the Line Item form. The Compute Field pull-down selects what fields you want to total. This will be Amount.
We want this to Display As a “Document List.” The Grid Fields area will configure what fields you want to show on the grid, such as Description, Category, and Amount. Type those in. Make the Field Attributes Required.
Save your changes. You will see your new Line Items field appear below the Description field.
Save the form and we are done with our edits.
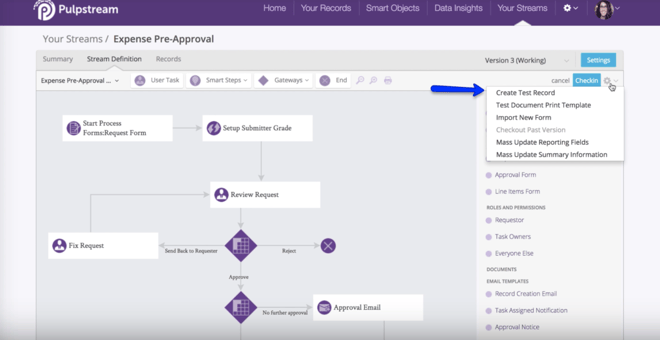
At this point, you could create a Test Record. Click on the gear icon to the right of the Checkin button. In the pull-down menu, select “Create Test Record.”
In the Request Form you would click on the “Add” button to add line items. Add some line items.
On the General Form you will start to see the totals being computed underneath the title Line Items.
Given this, the Amount field is redundant. That should be automatically rolled up.
Let's tackle that in our next Skill Station. Go back to your Stream Definition Canvas. Publish your stream.
